If your heating bill feels unreasonably high and your home never quite reaches the temperature on the thermostat, your attic is likely the culprit. Heat rises, and in most homes built before 2000, it escapes almost freely through gaps around light fixtures, plumbing chases, and attic hatches before the furnace can keep up. According to the U.S. Department of Energy, the attic is responsible for up to 25% of total heat loss in a typical home, making it the single highest-impact place to focus your energy efficiency efforts.
The good news is that fixing this problem is a legitimate weekend project. Air sealing the attic floor and topping up insulation to the recommended R-49 level for most U.S. climate zones can deliver 15 to 20% savings on your annual heating costs. For a homeowner paying $150 per month in winter heating bills, that is $27 to $30 back in your pocket every single month during the heating season. Materials for a standard attic typically run $200 to $600, putting the payback period at one to two heating seasons.
This post walks you through exactly what to do, whether you have two hours on a Saturday morning or a full weekend to commit. You will learn the building science behind why attics bleed so much heat, which gaps to seal first for maximum impact, and how to add blown-in insulation without renting special equipment. Even if you only tackle the air sealing step, you will see a meaningful difference on your next utility bill.
What You’ll Need
Click on an item below to shop for the recommended items for this recipe on Amazon.
As an Amazon Associate, we earn from qualifying purchases.
How to Do It
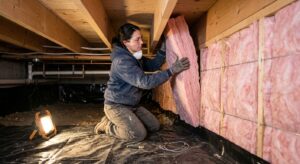
- Put on an N95 respirator, safety glasses, and long sleeves before entering the attic. Attic insulation fibers are irritating to skin and lungs.
- Using a flashlight, identify the top priority bypass locations: gaps around recessed light cans, the tops of interior walls, plumbing and electrical penetrations, and the attic access hatch itself.
- Seal small gaps under 1/4 inch around wires and pipes with acoustical sealant or paintable latex caulk. Apply a continuous bead and smooth with a gloved finger.
- Seal gaps between 1/4 inch and 3 inches with low-expansion spray foam (Great Stuff or equivalent). Keep the straw 1 inch from the gap and fill to about 50% full, allowing for expansion.
- For recessed light cans that are not IC-rated, build an airtight box from rigid foam board (cut with a utility knife), seal the seams with spray foam, and secure it over the fixture from above. Leave 3 inches of clearance from the bulb to the box sides.
- Cut a piece of rigid foam board to fit the attic access hatch, glue it to the back of the hatch door with construction adhesive, and apply foam weatherstripping around the perimeter of the frame. This single fix often eliminates a major heat loss point.
- Complete all air sealing steps from the Air Sealing Only approach first. Insulation added over unsealed gaps will not stop air movement and will trap moisture.
- Measure your attic square footage and check your current insulation depth. Use the DOE insulation calculator (available at energystar.gov) to determine how many bags of blown-in cellulose or fiberglass you need to reach R-49. For most attics, expect to add 8 to 12 inches of blown cellulose.
- Install cardboard or foam baffles (also called rafter vents) at each eave to keep blown insulation from blocking soffit vents. Blocking soffits creates moisture problems and defeats attic ventilation.
- Mark your target insulation depth on several wooden rulers or paint sticks and staple them to joists every 10 feet across the attic as depth guides. This prevents over- or under-application.
- Set up the blower machine at the attic access. Have a helper load bags and feed the hopper while you guide the hose across the attic floor, working from the far corners back toward the hatch. Keep the hose low and move steadily for even coverage.
- After blowing, use a rake to level high spots and check depth against your guide sticks. Allow 24 hours before checking that insulation has settled and is not blocking soffits.
- Upgrade the attic hatch by adding a pre-built insulated hatch cover (such as the Battic Door brand) over the existing hatch from above. These cover kits provide R-50 and pay for themselves within one heating season in most climates.
- Hire a BPI-certified or RESNET-certified home energy auditor to perform a blower door test. This identifies exactly where air is escaping and gives you a baseline ACH50 (air changes per hour) score to measure improvement against.
- Review the audit report and prioritize the contractor’s recommendations. A good auditor will rank fixes by cost-per-dollar-saved, letting you decide how far to go based on your budget.
- Have the contractor perform professional air sealing using two-part spray foam for large bypasses and dense-pack cellulose blown into wall cavities if wall insulation is also deficient.
- Request a post-work blower door test to verify the improvement. A well-air-sealed home should see ACH50 drop from a typical 8 to 12 in older homes down to 3 to 5, representing a measurable and documented improvement.
- File for the 25C federal tax credit using IRS Form 5695 when you file your taxes. Keep all contractor invoices and any Manufacturer Certification Statements for the insulation products used.
Why It Works: The Benefits
Proper air sealing and insulating to R-49 can reduce annual heating costs by 15 to 20%. For a home with a $1,500 annual heating bill, that translates to $225 to $300 saved every year.
Sealing attic bypasses eliminates the cold drafts and ceiling cold spots that make rooms feel uncomfortable even when the thermostat reads 70 degrees F. Homeowners consistently report that rooms feel warmer at the same thermostat setting after this project.
When your home holds heat better, your furnace runs fewer cycles per day. Shorter, less frequent run cycles reduce mechanical wear and can extend furnace lifespan by several years, delaying a replacement that costs $3,000 to $7,000.
Sealing gaps between the living space and attic reduces infiltration of attic dust, insulation fibers, and outdoor pollutants. This is especially important in homes with allergies or asthma, since the stack effect can pull particulates down from attic spaces into bedrooms.
The same air sealing that keeps heat in during winter keeps heat out during summer. A well-sealed, well-insulated attic can reduce attic temperatures by 20 to 30 degrees F on a hot day, cutting cooling loads by up to 15%.
💰 Savings Impact by Action
Sealing bypasses around fixtures, pipes, and wall top plates reduces conditioned air loss through the attic by up to 15% of total heating cost.
Increasing attic insulation from R-19 to R-49 cuts conductive heat loss through the ceiling assembly by approximately 50%, translating to 10 to 15% of whole-house heating savings.
Adding an insulated cover and weatherstripping to an uninsulated attic hatch eliminates one of the most concentrated single points of heat loss, saving up to 5% on heating bills alone.
Air sealing plus insulation together deliver compounding savings because each fix reduces a different heat loss mechanism, with combined annual savings of 15 to 20%.
🏠 Key Concepts Explained
The Science Behind It
The physics of why attics lose so much heat comes down to two simultaneous forces: conduction and convection. Conduction is the slow transfer of heat through solid materials. Insulation fights this by trapping millions of tiny air pockets that resist heat flow, which is exactly what R-value measures. The higher the R-value, the more layers of resistance stand between your warm living space and the cold attic air above. Doubling insulation thickness from R-19 to R-38 cuts conductive heat loss through that assembly by roughly 50%, which is why adding insulation has such a measurable impact on bills.
But convection is the bigger villain in most existing homes. Convection is heat carried by moving air, and it bypasses insulation entirely. A gap the size of a quarter around a plumbing vent can allow as much heat loss as several square feet of uninsulated ceiling because warm pressurized air simply flows through it. This is why energy auditors consistently find that air sealing delivers more savings per dollar than adding insulation in homes that already have some insulation present. The stack effect amplifies convective losses further. As warm air rises and escapes through attic bypasses, negative pressure at the lower floors pulls cold outside air in through foundation cracks, door gaps, and electrical outlets on exterior walls, forcing the furnace to heat an endless stream of fresh cold air.
Cellulose insulation, made from roughly 85% recycled paper treated with borate fire retardant, is the preferred blown-in material for DIY attic projects because it is dense enough to resist convective loops within the insulation layer itself. Fiberglass, while also effective, can allow air to circulate through the batt material at very low velocities, slightly reducing its real-world performance compared to its rated R-value. At the recommended 12-inch depth for R-49, cellulose also adds a degree of hygric buffering, meaning it can absorb and release small amounts of moisture without losing significant R-value, making it more forgiving in the event of minor humidity fluctuations in the attic space.
Frequently Asked Questions
▼ I added insulation last year but my heating bills are still high. What am I missing?
Insulation without air sealing is only half the job. If you added batts or blown-in insulation over unsealed attic bypasses, warm air is still escaping freely around the insulation rather than through it. Go back into the attic and look for unsealed gaps around recessed lights, plumbing stacks, and wall top plates. Sealing those after the fact will still deliver meaningful savings even with insulation already in place.
▼ How do I know if my attic has enough ventilation before I add insulation?
A general rule is 1 square foot of net free ventilation area for every 150 square feet of attic floor space, split equally between low (soffit) and high (ridge) vents. Before insulating, check that your soffit vents are clear of debris and that you have a ridge vent or gable vents at the peak. If your attic smells musty or you see condensation on the sheathing in winter, have a contractor assess ventilation before proceeding.
▼ Can I do this project in summer, or does it have to be done before heating season?
You can do it any time the attic is not dangerously hot (above 100 degrees F), which typically means early morning in summer or any mild day in spring or fall. Spray foam and caulk cure faster in warmer temperatures, so summer can actually work well if you start at dawn. The savings will apply to both the upcoming heating season and the cooling season, so there is no wrong time to do this project.
▼ My house is older than 40 years. Is the DIY approach still safe?
It can be, but older homes need a few extra checks first. Look for knob-and-tube wiring (ceramic knobs stapled to joists with cloth-wrapped wire running between them), which must be evaluated by an electrician before insulating. Also check for asbestos insulation, which looks like gray or white loose fill resembling cat litter or vermiculite, especially in homes built before 1980. If you suspect asbestos, do not disturb it and call a certified abatement contractor. For any other older home without those issues, the project is safe and often delivers even larger savings because the baseline energy waste is higher.
▼ Will this project qualify for a tax credit or utility rebate?
Yes, both potentially apply. The federal 25C tax credit covers 30% of material and labor costs for insulation and air sealing, up to $1,200 per year, for projects on your primary residence completed in 2024 or 2025. Additionally, most electric and gas utilities offer rebates of $0.10 to $0.25 per square foot of attic insulation added. Check the DSIRE database (dsireusa.org) or call your utility company to find out what is available in your area before you buy materials.
Quick Tips
- Check your current insulation depth before buying materials. If you can clearly see the tops of ceiling joists, you almost certainly have less than R-19 and upgrading to R-49 will have a dramatic effect.
- Seal the attic access hatch first before spending time on anything else. An unsealed hatch is equivalent to leaving a small window open all winter, and fixing it takes about 30 minutes.
- Use fire-rated (intumescent) caulk or foam around any gaps near chimneys or metal flue pipes. Standard foam is flammable and must not be used within 2 inches of heat-producing equipment.
- Take photos of your attic before and after, and note the date and materials used. This documentation simplifies filing for the 25C tax credit and provides proof of upgrades when you sell the home.
Variations for Your Situation
- Apartment/Rental: Renters cannot access the attic or modify building insulation, but you can still address heat loss at the unit level. Focus on draft-proofing your front door with a door sweep ($15 to $25) and foam weatherstripping, sealing gaps around electrical outlets on exterior walls with foam gaskets ($8 for a pack), and using thermal curtains on north-facing windows. These steps together can reduce your unit’s heat loss by 5 to 10% without requiring landlord permission.
- Tight Budget (under $50): Skip the blown insulation and focus entirely on air sealing, which delivers the best savings per dollar spent. One can of low-expansion spray foam ($8), a tube of acoustical sealant ($6), and a roll of foam weatherstripping ($10) for the attic hatch will address the three biggest leak points in most attics. Total cost under $30, and savings of 8 to 12% on heating bills are realistic from air sealing alone.
- Older Home (pre-1980): Homes built before 1980 typically have R-7 to R-11 of attic insulation at best, and air sealing was rarely done during original construction. This means your savings potential is at the high end of the range, often 20 to 30% rather than 15 to 20%. However, check for knob-and-tube wiring and potential asbestos before entering the attic. If either is present, invest the $300 to $500 in a professional energy audit first. The auditor will identify the safest and highest-impact path forward and the project cost will still pay back within two seasons.