You crank the thermostat to 72 degrees, the furnace kicks on, and yet you still reach for a sweater. Sound familiar? This is one of the most common complaints homeowners have in winter, and it almost always points to the same underlying culprits: air leakage, inadequate insulation, and radiant heat loss from cold walls, windows, and floors. Your heating system may be working perfectly, but if the building envelope is compromised, you are essentially heating the outdoors.
The uncomfortable truth is that most homes in the United States lose 25 to 40 percent of their heating energy through gaps, cracks, and under-insulated surfaces before that warmth ever contributes to your comfort. That translates to real money, often hundreds of dollars per winter, and it explains why your energy bill stays high while you stay cold. Understanding where the heat is going is the first step toward actually fixing the problem.
This post breaks down exactly why homes feel cold despite high thermostat settings, which factors matter most, and what you can do about it today ranging from free fixes you can do in the next hour to longer-term upgrades that pay back within two to three heating seasons. Whether you rent or own, there are actions at every budget level that will make a measurable difference.
What You’ll Need
Click on an item below to shop for the recommended items for this recipe on Amazon.
As an Amazon Associate, we earn from qualifying purchases.
How to Do It
- On a cold windy day, hold a lit incense stick or a damp hand near the edges of exterior doors, windows, electrical outlets on exterior walls, attic hatches, and where pipes enter the home. Watch for smoke movement or feel for cold air to identify leak points.
- Roll up a towel or install a door draft stopper at the base of any exterior door where you feel cold air. This costs $0 to $10 and is one of the fastest comfort wins available.
- Press foam outlet gaskets behind the cover plates of electrical outlets and light switches on exterior walls. A pack of 10 costs under $5 and takes about 20 minutes to install across an average room.
- Close the fireplace damper completely if you have a fireplace not in use. An open damper is equivalent to leaving a 10-inch hole in your ceiling and accounts for significant heat loss in many homes.
- Check your furnace filter and replace it if it is gray and clogged. A dirty filter reduces airflow, causes the system to short-cycle, and can leave rooms feeling underheated even when the furnace is working hard.
- Buy one or two cans of low-expansion spray foam and a tube of paintable caulk. Use the foam for gaps larger than a quarter inch around pipes, wires, and framing in the attic floor and basement rim joists. Use caulk for smaller gaps around window and door trim on the interior side.
- Seal the attic hatch by gluing rigid foam board insulation to the back of the panel and adding adhesive weatherstripping around the frame. Attic hatches are often completely uninsulated and sit above the living space like an open refrigerator door.
- Add adhesive foam or V-strip weatherstripping to the stops of all exterior doors and any operable windows that feel drafty. This compresses when closed to block airflow and typically costs $10 to $20 per door.
- In the basement or crawl space, cut pieces of rigid foam insulation (R-10 or higher) to fit tightly into the rim joist bays, which are the wood frames where the floor meets the foundation wall. Press them in firmly and seal the edges with spray foam. This one area alone can cut basement heat loss by 30 to 40 percent.
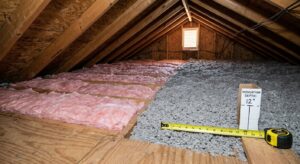
- Check attic insulation depth. Attics should have at least R-38 (about 12 inches of fiberglass batts or 10 inches of blown cellulose) in most cold climates. If you can see the tops of ceiling joists, you need more insulation. Adding blown-in insulation yourself using a rental blower from a home center typically costs $0.20 to $0.50 per square foot in materials.
- After completing the sealing work, tape a piece of plastic sheeting over each vent and return register in an unused room for one day. If heat distribution still feels uneven, have an HVAC technician check for duct leakage before investing in more insulation.
- Schedule a blower door test with a certified energy auditor. This depressurizes your home and precisely measures total air leakage in CFM50, giving you a ranked list of where your home is losing the most energy rather than guessing.
- Ask the auditor to include a thermal imaging scan (infrared camera inspection) while the blower door runs. This makes invisible cold spots in walls, missing insulation in ceilings, and hidden air bypass channels clearly visible as color variations on screen.
- Review the auditor’s priority list and get quotes for the top two or three recommendations. In most cold climates, attic air sealing plus insulation and basement rim joist sealing return the investment within one to two heating seasons.
- Hire a weatherization contractor to seal bypasses in the attic using fire-rated caulk and foam, install baffles, and blow in additional insulation to achieve R-49 in climate zones 5 through 7. This is difficult to do correctly as a DIY project because attic bypasses are often hidden under existing insulation.
- If duct leakage was identified in the audit, have a contractor apply Aeroseal duct sealing or manually seal joints with mastic and fiberglass mesh tape. Eliminating 20 percent duct leakage can recover hundreds of dollars in annual heating costs that are currently heating your attic instead of your rooms.
Why It Works: The Benefits
Addressing air leaks and insulation gaps typically reduces heating energy use by 15 to 30 percent, which can save a homeowner with a $200 monthly winter gas bill $30 to $60 every month from November through March.
Sealing air leaks and adding insulation eliminates the cold drafts and temperature swings that cause a 5 to 10 degree difference between rooms, making the whole house feel consistent and comfortable.
When heat stays inside, the furnace reaches your set temperature faster and cycles off sooner, reducing wear on the system and extending equipment life by potentially several years.
Reducing uncontrolled air infiltration means fewer drafts carrying in dust, pollen, and outdoor pollutants, giving you better control over what enters your home’s air supply.
Using 20 percent less heating energy in an average home eliminates roughly 500 to 1,000 pounds of CO2 emissions per winter season, depending on your fuel type and local grid.
💰 Savings Impact by Action
Sealing gaps, cracks, and bypasses in the building envelope reduces uncontrolled heat loss and can cut heating energy use by up to 20 percent according to DOE estimates.
Bringing attic insulation up to R-38 or R-49 reduces conductive heat loss through the ceiling by 15 to 25 percent in cold climates.
Sealing leaky ducts in unconditioned spaces recovers 20 to 30 percent of forced-air heating that was previously escaping into attics and crawl spaces.
Insulating and air sealing the rim joist band in the basement or crawl space can reduce basement heat loss by up to 40 percent, contributing roughly 10 percent in whole-home savings.
Thermal curtains and window insulation film on single-pane or poor double-pane windows reduce window heat loss by 25 to 30 percent, translating to roughly 5 to 8 percent in overall heating savings.
🏠 Key Concepts Explained
The Science Behind It
Heat always moves from warmer areas to cooler ones through three mechanisms: conduction, convection, and radiation. In a cold house, all three are working against you simultaneously. Conduction pulls heat through solid materials like walls and windows at a rate determined by their R-value. Convection drives cold air infiltration and warm air exfiltration through every gap and crack in the building shell. Radiation draws heat from your body toward any cold surface within line of sight, even if the air temperature between you and that surface is perfectly comfortable.
The stack effect is the dominant force driving air infiltration in multi-story homes during winter. Warm indoor air is less dense than cold outdoor air, so it rises and escapes through high openings while cold outside air is pulled in at low points to replace it. The greater the temperature difference between inside and outside, the stronger this chimney-like pressure difference becomes. A home that feels fine on a mild 45-degree day may feel drafty and cold on a 10-degree day not because anything changed in the house, but because the temperature differential doubled the stack effect pressure driving cold air through every small gap.
Duct leakage compounds all of this by depositing your heated air somewhere other than your living space. The Department of Energy estimates that in a typical home with ducts in the attic, 20 to 30 percent of forced-air heating is lost before reaching the registers. From your furnace’s perspective, it is working fine. From your living room’s perspective, it is receiving 70 to 80 cents of every heating dollar you spend. Sealing and insulating ductwork addresses this directly, while air sealing the building shell reduces the load the system has to overcome in the first place. These two measures work together and are the reason a well-sealed, well-insulated home at 68 degrees often feels warmer and more comfortable than a leaky home set to 74.
Frequently Asked Questions
▼ My furnace runs constantly but the house never reaches the set temperature. What is wrong?
This usually means your heating system is undersized for the current heat loss rate of the home, which is often caused by significant air leakage or missing insulation. Before assuming the furnace is failing, check for obvious leaks, a clogged filter, and closed dampers. If the unit is properly sized and maintained, hire an energy auditor to measure the home’s actual heat loss before considering equipment replacement.
▼ Why is one room always colder than the rest of the house?
Cold rooms typically have one of three causes: the supply duct serving that room is leaking, undersized, or has a partially closed damper; the room has more exterior wall or window exposure than the duct system was balanced to handle; or there is significant air leakage specifically in that room such as around a poorly sealed window or exterior door. Check the duct damper first, then inspect the room carefully for drafts on a cold windy day.
▼ Can renters fix a cold apartment without landlord permission?
Yes, several effective measures require no permanent modifications. Draft snakes or door sweeps can be placed against exterior doors, foam outlet gaskets require only removing and replacing a cover plate, and thermal curtains require only a curtain rod. A portable oil-filled electric radiator can also supplement heat in a single cold room efficiently without any installation. If the apartment is genuinely under-heated, most states require landlords to maintain minimum temperatures of 68 degrees during heating hours, which is a matter you can raise formally.
▼ How long before I notice a difference in my heating bill after sealing leaks?
You should see the change on the first full billing cycle after completing the work, typically within 30 days. Most utility bills compare your current usage to the same month last year, so accounting for weather differences, a 15 to 25 percent reduction in therms or CCF consumed is realistic after thorough air sealing. Comfort improvement is usually noticeable within hours of finishing the sealing work.
▼ What if my home is older than 30 years and still has original windows?
Older homes typically have two to three times more air leakage than newer construction and often have single-pane or low-quality double-pane windows that dramatically increase radiant heat loss. Start with air sealing rather than window replacement, since leakage and insulation gaps almost always deliver faster payback. Interior window insulation film (about $5 per window) can reduce heat loss through old windows by 30 to 40 percent as an interim measure. Full window replacement has a payback period of 15 to 25 years on energy savings alone, so prioritize the building shell first.
Quick Tips
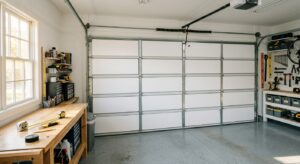
- Check for cold floors above a vented crawl space or garage. Insulating the floor cavity to R-19 with faced batts, friction-fit between joists with the vapor barrier facing up toward the living space, can eliminate one of the most common cold zone complaints in single-story homes.
- Use a $20 infrared thermometer to scan your walls, windows, and ceiling from inside on a cold day. Surfaces reading more than 5 degrees below the room air temperature are contributing significantly to your radiant discomfort and are worth prioritizing.
- Heavy thermal curtains on north-facing and large windows can reduce window heat loss by 25 to 30 percent and dramatically cut the radiant chill you feel sitting near them. Close them at sundown and open south-facing ones during daylight hours to capture free solar gain.
- If specific rooms are always cold, check that supply registers are not blocked by furniture, and verify that the dampers inside the ducts serving those rooms are fully open. A partially closed branch damper is a simple fix that is often overlooked entirely.
Variations for Your Situation
- Apartment or Rental: Renters cannot modify ductwork or add insulation, but they can still make a meaningful impact. Install foam outlet gaskets on exterior wall outlets, hang thermal blackout curtains on drafty windows, use door draft stoppers on exterior doors, and add a rug over cold floors. A programmable smart plug running a small oil-filled radiator in the coldest room for a few hours before bed can also reduce reliance on central heat. Total cost for all of these measures is typically under $100.
- Tight Budget (under $50): Focus on zero and low-cost steps that stop the biggest leaks. Close your fireplace damper, replace the furnace filter ($10 to $20), install outlet gaskets ($5), add a door draft stopper ($10), and rearrange furniture so no seating is directly in front of exterior windows or walls. These steps alone can reduce perceived coldness and cut heating bills by 10 to 15 percent with minimal investment.
- Older Home (pre-1980): Homes built before 1980 were constructed before modern energy codes and often have no insulation in exterior walls, minimal attic insulation, and leakage rates three to four times higher than newer homes. Start with a professional energy audit since the number of potential problem areas makes DIY diagnosis difficult and inefficient. Prioritize attic air sealing and insulation, rim joist sealing, and door and window weatherstripping in that order. Federal Inflation Reduction Act tax credits cover 30 percent of costs up to $1,200 for insulation and air sealing, making this the best time in decades to invest in a comprehensive upgrade.