
Water damage is the second most common home insurance claim in the United States, averaging $11,000 per incident according to the Insurance Information Institute. In most of those situations, the difference between a minor inconvenience and a catastrophic loss comes down to one thing: how quickly the homeowner was able to shut off the water. If you have ever scrambled under a sink or sprinted to the basement during a leak, you already know how disorienting that moment can be.
Every home has a network of shutoff valves controlling water flow to individual fixtures, appliances, and the entire house. Most homeowners could not locate more than one or two of them without searching. The main shutoff alone can be buried behind landscaping, tucked in a crawlspace, or hidden inside a mechanical room. Add gas shutoffs, electrical subpanels, and HVAC isolation valves, and you have a home full of critical controls that nobody has ever mapped.
This guide walks you through exactly how to find, test, and label every shutoff valve in your home, from the main water supply to the individual valve behind your refrigerator ice maker. You will end up with a clear map, labeled valves, and the confidence to act fast when something goes wrong. This is one of the highest-return 90-minute projects any homeowner can do.
What You’ll Need
Click on an item below to shop for the recommended items for this recipe on Amazon.
As an Amazon Associate, we earn from qualifying purchases.
How to Do It
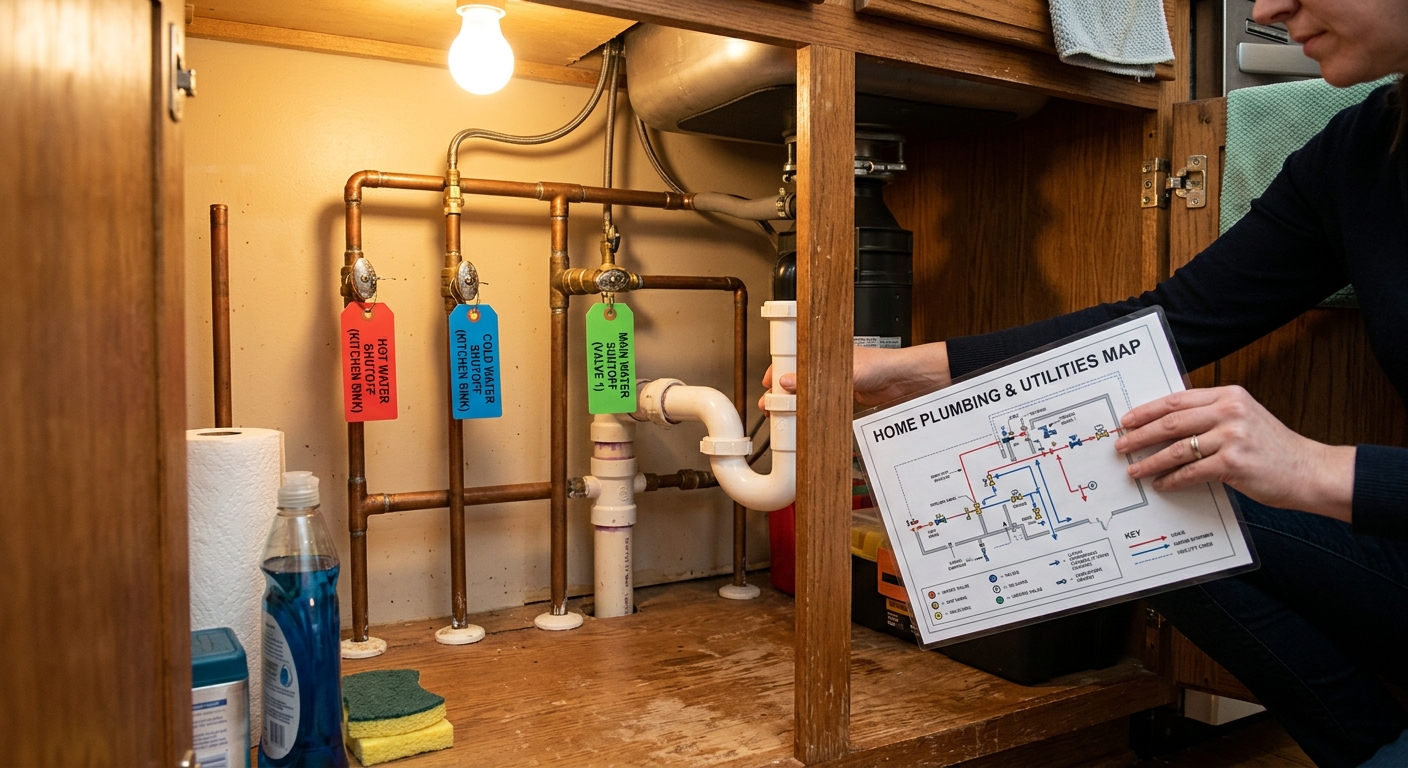
- Start at your water meter or where the main supply enters the house. This is almost always near the street in a covered box, in the basement on the front wall, or in a utility closet. Turn the handle to confirm it moves, then attach a bright red tag or label reading MAIN WATER SHUTOFF with a permanent marker.
- Walk through the house room by room and locate every under-sink shutoff valve, typically two per sink (hot and cold) and one behind each toilet. Open the cabinet or access panel, confirm the valve is present, and tag it with a simple label: KITCHEN SINK HOT, BATHROOM 2 TOILET, etc.
- Find the shutoffs for major appliances: behind the refrigerator (ice maker line), under or behind the dishwasher, behind the washing machine (usually two valves on the wall), and at the water heater (cold supply in, sometimes hot supply out).
- Locate your gas meter shutoff on the exterior of the home and your individual appliance gas valves behind the stove, water heater, furnace, and dryer if gas-powered. Do not operate the gas meter shutoff yourself during this audit. Simply confirm its location and note it requires a wrench.
- Photograph every labeled valve and compile the photos in a phone album or shared family folder labeled Home Shutoffs. Write the main water and gas shutoff locations on a card and tape it inside a kitchen cabinet door where any adult in the home can find it.
- Purchase a set of waterproof valve tags or colored zip ties, a roll of label tape, a pipe marker or paint pen, and a basic adjustable wrench. Print or sketch a rough floor plan of each level of your home before you begin.
- Starting with the main water shutoff, turn it fully off and then open a faucet inside to confirm water stops. If the valve is stiff, apply penetrating oil and work it slowly. If it will not move or leaks at the stem when operated, mark it for replacement by a plumber. Turn it back on fully.
- Test each individual fixture shutoff by slowly turning it clockwise to closed, then checking that the downstream fixture loses water. Open the valve back up fully. A valve that leaks from the stem packing or refuses to seat completely should be flagged with a red tag for replacement.
- Mark each valve directly on the pipe with a paint pen, including an arrow showing the open direction. Attach a durable metal or plastic tag with the zone name. For complex mechanical rooms, photograph the area and annotate the photo digitally with labels.
- Draw each floor of your home on graph paper or use a free app like MagicPlan to create a simple floor plan. Mark the location of every shutoff with a consistent symbol. Note valve type (ball valve or gate valve), condition (good or needs replacement), and what it controls.
- Laminate the completed map and store one copy inside the electrical panel door, one inside a kitchen drawer, and share a digital copy with anyone who has a house key. Update the map after any plumbing work.
- Research whole-home water monitoring devices such as the Flo by Moen or Phyn Plus. These install on the main supply line and monitor flow patterns to detect both sudden bursts and slow drip leaks, then shut off automatically or via smartphone app.
- Hire a licensed plumber to install the device on your main supply line. Most installations take 1 to 2 hours and require cutting into the supply pipe. Budget $100 to $200 for labor in addition to the device cost.
- Place individual smart leak sensors (typically $15 to $30 each) under sinks, behind toilets, near the water heater, and beside the washing machine. These sensors alert your phone within seconds of detecting moisture and integrate with most auto-shutoff systems.
- Connect the system to your home Wi-Fi and configure alerts for all household members. Set vacation mode when leaving for more than 24 hours so the system tightens its leak-detection sensitivity automatically.
- Complete the manual valve audit and labeling from the earlier approaches regardless of the smart system. Technology can fail, and every adult in the home should still know how to manually shut off the water in under 60 seconds.
Why It Works: The Benefits
Homeowners who shut off water within 3 minutes of a pipe failure typically see damage costs under $2,000. Those who take 10 or more minutes average $10,000 or more in losses. Labeled valves directly compress that response window.
Some insurers offer discounts of 5 to 10% for homes with automatic or clearly documented shutoff systems. More importantly, preventing even one water damage claim protects your claims history and keeps premiums stable for years.
Knowing which valve controls your kitchen sink means you can replace a faucet in an afternoon without hiring a plumber. Homeowners who can isolate fixtures confidently save $150 to $300 per repair visit by handling basic plumbing themselves.
A labeled main shutoff means house sitters, neighbors, or adult children can stop a leak while you are away. Without a clear label, they will be helpless or will call 911, turning a $200 fix into a full remediation job.
Homeowners who understand their system layout get faster service and more accurate quotes. Plumbers spend less time diagnosing and more time fixing, which reduces billable hours by 20 to 40% on straightforward jobs.
💰 Savings Impact by Action
Homeowners who can shut off water within 3 minutes prevent an estimated 70 to 80% of the total water damage that would occur with a 10-plus minute response time.
Knowing how to isolate fixtures allows homeowners to handle basic repairs themselves, reducing plumber call frequency by an estimated 25 to 35% annually.
Replacing a failed main gate valve proactively costs $150 to $300, compared to an emergency replacement during a leak event that averages $400 to $800 plus water damage costs.
Shutting off the main supply during travel eliminates virtually all supply-line leak risk for the duration of the absence, covering the most common source of severe home water damage.
🏠 Key Concepts Explained
The Science Behind It
Water supply lines in a typical home operate at 40 to 80 PSI of pressure. At 60 PSI, a fully open 3/4-inch supply line moves roughly 15 to 20 gallons per minute under normal flow, but a burst fitting or failed washing machine hose can allow uncontrolled discharge at far higher rates. The physics here are straightforward: pressure times time equals volume, and volume is what causes damage. Every 30 seconds of delayed shutoff at a moderate leak rate adds another 10 to 30 gallons of water to your floor, walls, and subfloor.
The reason so many shutoff valves fail over time comes down to mineral deposits and galvanic corrosion. In areas with hard water, calcium carbonate deposits build up inside valve seats and around stem threads. When a valve sits in the fully open position for years, those minerals essentially cement the moving parts in place. Gate valves are especially vulnerable because the brass stem threads are finer and more prone to seizing. Ball valves are more reliable because the quarter-turn mechanism keeps the sealing ball in contact with Teflon seats that resist mineral binding, and the operation is simple enough that even partial turning keeps the mechanism from seizing completely.
Gas shutoff valves operate on the same quarter-turn ball valve principle for individual appliances, but the gas meter shutoff is a specialized valve requiring a flat wrench to prevent accidental operation. Natural gas is delivered at low pressure (typically under 0.5 PSI at the meter), so a leak does not spray like water. Instead it accumulates in low-lying areas and seeks ignition sources. This is why knowing the location of the gas shutoff before you smell gas matters so much. In an active leak situation, you should be turning the valve, opening windows, and leaving the building simultaneously, not searching through a utility room trying to identify the right valve for the first time.
Frequently Asked Questions
▼ What do I do if my main water shutoff valve will not turn at all?
Apply a penetrating lubricant like WD-40 or PB Blaster to the valve stem and wait 10 to 15 minutes before trying again with gentle pressure from an adjustable wrench. Do not force it. If the valve still will not move, call a licensed plumber to replace it before you have an emergency. In the meantime, locate the street-side curb shutoff at your water meter box and confirm it operates as your backup.
▼ My house has no shutoff valves under the sinks. Is that normal?
Older homes built before the 1970s often have no individual fixture shutoffs, relying entirely on the main valve. This is a significant risk because any repair requires cutting water to the whole house. A plumber can add angle stop shutoff valves under each sink and behind each toilet for roughly $50 to $100 per valve installed, and it is one of the most practical plumbing upgrades you can make to an older home.
▼ How do I find the main shutoff in a house built on a slab with no basement?
In slab-on-grade homes, the main interior shutoff is usually in a utility closet, inside the garage on the exterior wall facing the street, or under the kitchen sink if the supply enters there. If you cannot find it indoors, the street-side curb shutoff inside the water meter box is always your backup. Check your home inspection report if you have one, as inspectors are required to locate and document the main shutoff.
▼ Should I shut off the water main when we go on vacation?
Yes, shutting off the main water supply when leaving for more than 3 days is one of the most effective ways to prevent vacation water damage, which is disproportionately costly because leaks run undetected for days. Turn off the main, open a faucet to relieve pressure, and your home is protected from supply-side failures for the entire trip. Note that this does not protect against drain backups or roof leaks.
▼ The valve behind my toilet is leaking slightly after I tested it. What do I do?
A small drip from the packing nut (the nut where the stem exits the valve body) can sometimes be stopped by tightening the nut a quarter turn with an adjustable wrench. Do not overtighten. If tightening does not stop the drip within a few hours, the valve needs replacement. Angle stop valves behind toilets cost $8 to $20 at a hardware store and are a straightforward DIY replacement once you have shut off the main water supply.
Quick Tips
- Use different colored tags for different systems: red for main water shutoff, blue for fixture shutoffs, yellow for gas valves, and orange for HVAC. Anyone in the household can act correctly under stress with a color-coded system.
- Test every shutoff valve once a year, ideally at the start of winter before pipes face freeze risk. This keeps valve stems moving and gives you one annual opportunity to catch a failing valve before it matters.
- If you have a crawlspace, use a bright spray paint dot on the floor above each crawlspace shutoff so you can find it quickly with a flashlight without crawling the entire space.
- Add your home’s shutoff valve map to your phone’s notes app and share it with a trusted neighbor. If a leak starts while you are at work, they can act immediately without waiting for you to talk them through it over the phone.
Variations for Your Situation
- Apartment or Rental: Renters typically cannot access building-wide shutoffs, but every unit should have individual shutoffs under sinks and behind toilets that are renter-accessible. Locate and photograph these on move-in day. Ask your building manager or super to walk you through the unit shutoffs and confirm whether there is a unit-level main valve, often found in a hallway closet or behind an access panel. Keep the building emergency maintenance number saved in your phone alongside your photos.
- Tight Budget (under $20): Skip the laminator and printed maps entirely. Use a permanent marker directly on the pipe or wall surface next to each valve, and photograph every labeled valve with your phone. Create a shared album with your household members. Colored electrical tape (red, blue, yellow) costs about $5 at any hardware store and can color-code every valve in the house without tags. This zero-purchase approach delivers 90% of the safety benefit at nearly no cost.
- Older Home (pre-1970): Expect to find gate valves throughout, corroded packing nuts, and potentially no individual fixture shutoffs at all. Before testing any old valve aggressively, have a plumber’s number ready, as older gate valves on galvanized pipe can fail during testing. Budget $300 to $700 to replace key gate valves with modern ball valves while labeling, treating this as a dual audit-and-upgrade project rather than a pure documentation exercise.