If your home has a finished attic, a Cape Cod style second floor, or a bonus room over a garage, you almost certainly have knee walls. These short vertical walls, typically 3 to 5 feet tall, separate your living space from the unconditioned attic cavity behind them. They look like ordinary walls, but most of them are energy disasters hiding in plain sight. Without proper insulation and air sealing, they act like open windows to the outside every single day of the year.
The problem goes beyond just missing insulation. Even when knee walls have batts stuffed between the studs, they are almost always missing the air barrier that stops warm or cool air from moving freely between your living space and the uncontrolled attic space behind them. In winter, heat pours out. In summer, attic air heated to 130°F or more pushes right back in. Homeowners with these spaces often notice rooms that are stuffy in summer, freezing in winter, and expensive to condition year round regardless of how much they run their HVAC system.
This post breaks down exactly why knee walls fail, what the building science says about fixing them, and two clear approaches you can take, whether you want a weekend DIY project or a comprehensive professional upgrade. We include real numbers on savings, payback periods, and the specific steps that actually move the needle.
What You’ll Need
Click on an item below to shop for the recommended items for this recipe on Amazon.
As an Amazon Associate, we earn from qualifying purchases.
How to Do It
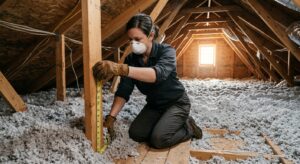
- Access the attic space behind each knee wall through the access door. Use a headlamp and wear an N95 respirator and long sleeves, as existing insulation may contain irritants.
- Inspect the existing knee wall insulation. If batts are present but have no rigid backing on the attic side, they are providing little benefit. Note any gaps, compression, or missing sections.
- Seal all penetrations in the attic floor (the space behind and below the knee wall) using canned spray foam. Target gaps around joists, wiring holes, plumbing chases, and any area where the floor meets the exterior wall. This step alone can cut air leakage by up to 40%.
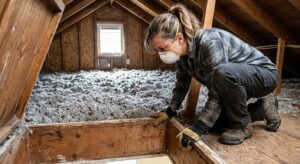
- Install rigid foam board (minimum R-10, ideally R-15) cut to fit tightly between each stud bay on the attic-facing side of the knee wall. Use spray foam around the perimeter of each panel to create a continuous air barrier. This is the single most impactful step in the entire process.
- Add R-15 or R-19 batt insulation over the rigid foam if stud depth allows, facing toward the living space. The combination of rigid foam plus batt insulation achieves the R-38 to R-49 target recommended by the DOE for Climate Zones 4 through 7.
- Insulate and weatherstrip the access door. Cut rigid foam to fit the attic-facing side of the door and glue it in place. Apply foam weatherstripping around the entire door frame perimeter and add a simple hook-and-eye latch to ensure the door seals tightly when closed.
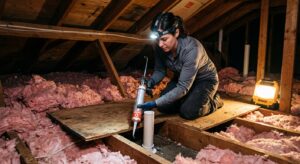
- Get two to three quotes from insulation contractors certified in spray polyurethane foam application. Ask specifically about closed-cell versus open-cell foam and request the final R-value per inch for the product they plan to use.
- Have the contractor apply 2 to 3 inches of closed-cell spray foam (R-6 to R-7 per inch) directly to the roof deck and exterior walls of the knee wall attic cavity. This seals air leakage and insulates in one step, achieving R-12 to R-21 at the roof line.
- Request that the attic floor behind the knee wall be left uninsulated after encapsulation. Once the roof deck is sealed, insulating the attic floor is counterproductive and wastes money.
- Ensure the contractor addresses all knee wall access doors with either spray foam on the door itself or a pre-fabricated insulated hatch cover rated to match surrounding R-values.
- After work is complete, verify the finished R-value with an infrared thermometer scan during the first heating or cooling season. Surface temperatures on the knee wall face should be within 5°F of the adjacent interior wall temperatures if the job was done correctly.
Why It Works: The Benefits
Properly air sealing and insulating knee walls can reduce heating and cooling energy use in affected rooms by 20 to 30%, according to DOE research on encapsulated attic assemblies. For a home spending $2,000 per year on HVAC, that is $400 to $600 back in your pocket annually.
Finished attic rooms and bonus spaces above knee walls often swing 10 to 15°F warmer in summer and cooler in winter compared to the rest of the house. Correct insulation and air sealing reduces that temperature swing to within 2 to 3°F of the main living area.
When conditioned air stops pouring out through knee walls, your furnace and AC run fewer cycles to maintain setpoint. Less runtime means less wear on compressors, heat exchangers, and fan motors, extending equipment life by several years.
Air sealing knee walls reduces the amount of humid indoor air that can enter the attic cavity in winter and condense on cold surfaces. This lowers the risk of mold, wood rot, and structural damage that commonly affects knee wall attic spaces in colder climates.
Dense insulation and a continuous air barrier in the knee wall assembly also provides meaningful sound attenuation from outdoor noise and attic mechanical equipment, noticeably quieting finished attic bedrooms and bonus rooms.
💰 Savings Impact by Action
Air sealing the attic floor behind the knee wall eliminates up to 40% of total air leakage in the knee wall assembly, delivering the highest return on investment of any single step.
Adding a rigid foam air barrier to the attic face of knee wall stud bays stops wind washing and convective looping, recovering up to 25% of lost insulation performance from existing batts.
Full encapsulation of the knee wall attic space with closed-cell spray foam reduces whole-room heating and cooling energy use by 20 to 30% compared to uninsulated or poorly insulated assemblies.
Insulating and weatherstripping the knee wall access door eliminates a concentrated air leak that can account for up to 10% of total knee wall heat loss on its own.
A complete knee wall treatment combining floor sealing, rigid foam barrier, full-depth insulation, and door weatherstripping delivers an average 25 to 30% reduction in heating and cooling costs for the affected rooms.
🏠 Key Concepts Explained
The Science Behind It
A knee wall assembly fails for the same reason a down jacket fails when it gets wet: the insulating material only works when air is not moving through it. Fiberglass and mineral wool batts trap heat in millions of tiny air pockets, but when air flows through the batt, it carries heat with it and the R-value drops dramatically. In a knee wall without a rigid air barrier, the pressure difference between your warm interior and the cold or hot attic behind the wall drives a constant flow of air directly through the insulation, rendering it nearly useless. This phenomenon is called wind washing, and it is the primary reason knee walls fail even when they appear to be insulated.
The second mechanism is convective looping inside the stud bays themselves. When the attic-side face of a batt insulation panel is cold (in winter) and the room-side face is warm, air inside the batt circulates in a slow convective loop, continuously transferring heat from the warm side to the cold side. Studies by Oak Ridge National Laboratory found that convective looping in open-faced batt insulation can reduce effective R-value by 30 to 50% compared to the labeled value. A rigid foam panel installed on the attic face of the stud bay interrupts this loop entirely by eliminating the open air cavity.
Spray foam encapsulation solves both problems simultaneously. Closed-cell spray foam at the roof deck creates an air-impermeable barrier with an R-value of 6 to 7 per inch, stopping wind washing and convective looping in one step. It also acts as a vapor retarder, which matters in cold climates where moisture-laden indoor air would otherwise diffuse into the attic cavity and condense. The Building Science Corporation classifies this as a conditioned attic assembly, and their field data consistently shows 20 to 40% reductions in whole-house energy use when complex attic geometries including knee walls are fully encapsulated.
Frequently Asked Questions
▼ I already have insulation in my knee walls. Why is the room still cold in winter?
The most likely cause is missing air barrier, not missing insulation. If the batts are unfaced or have no rigid backing on the attic side, air is flowing right through them and carrying heat with it. Go into the attic space behind the knee wall on a cold day and hold your hand near the base of the wall and attic floor junction. If you feel air movement, the floor is the primary leak point. Install rigid foam on the attic face of each stud bay and seal the attic floor with spray foam to see immediate improvement.
▼ How do I know if my knee wall attic space has vermiculite or asbestos insulation?
Vermiculite looks like small gray or silver pebbles and was commonly used in attics through the 1980s. Do not disturb it, blow it, or sample it yourself. Contact a certified asbestos inspector to collect a sample and have it tested at a certified lab. Testing typically costs $25 to $75 per sample. If asbestos is confirmed, you will need a licensed abatement contractor to remove it before any insulation work can proceed.
▼ Can I use just spray foam cans from the hardware store, or do I need professional equipment?
Canned spray foam from a hardware store is excellent for sealing gaps, cracks, and perimeters, but it cannot efficiently fill large areas like an entire roof deck. For air sealing the attic floor, penetrations, and door frames, canned foam works well and costs $5 to $10 per can. For covering the full roof deck and exterior walls of the knee wall attic space, you need professional spray foam equipment. Use canned foam for the DIY approach and save professional application for the encapsulation upgrade.
▼ Will insulating my knee walls cause any moisture problems?
Done correctly, knee wall insulation reduces moisture problems by stopping warm humid interior air from reaching the cold attic surfaces where it would condense. The key is ensuring the air barrier is on the warm-in-winter side of the insulation assembly, which means the room-facing side of the stud bay or the rigid foam panel installed against the attic face. If you are in a climate with very hot and humid summers, discuss vapor control strategy with a local building scientist or insulation contractor before proceeding, as the optimal approach can vary by climate zone.
▼ My knee wall attic has an HVAC unit or ductwork in it. Does that change anything?
Yes, significantly. Ducts and air handlers in an unconditioned attic space can lose 20 to 30% of their heating or cooling capacity to the surrounding extreme temperatures. In this case, encapsulating the knee wall attic space with spray foam is even more valuable because you bring the equipment into a semi-conditioned environment. However, if you have a gas furnace or other combustion appliance in that space, you must ensure it has adequate combustion air supply after encapsulation. Have an HVAC technician evaluate the setup before you seal the space.
Quick Tips
- Use a laser infrared thermometer to scan your knee wall surfaces from inside your living space on a cold day. A temperature reading more than 5°F below your room air temperature confirms significant heat loss through that wall.
- If you have HVAC supply or return ducts running through the knee wall attic space, encapsulating that space becomes even more valuable because it protects the ducts from extreme temperatures and can improve system efficiency by 10 to 15%.
- When cutting rigid foam board for stud bays, cut each piece 1/4 inch larger than the opening in each dimension so it friction fits snugly. Then run a bead of canned foam around the perimeter. This two-step seal is more reliable than foam alone.
- Paint the rigid foam or cover it with drywall if the knee wall attic space is occasionally accessed. Many rigid foam products are flammable and building codes in most jurisdictions require them to be covered with a thermal barrier when exposed in occupied or semi-occupied spaces.
Variations for Your Situation
- Apartment/Rental: If you live in a top-floor apartment with knee wall-style sloped ceiling rooms, you cannot modify the building envelope yourself. Focus on interior solutions: use heavy thermal curtains on any skylights or dormers, place dense furniture against exterior knee wall surfaces to reduce radiant heat gain, and use a portable smart thermostat with scheduling to reduce HVAC load during peak temperature hours. Ask your property manager about insulation upgrades and reference local energy codes, as many jurisdictions now require landlords to meet minimum insulation standards.
- Tight Budget (under $50): Start with the attic floor rather than the wall. A single afternoon spent sealing gaps and penetrations in the attic floor behind the knee wall using two to three cans of spray foam ($15 to $25 total) and a tube of acoustical sealant ($5) can capture the majority of the air leakage benefit. Add foam weatherstripping around every access door frame for another $8 to $12. These two steps combined address the biggest sources of air leakage and can meaningfully improve comfort before you spend anything on wall insulation.
- Older Home (pre-1980): Homes built before 1980 often have knee wall attic spaces with no insulation at all, knob-and-tube wiring, and significant structural gaps between framing members. Prioritize an energy audit (cost $150 to $400, often subsidized by utilities) before starting work, as the auditor can use blower door and infrared equipment to identify your specific leak points and flag any hazardous materials. Many older homes qualify for utility rebates and federal tax credits that can cover 30% of insulation and air sealing costs under the Inflation Reduction Act, making the professional encapsulation approach much more financially attractive.