You can have a perfectly tuned furnace, fresh filters, and a smart thermostat, and still watch your heating bills climb every winter. The culprit is usually hiding in plain sight: the gaps around your exterior doors. A worn door sweep lets cold air pour in along the bottom. Compressed or missing weatherstripping on the sides and top creates a continuous crack that works like a chimney in reverse, pulling heated air out and drawing freezing air in.
The U.S. Department of Energy estimates that air leaks account for 25 to 40% of the energy used for heating and cooling in a typical home, and doors are among the easiest entry points to address. Unlike window replacements or insulation upgrades that cost thousands, weatherstripping an exterior door takes about 90 minutes per door, costs $15 to $30 in materials, and requires no special skills. Done across two or three doors in a single Saturday, most homeowners see savings of $150 to $250 over a full heating season.
This post walks you through exactly how to assess your doors, choose the right weatherstripping type for each location, and install it correctly the first time. Whether you want a fast patch job today or a thorough upgrade that lasts a decade, you will find a clear path forward with real cost and savings numbers at every step.
What You’ll Need
Click on an item below to shop for the recommended items for this recipe on Amazon.
As an Amazon Associate, we earn from qualifying purchases.
How to Do It
- Do the flashlight test first: have someone shine a flashlight along the outside of the closed door at night while you look from inside for light gaps. Mark every gap with painter’s tape.
- Clean the door frame surfaces where weatherstripping will adhere using rubbing alcohol and a cloth. Remove any old foam or adhesive residue with a plastic scraper. The bond fails on dusty or oily surfaces.
- Cut self-adhesive foam tape (3/8-inch wide, D-profile) to fit the top and both side jambs. Peel and press firmly, starting at the top corner and working down. Close the door to confirm compression without sticking.
- For the door bottom, install a slide-on or screw-on door sweep. Measure the door width, cut the sweep with a hacksaw if needed, and position it so the rubber blade just grazes the threshold with the door closed.
- Recheck all four sides with the flashlight test. Press any lifting edges back down or add a second layer of foam in high-gap areas.
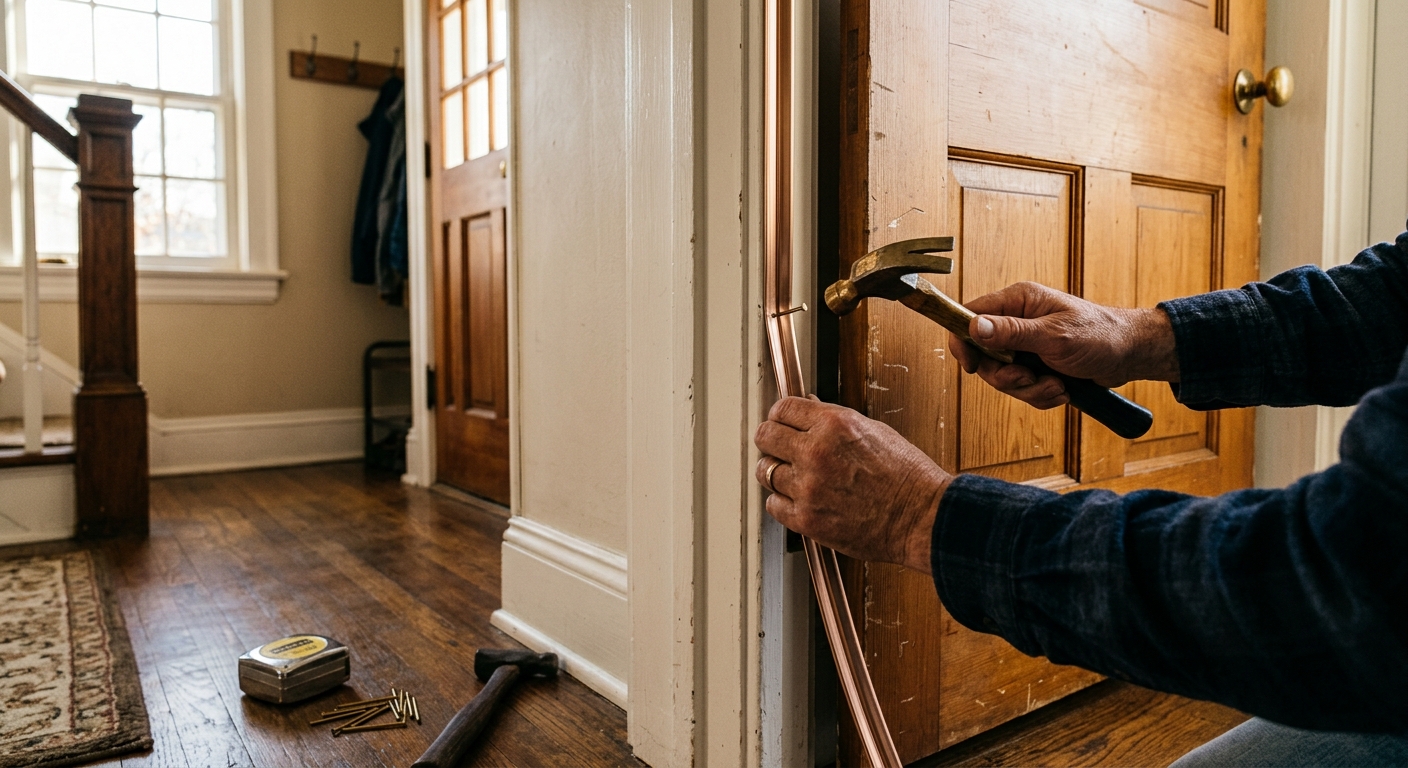
- Remove the old weatherstripping completely. Use a putty knife to clear the door stop channel and a heat gun on low to soften stubborn adhesive. Sand lightly with 80-grit sandpaper so new materials adhere cleanly.
- Measure the door height for the side jambs and the door width for the top. Cut metal V-strip (tension-seal weatherstripping) to these lengths using aviation snips. Cut a 45-degree miter at the top corners so strips meet cleanly.
- Fold the V-strip so the open side of the V faces the exterior. Nail or press the strip into the door stop channel using the pre-punched holes, spacing fasteners every 2 inches at the top and bottom and every 4 inches in the middle.
- Use a flathead screwdriver to open the V slightly along the entire length so it creates a spring-tension seal when the door closes. This tension is what makes V-strip outlast foam by a decade.
- Install a heavy-duty automatic door bottom or a reinforced screw-on sweep at the base. Automatic door bottoms retract when the door opens to prevent wear and drop to seal when the door closes. Set the height so the rubber compresses about 1/16 inch against the threshold.
- Perform a final flame test: hold a lit incense stick or a candle 1 inch from each corner and seam of the closed door. If the flame bends, mark the spot and add a small piece of V-strip or foam patch to eliminate the remaining leak.
- Schedule a home energy audit with a BPI-certified auditor. They will perform a blower door test that pressurizes your home and uses a thermal camera to identify every air leak location, not just the obvious door gaps.
- Review the audit report with the contractor and prioritize door work alongside any attic bypasses or rim joist sealing the test uncovers. Bundling the work reduces the per-project cost.
- Ask the contractor to assess whether door frames are plumb and doors are properly hung. A warped or sagging door creates uneven gaps that no weatherstripping can fully compensate for, and rehanging the door first ensures the seal works.
- Have the contractor install commercial-grade compression weatherstripping with a kerf-style frame insert, which seats into a routed slot in the door stop for a flush, durable finish that will not peel or compress like adhesive foam.
- Request a post-installation blower door retest to verify the air changes per hour (ACH) number improved. A properly sealed home should move from 8 to 12 ACH (typical older home) toward the 4 to 6 ACH range after door and window sealing work.
Why It Works: The Benefits
Properly sealed exterior doors can reduce air infiltration by 30 to 40% at those entry points, translating to a 10 to 15% reduction in total heating costs. On a $150 monthly bill, that is $15 to $22 saved every month of the heating season.
Cold drafts at floor level disappear almost immediately after installing a door sweep. Rooms adjacent to exterior doors typically feel 2 to 4 degrees warmer within 24 hours of sealing, even without any change to your thermostat setting.
When your home holds heat more effectively, your furnace cycles less frequently. Shorter run cycles reduce wear on the heat exchanger, blower motor, and igniter, potentially adding years to the system’s service life.
Uncontrolled air infiltration pulls in outdoor particulates, pollen, and car exhaust through door gaps. Sealed doors mean air enters your home through filtered pathways instead of uncontrolled cracks.
Weatherstripping compresses against the door stop and threshold to create an acoustic seal as well as a thermal one. Street noise, wind sound, and neighborhood noise can drop noticeably after a thorough door sealing project.
💰 Savings Impact by Action
Sealing all gaps on two to three exterior doors reduces whole-home heating air leakage by up to 15%, based on DOE estimates for door infiltration as a share of total envelope leakage.
Installing a quality door sweep addresses the single largest gap on most doors and can reduce that door’s air leakage by up to 10% of total heating costs on its own.
Replacing degraded foam with metal V-strip on all four sides of an exterior door cuts air infiltration through that door by up to 20% compared to worn or absent weatherstripping.
Weatherstripping the interior door between an attached garage and the living space can reduce heating load by an additional 8% in homes where that door was previously unsealed.
🏠 Key Concepts Explained
The Science Behind It
Air infiltration through door gaps is driven by two forces working simultaneously: the pressure differential between indoors and outdoors, and the stack effect created by temperature differences. When your furnace heats interior air, that air expands slightly and rises. It escapes through any upper-level opening, and the resulting low-pressure zone at floor level actively draws cold outdoor air in through door sweeps, thresholds, and lower wall gaps. On a 20-degree winter day with a heated interior at 68 degrees, this pressure difference can reach 10 to 15 pascals, enough to pull measurable airflow through a 1/8-inch continuous gap.
The physics of heat transfer at a door involve all three mechanisms: conduction through the metal frame and threshold, convection from air movement through gaps, and radiation from the cold glass and door surface toward warmer interior surfaces. Weatherstripping addresses the convective component directly by eliminating the air pathway. A properly installed V-strip or compression gasket forces air to flow through the bulk material rather than around it, and since still air is an excellent insulator (about R-3.5 per inch), even a thin layer of trapped air in a compressed gasket adds meaningful resistance to heat flow.
Material choice matters because of a property called compression set. Open-cell foam compresses permanently over time and loses its ability to spring back and seal the gap. Closed-cell foam lasts longer but still degrades after 3 to 5 years. Metal V-strip works on a spring-tension principle rather than compression, so it maintains its sealing force for decades. Silicone door sweeps resist both cold hardening (which makes rubber brittle and cracked) and UV degradation. Matching the weatherstripping material to the specific location, high-wear door bottoms versus low-wear top jambs, is what makes the difference between a seal that lasts one winter and one that lasts twenty.
Frequently Asked Questions
▼ I installed weatherstripping but my door is now hard to close. What did I do wrong?
The most common cause is using weatherstripping that is too thick for the gap, or applying it on the door face rather than in the door stop channel. Remove the material, measure the actual gap with a feeler gauge or a folded piece of paper, and select a product sized to that gap. D-profile foam should compress about 50% when the door closes, not flatten completely.
▼ Why can I still feel a draft even after replacing the weatherstripping?
If you sealed the sides and top but not the bottom, up to 40% of the door’s air leakage is still open. Check the door sweep and threshold seal first. Also inspect the area where the door frame meets the wall framing on the interior side, this rough opening gap is often unsealed and can be addressed with a bead of paintable caulk or expanding foam.
▼ Can renters do this without landlord permission?
Self-adhesive foam tape and slip-on door sweeps require no fasteners and leave no permanent changes, making them renter-safe in most situations. Avoid screw-on products or anything that requires drilling without landlord approval. When you move out, remove adhesive products and use a heat gun on low to clean residue without damaging the paint.
▼ How long before I actually see the savings on my utility bill?
Most homeowners see a measurable difference within one full billing cycle after a cold snap, typically 4 to 6 weeks. The savings are most visible on months where outdoor temperatures average below 30 degrees Fahrenheit, because that is when the pressure and temperature differential driving infiltration is greatest. Compare your bill to the same month in the prior year rather than the previous month for the clearest picture.
▼ My door is old and visibly warped. Will weatherstripping still help?
Weatherstripping can compensate for minor warping of up to 3/16 inch using thicker compression foam or double-layer V-strip, but severe warping creates uneven gaps that no standard product can bridge. If you can fit more than a quarter coin flat in any part of the gap with the door closed, the door needs to be rehung or replaced before weatherstripping will deliver meaningful savings.
Quick Tips
- Replace all weatherstripping on a door at the same time. Patching one side while leaving degraded material on the others leaves the thermal envelope incomplete and the savings on the table.
- Check your door threshold height before buying a sweep. Thresholds that are too low leave a gap no sweep can bridge. Most adjustable thresholds have screws that raise the saddle by 1/8 to 1/4 inch, do that first before adding a sweep.
- In climates with both hot summers and cold winters, choose weatherstripping rated for temperature ranges from minus 40 to 200 degrees Fahrenheit. Cheap foam hardens and cracks in extreme cold, eliminating the seal exactly when you need it most.
- Do not forget the door to your attached garage. That door is often the worst air leaker in the house because it is rarely treated like an exterior door. It connects directly to an unheated space and should receive the same weatherstripping treatment as your front door.
Variations for Your Situation
- Apartment/Rental: Focus entirely on renter-safe products that require no tools or permanent modifications. A door draft stopper placed at the base costs $10 to $20 and blocks the bottom gap immediately. Self-adhesive closed-cell foam tape (not standard open-cell) applied to the door stop seals the sides and top without damage. Look for products from brands like Frost King or M-D Building Products available at hardware stores in precut kits for $12 to $18. Take photos before and after installation in case your landlord questions changes.
- Tight Budget (under $50): Prioritize the door you use most and the one facing the prevailing winter wind. A $6 roll of V-strip, a $10 door sweep, and a $4 roll of foam tape for the top jamb covers one full door for under $20. Skip the automatic door bottom and use a basic screw-on aluminum sweep with a rubber blade instead. Total materials for two doors can stay under $40 if you focus on high-impact locations only.
- Older Home (pre-1980): Homes built before 1980 typically have door frames that are out of square due to decades of settling, and weatherstripping gaps are often uneven across the height of the frame. Use flexible silicone compression tape rather than rigid V-strip, since it conforms better to irregular surfaces. Check the rough opening caulk line on the interior where the door casing meets the drywall, this is almost always unsealed in older homes and can account for as much leakage as the door gaps themselves. Budget an extra $15 to $20 for caulk and backer rod to address these secondary leaks.