You signed the papers, unpacked the boxes, and expected to finally feel at home. Instead, the bedroom is stifling at night, the living room feels drafty by the windows, and your energy bill for the first month made your jaw drop. You are not imagining it. Almost every home has a set of comfort problems that previous owners simply learned to live with, and you are noticing them fresh because you have no mental baseline to ignore them.
The most common culprits are not expensive to fix. Dirty air filters, blocked or closed vents, unbalanced thermostat settings, missing weatherstripping, and neglected duct systems are responsible for the vast majority of move-in comfort complaints. Studies from the Department of Energy show that duct leakage alone can account for 20 to 30 percent of conditioned air loss in a typical home, and most buyers have no idea what condition the ducts are in when they take ownership.
This post walks you through a systematic first-week checklist for any new home. You will learn what to inspect yourself in under two hours, which fixes are free or nearly free, and when a single HVAC service call could solve problems that would otherwise cost you hundreds in wasted energy each year. Whether you bought a brand-new build or a 40-year-old ranch house, these are the right places to start.
What You’ll Need
Click on an item below to shop for the recommended items for this recipe on Amazon.
As an Amazon Associate, we earn from qualifying purchases.
How to Do It
- Locate every supply and return vent in the home. Confirm all supply vents are open and unobstructed by furniture, rugs, or drapes. Blocked vents are the single most common cause of uneven temperatures.
- Find the air handler or furnace and pull the existing air filter. Hold it up to a light source. If you cannot see light through it, replace it immediately with a MERV 8 filter ($10 to $20). A clogged filter can reduce airflow by 15 percent and force the system to work far harder.
- Set your thermostat to a single temperature and let the system run for 30 minutes. Walk each room with your hand near vents to confirm air is flowing. Rooms with weak or no airflow signal duct disconnections or damper problems.
- Check every exterior door and window by running your hand around the frame on a windy day or when the HVAC is running. Noticeable cold or warm air movement indicates missing or failed weatherstripping.
- Look at the thermostat location. If it is within 3 feet of a supply vent, in direct sunlight for part of the day, or on an exterior wall, note it as a potential calibration problem that may require repositioning later.
- Note the indoor humidity using a $10 to $15 hygrometer. Readings below 35 percent in winter or above 60 percent in summer explain a large portion of discomfort that has nothing to do with temperature.
- Buy a box of incense sticks or a smoke pen ($8 to $12). Move slowly around every window frame, door frame, electrical outlet on exterior walls, plumbing penetrations under sinks, and the attic hatch. Mark each spot where smoke deflects with blue painter’s tape. These are your air leaks.
- Seal all marked leaks with the appropriate material. Use paintable latex caulk for stationary gaps around window and door trim. Use foam backer rod plus caulk for gaps wider than a quarter inch. Install new foam outlet gaskets behind cover plates on exterior walls. This alone reduces infiltration by 10 to 20 percent.
- Pull all supply vent covers and shine a flashlight into the duct boot at the floor or ceiling. Look for visible gaps between the boot and the drywall or subfloor. Seal those gaps with foil-backed HVAC tape, not standard duct tape, which fails within a year.
- Go into the attic or crawlspace if safe to access. Inspect every duct connection you can reach for separation, gaps, or missing insulation wrap. Reconnect any separated ducts and seal connections with mastic sealant or foil tape. Even one disconnected supply duct dumping conditioned air into an attic can raise cooling bills by 10 to 15 percent.
- Program or schedule your thermostat with a setback of 7 to 10 degrees Fahrenheit during sleeping hours and while the home is unoccupied. The DOE estimates this saves 10 percent annually on heating and cooling with zero additional investment.
- Replace all standard showerheads and check water heater temperature. While not strictly HVAC comfort, a water heater set above 120 degrees Fahrenheit adds unnecessary heat load in summer and raises burn risk. Set it to 120 degrees, which also saves 3 to 5 percent on water heating energy.
- Call two HVAC contractors and request a full system commissioning or move-in tune-up, not just a filter change. Ask specifically whether they perform a duct leakage test or blower door test as part of the service.
- Ask the technician to check refrigerant charge on the air conditioner. A system that is even 10 percent low on refrigerant loses up to 20 percent of its cooling efficiency, which directly translates to hot, humid rooms on warm days.
- Request a static pressure test on the duct system. This 15-minute test reveals whether the duct design is undersized for the equipment, a very common problem in older homes that remodeled without updating ductwork.
- Have the technician balance airflow dampers in the duct trunk lines to equalize delivery across all rooms. In a home with multiple zones or floors, proper balancing can reduce temperature differences between rooms from 8 to 10 degrees down to 2 to 3 degrees.
- Ask for a written report with all findings, refrigerant levels, static pressure readings, and any recommended repairs with cost estimates. This document is useful for warranty claims and future service calls.
Why It Works: The Benefits
Addressing duct leakage and airflow balance can eliminate hot and cold spots that differ by 5 to 10 degrees Fahrenheit from room to room, making the entire home feel even without any equipment upgrade.
Homeowners who fix duct leakage, replace a clogged air filter, and seal major air leaks in the first month typically see 15 to 25 percent reductions in their heating and cooling costs compared to doing nothing.
Leaky return ducts can pull in attic dust, mold spores, and pest debris. Sealing them and replacing a dirty filter immediately reduces particulate levels and allergens circulating through the home.
A system fighting duct leaks, a clogged filter, and blocked returns runs harder and longer than it should. Fixing these issues reduces runtime by 10 to 20 percent, directly extending the life of the compressor and heat exchanger.
Most move-in comfort problems are solved within the first weekend of targeted inspection and repair, turning an uncomfortable new house into a genuinely livable home without waiting for a scheduled HVAC visit weeks away.
💰 Savings Impact by Action
Sealing accessible duct leaks with mastic or foil tape recovers 20 to 30 percent of conditioned air that was escaping into unconditioned spaces.
Replacing a severely clogged filter restores system airflow and reduces blower energy consumption by up to 15 percent immediately.
Caulking and weatherstripping the worst infiltration points reduces heating and cooling load by 10 to 20 percent per DOE estimates.
Programming 7 to 10 degree setbacks during sleep and unoccupied hours saves approximately 10 percent on annual heating and cooling costs.
Properly opening all vents and balancing dampers eliminates pressure imbalances that cause the system to run 8 to 12 percent longer than necessary.
🏠 Key Concepts Explained
The Science Behind It
The reason a home feels uncomfortable is almost never a single cause. Comfort is determined by four physical factors working together: air temperature, radiant temperature from surrounding surfaces, humidity, and air movement. Your thermostat only measures one of those four things. A room can read 70 degrees on the thermostat while feeling cold because the wall surfaces behind you are radiating heat away from your body, or because dry winter air is accelerating moisture evaporation from your skin. This is why fixing the thermostat setting alone rarely solves the problem.
Duct leakage is the most impactful hidden factor in almost every existing home. When supply ducts leak conditioned air into an attic, the HVAC system is essentially trying to heat or cool a much larger space than your living area. At the same time, leaky return ducts create negative pressure in the living space, pulling in unconditioned outside air through every crack in the envelope to replace what the return is pulling. This creates a cycle where the system runs longer, the house pressurizes and depressurizes constantly, and comfort never stabilizes. The DOE has measured duct leakage in existing homes and found that the average home loses 20 to 30 percent of conditioned air before it reaches living spaces.
Air infiltration compounds the problem exponentially. The EPA estimates that air sealing and insulation improvements can reduce heating and cooling energy use by 10 to 20 percent. In a leaky older home, the actual figure can be higher because infiltration defeats mechanical ventilation, humidity control, and filtration simultaneously. When outside air bypasses the filter and humidity control of the HVAC system and enters directly through cracks, you get the outdoor air quality and humidity level regardless of what your thermostat or dehumidifier is doing. Addressing the envelope first, before upgrading equipment, is the single most cost-effective move any new homeowner can make.
Frequently Asked Questions
▼ Why is one room always hotter or colder than the rest of the house?
The most likely causes are a partially closed or blocked supply vent, a disconnected duct serving that room, or a duct damper that was adjusted by the previous owner and never corrected. Start by confirming the vent is fully open and unobstructed, then go into the attic or crawlspace to verify the duct branch serving that room is connected and insulated. If both check out, the room may simply be undersized in the duct design and require a professional damper adjustment or duct modification.
▼ My HVAC runs constantly but the house never reaches the set temperature. What is wrong?
This usually points to one of three problems: a severely undersized system for the home’s square footage and envelope condition, refrigerant that is low on the air conditioning side, or extreme duct leakage dumping conditioned air into unconditioned spaces. Replace the filter first and confirm all vents are open. If the system still cannot maintain temperature within 3 degrees of the setpoint on a mild day, schedule an HVAC service call to check refrigerant charge and static pressure.
▼ The house smells musty whenever the AC runs. Is that a comfort problem or something more serious?
Musty odors from vents almost always indicate mold growth on the evaporator coil, in the drain pan, or inside duct work in a humid section of the home. This is both a comfort and an air quality issue. Turn off the system and call an HVAC technician to inspect and clean the evaporator coil. Do not run the system and spread spores throughout the house while waiting for service.
▼ Can I do these checks if I am renting, not buying?
Yes, with some limits. Renters can replace air filters, check vents for obstructions, use a hygrometer to measure humidity, and add draft snakes or door sweeps to obvious air leaks. For anything involving ductwork, the thermostat, or major weatherstripping, submit a written maintenance request to your landlord and keep a copy. Many states require landlords to maintain HVAC systems in working order, so documenting comfort problems with temperature readings and humidity measurements strengthens your request.
▼ How quickly will I notice a difference after making these fixes?
Air filter replacement and vent unblocking produce noticeable airflow improvement within one HVAC cycle, usually 20 to 40 minutes. Air sealing and weatherstripping improvements show up as reduced drafts within hours. The full energy bill impact of combined improvements typically shows up in the second full billing cycle after the work is done, since the first cycle often includes days before the fixes were made.
Quick Tips
- Change the air filter on day one no matter what it looks like. Previous owners may have replaced it right before listing the home, but you have no way to verify the schedule it was on.
- Check that the HVAC system has only one return air path per floor. Homes that were remodeled sometimes have returns blocked off or converted to storage, forcing the blower to work against high resistance.
- If the home has a fireplace, confirm the damper is fully closed when not in use. An open fireplace damper is essentially a 48-square-inch hole in your ceiling pulling conditioned air straight out of the house.
- Ask the previous owner or your real estate agent for any records of HVAC service, filter changes, or duct work. A system that has never been serviced is a strong signal to schedule a professional tune-up in the first 60 days.
Variations for Your Situation
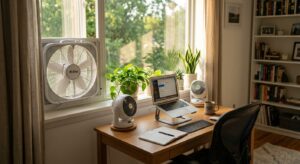
- Apartment or Rental: Focus on the things you can do without landlord permission. Replace the air filter if you can access it and the lease allows, add foam outlet gaskets on exterior walls, place draft snakes at exterior doors, and use a hygrometer to document humidity problems. If vents are weak or the system is clearly not performing, photograph the filter and submit a formal written maintenance request with temperature readings as evidence. Portable fans ($20 to $50) placed to push air from over-conditioned rooms to under-conditioned ones can reduce temperature differences by 3 to 5 degrees at zero permanent modification.
- Tight Budget Under $50: Prioritize in this order. First, replace the air filter ($10 to $20) since this single fix can restore 10 to 15 percent of lost airflow immediately. Second, add foam outlet gaskets to exterior wall outlets ($5 for a 10-pack). Third, use latex caulk ($4 to $6) on the three or four worst window frames you identified in your walkthrough. Fourth, adjust thermostat setback schedules if you have a programmable model already installed. These four steps together typically address 70 percent of the comfort gains available from a full audit at under 15 percent of the cost.
- Older Home Pre-1980: Expect higher baseline air leakage, no vapor barrier in the crawlspace, and duct insulation that may be deteriorated or missing entirely. Start with the smoke pen test at the top and bottom plates of exterior walls, which in older construction often have no blocking and connect directly to the attic and crawlspace. Add attic hatch insulation ($15 to $30 in rigid foam board) as a first priority since uninsulated hatches can have an R-value near zero. Budget for a professional blower door test ($150 to $300) to quantify the leakage rate before spending money on equipment upgrades, since sealing the envelope on a pre-1980 home often delivers more comfort improvement than any mechanical upgrade.