If you live in a home built before 1980, you already know the feeling: you crank the heat, the furnace runs constantly, and yet somehow the living room still feels chilly and the hallway is downright cold. Drafty older homes lose heat through dozens of pathways simultaneously, including gaps around electrical outlets, leaky attic hatches, and windows with deteriorated glazing compound. The result is not just discomfort but heating bills that are 30 to 50% higher than they need to be.
The good news is that most of the worst offenders are fixable without a contractor. Building science research from the Department of Energy shows that air sealing alone can reduce heating and cooling costs by up to 20%, and adding that to smarter thermostat habits and targeted insulation can push total savings well past 30%. Better still, the improvements that make the biggest difference are often the cheapest and fastest to do.
This guide walks you through exactly how to diagnose where your home is losing heat, prioritizes the highest-impact fixes, and gives you three levels of action: quick no-cost wins you can do today, a focused DIY weekend project, and professional upgrades worth considering if your home has serious efficiency gaps. By the end of winter, your home can feel like the cozy retreat it should be.
What You’ll Need
Click on an item below to shop for the recommended items for this recipe on Amazon.
As an Amazon Associate, we earn from qualifying purchases.
How to Do It
- Do a draft audit on a cold windy day: hold a lit incense stick or thin strip of tissue paper near window frames, door edges, electrical outlets on exterior walls, and where the floor meets the baseboard. Mark any spots where the smoke or tissue moves with painter’s tape so you can address them systematically.
- Install foam gaskets behind exterior-wall electrical outlet and switch plate covers. Remove the cover plate, press the pre-cut foam gasket (available in packs of 10 for about $3) against the electrical box, and replace the cover. This single step can measurably reduce air infiltration in older homes where outlets are often uninsulated penetrations straight to the wall cavity.
- Add door sweeps or draft snakes to any exterior door where you can see daylight or feel air movement at the bottom. A basic adhesive door sweep costs $8 to $15 and installs in under 10 minutes. For interior doors to unheated spaces like garages or basements, this is equally important.
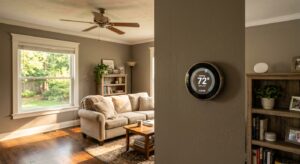
- Set your thermostat to 68 degrees F when home and awake, and drop it to 60 degrees F when sleeping or away for more than 2 hours. The DOE estimates this setback strategy alone saves about 1% per degree per 8 hours, meaning an 8-degree nighttime setback saves roughly 8% on heating costs with zero upfront investment.
- Close the damper on any fireplace you are not actively using. An open fireplace damper is essentially a 50-square-inch hole in your ceiling venting directly to the outside. If the fireplace is decorative and never used, purchase a chimney balloon inflatable plug (about $40) for an even tighter seal.
- Seal window frames from the interior using a paintable latex caulk where the window frame meets the drywall or plaster. Many older windows have a visible gap here that is simply painted over repeatedly rather than sealed. Use a caulk gun and smooth the bead with a damp finger. One tube covers roughly 30 to 40 linear feet and costs $4 to $6.
- Replace deteriorated weatherstripping on all exterior doors. Remove the old stripping from the door stop on the hinge side, latch side, and top. Install V-strip tension seal weatherstripping (sold by the roll for $10 to $20), which is more durable than foam tape and seals more effectively under different door pressures.
- Go into the attic and seal the top plates of interior walls with canned expanding foam or acoustical sealant. These are the gaps where interior partition walls meet the attic floor and are among the most significant bypass leakage points in older homes. Work in sections, wearing a respirator and moving carefully to avoid stepping through the ceiling drywall.
- Seal around any attic penetrations you find: plumbing vent pipes, electrical wires, HVAC ducts, and any recessed light fixtures visible from the attic. Use fire-rated caulk or intumescent foam around anything near heat sources. Even gaps the size of a quarter around a pipe can leak hundreds of cubic feet of warm air per day under stack effect pressure.
- In the basement or crawl space, apply foam backer rod and caulk along the sill plate, which is the wood framing member sitting directly on top of the foundation wall. This joint is almost never sealed in pre-1980 homes and is a major source of ground-level cold air infiltration. A tube of sill-seal caulk and a few feet of backer rod costs under $15.
- After sealing, replace your furnace filter if it has been more than 60 to 90 days since the last change. A clogged filter forces the furnace to work harder, offsetting some of the efficiency gains from air sealing. Aim for a MERV 8 to 11 filter, which captures most dust and allergens without restricting airflow too much.
- Schedule a professional energy audit with a certified BPI (Building Performance Institute) auditor. The auditor will run a blower door test that depressurizes the home and quantifies exactly how much air is leaking and where. This typically costs $200 to $400 and is sometimes offered free by your utility company. The report will prioritize improvements by cost-effectiveness.
- Have a weatherization contractor perform professional air sealing using two-part spray foam on the attic floor, rim joists, and any major bypasses identified in the audit. Professional equipment can access cavities and apply foam at pressures and thicknesses that are difficult to match with DIY canned foam.
- Add blown-in insulation to bring the attic to R-38 to R-49 (the DOE recommended range for most of the continental US). Blown-in cellulose or fiberglass costs $1.50 to $3.50 per square foot installed and has a typical payback period of 3 to 7 years depending on current heating costs and local energy prices.
- Ask the contractor about dense-pack insulation for exterior walls if wall insulation is absent or minimal, which is common in homes built before 1960. Small holes are drilled in the siding or interior walls, and cellulose is blown in under pressure to fill the cavity. This typically costs $1 to $3 per square foot and can improve wall R-value from near zero to R-13.
- After insulation and air sealing work is complete, confirm that adequate mechanical ventilation is in place, either through a bath fan running on a timer or an energy recovery ventilator (ERV). Tightening a home without adding controlled fresh air can trap moisture and pollutants indoors, so this step is not optional.
Why It Works: The Benefits
Combining air sealing with attic insulation upgrades can reduce heating costs by 20 to 35% annually. For a home spending $1,800 per winter on heat, that translates to $360 to $630 back in your pocket every year.
Sealing bypasses and adding insulation eliminates the cold spots and temperature swings that make certain rooms unusable in winter. Most homeowners report room-to-room temperature differences dropping from 8 to 12 degrees F down to 2 to 3 degrees F after a full air sealing project.
A well-sealed home holds heat longer between heating cycles, which means your furnace runs less, experiences less wear, and is likely to last several years longer before needing replacement. Shorter run times also reduce the risk of overheating and cracked heat exchangers.
Uncontrolled air leaks pull in unconditioned outdoor air along with allergens, vehicle exhaust, and basement moisture. Sealing these leaks and introducing controlled ventilation gives you cleaner, drier interior air rather than whatever happens to be blowing past your foundation.
Addressing foundation sill sealing and door threshold gaps directly eliminates the cold air that pools along floor level in older homes. Homeowners consistently rate draft elimination as the most noticeable comfort improvement, often detectable within the first 24 hours.
💰 Savings Impact by Action
Sealing attic bypasses and the rim joist reduces uncontrolled air infiltration by up to 20%, directly cutting the heating load your furnace must meet.
Upgrading attic insulation from R-11 to R-38 reduces heat flow through the ceiling assembly by up to 70%, translating to 10 to 20% savings on total heating costs.
Setting back the thermostat 8 degrees F for 8 hours per day saves approximately 8 to 10% on annual heating costs with zero capital investment.
Adding interior insulating film or thermal curtains to single-pane windows reduces window heat loss by 25 to 35%, contributing 5 to 12% to total heating savings.
Weatherstripping exterior doors and installing outlet gaskets addresses accessible surface leaks and reduces infiltration by roughly 3 to 5% of total heating energy use.
🏠 Key Concepts Explained
The Science Behind It
Heat moves in three ways: conduction through solid materials, convection through air movement, and radiation through space. In a drafty older home, all three are working against you simultaneously. The stack effect drives convection losses: physics dictates that warm, buoyant air rises toward any gap at or near the ceiling, and cold replacement air is pulled in at the lowest points of the building envelope. The pressure difference driving this movement is small but relentless, operating every minute of every cold day regardless of wind. Sealing top and bottom leaks together breaks this loop and is why attic and basement air sealing are always addressed as a pair.
Conduction losses are governed by R-value, which measures resistance to heat flow through a material. Older attic insulation, often compressed fiberglass batts installed at R-11 or R-13 in the 1960s and 1970s, loses effectiveness as it settles and ages. Because heat flow through an assembly is inversely proportional to total R-value, doubling the attic insulation from R-11 to R-38 does not just add comfort, it reduces heat flow through that assembly by nearly 70%. This is why attic insulation upgrades almost always have the shortest payback period of any envelope improvement.
Radiant discomfort is a phenomenon many homeowners do not fully understand. Mean Radiant Temperature (MRT) is the average temperature of all the surfaces surrounding your body, and it affects your thermal comfort as strongly as air temperature does. A room with air at 70 degrees F but cold single-pane windows and uninsulated walls may have an MRT of only 62 degrees F, making you feel chilly despite adequate thermostat settings. Adding interior window insulating film, heavy curtains, or window inserts raises the surface temperature of glass and dramatically improves perceived warmth without touching the thermostat at all.
Frequently Asked Questions
▼ I sealed gaps and added insulation but my house still feels drafty near the floor. What am I missing?
Cold air pooling at floor level usually points to an unsealed rim joist in the basement or crawl space, which is the framing that sits on top of the foundation wall around the perimeter of the house. In older homes this area is almost never insulated or sealed. Cut rigid foam board to fit each joist bay at the rim and seal the edges with canned foam, or hire a weatherization contractor to spray-foam the entire rim joist area in a few hours for $400 to $900.
▼ My heating bill is still high after weatherstripping the doors. Did it not work?
Door weatherstripping is a worthwhile fix but addresses only a small fraction of total air leakage in most older homes. The bigger leaks are hidden in the attic floor, around plumbing chases, and at the sill plate. Use an incense stick to check outlets, light switches, and any penetrations in exterior walls, and plan to spend a weekend sealing the attic bypasses to see meaningful bill reductions. Savings from door and window sealing alone are typically in the 3 to 5% range.
▼ How long before I see these savings show up on my actual utility bill?
Air sealing improvements show up within the first full billing cycle after the work is done, typically 30 to 60 days. However, weather variation between months can mask the savings, so compare your usage in therms or kWh (not dollar amount, since prices fluctuate) against the same month from the prior year for the most accurate read. Most utility companies also offer free online tools that normalize bills for weather, which gives you a cleaner comparison.
▼ Can I do this work in winter or do I have to wait for warmer weather?
Most air sealing work can be done year-round, and winter is actually ideal because you can feel the drafts and the stack effect is at its strongest, making leaks easier to find. The main exception is caulking exterior surfaces, which requires temperatures above 40 to 45 degrees F to cure properly. For attic and basement interior work, temperature is not a limiting factor.
▼ My home is a rental. What can I do without landlord permission?
Renters can legally and reversibly address most of the biggest comfort issues. Heavy thermal curtains, draft snakes at door bottoms, outlet gaskets behind switch plates, and interior window film kits are all renter-safe options that leave no permanent marks and can be removed at move-out. Together these steps can meaningfully reduce drafts and improve comfort even without touching walls or attic spaces. Document any improvements with photos and keep receipts in case your landlord questions changes.
Quick Tips
- Use a thermal imaging app on your smartphone (or rent an infrared camera from a hardware store for about $40 per day) to visually pinpoint cold spots on walls and ceilings before you start sealing. This makes the process dramatically faster and more targeted.
- Add heavy thermal curtains to north and west-facing windows and keep them closed after sunset. A good set of insulating curtains can reduce heat loss through windows by 25 to 35% on cold nights and costs $30 to $80 per panel.
- If you have old single-pane windows and full replacement is not in the budget, apply interior shrink-film window kits (about $8 per window) for the winter. They are nearly invisible when installed correctly and create a dead air space that roughly doubles the insulating value of the window.
- Check your attic hatch or pull-down stair cover. This is one of the most commonly missed air leaks in older homes. Add weatherstripping around the frame and glue rigid foam board to the attic side of the hatch cover to bring it up to at least R-15.
Variations for Your Situation
- Apartment or Rental: Renters should focus on the four reversible strategies: heavy insulating curtains ($30 to $80 per panel), interior window film kits ($8 per window), foam outlet gaskets ($3 for a pack of 10), and door draft stoppers ($10 to $20). These require no landlord permission, leave no permanent marks, and can reduce perceived cold and heating costs by 10 to 15% combined. If the apartment has baseboard heat with individual controls, lowering unoccupied rooms to 60 degrees F adds additional savings with no modification needed.
- Tight Budget (under $50): Prioritize in this order: foam outlet gaskets for all exterior wall outlets and switches (about $5), a door sweep for the leakiest exterior door ($10 to $15), a chimney balloon if you have an unused fireplace ($35 to $45), and a roll of V-strip weatherstripping for the worst-sealing door ($10 to $15). These four items can be had for under $70 and address a disproportionate share of the most accessible air leaks in an older home, with payback often within a single heating season.
- Older Home Pre-1960: Homes built before 1960 may have no wall insulation at all, knob-and-tube wiring in the walls (which prohibits adding insulation without an electrician’s sign-off), and plaster walls that make accessing bypasses more complex. Start with attic and basement work where access is easiest and gains are highest. Consult a certified energy auditor before adding any wall insulation to confirm the wiring situation, and check with your local utility about rebate programs since many offer enhanced incentives specifically for pre-1960 housing stock.