Insulation is the single highest-return upgrade most homeowners can make, but the type you choose matters just as much as adding it in the first place. Blown-in and batt insulation are both widely available and effective, yet they perform very differently depending on your home’s age, construction style, and the specific space you’re insulating. Pick the wrong one and you could end up with gaps, compressed fibers, or an R-value that falls far short of what you paid for.
The U.S. Department of Energy estimates that properly insulating and air sealing an older home can cut heating and cooling costs by 15 to 25 percent annually. That translates to $300 to $600 per year for a typical household spending $2,000 on energy. But those savings depend heavily on achieving uniform coverage with no voids, and that’s where the blown-in versus batt debate becomes very practical, very fast.
In this post, we’ll walk through how each insulation type works, where each performs best, which is easier to install yourself, and how to calculate the payback period for your specific situation. Whether you’re finishing a new addition, upgrading a drafty 1970s ranch, or just trying to stop paying to heat your attic, you’ll leave with a clear answer for your home type.
What You’ll Need
Click on an item below to shop for the recommended items for this recipe on Amazon.
As an Amazon Associate, we earn from qualifying purchases.
How to Do It
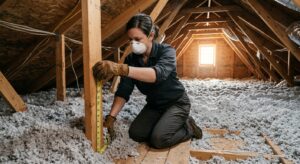
- Check your current attic insulation depth and calculate existing R-value. Most older homes have R-11 to R-19; the DOE recommends R-38 to R-60 for most U.S. climate zones.
- Before adding any insulation, air seal all penetrations: top plates, recessed light housings, plumbing stacks, and electrical chases. Use canned spray foam or acoustical sealant. Skipping this step can leave 20 to 30 percent of your savings unrealized.
- Measure your joist spacing. Standard 16-inch or 24-inch on-center spacing accepts pre-cut batt widths without trimming. Irregular spacing, obstructions, or existing wiring will require custom cuts that leave performance-robbing gaps.
- Install the first layer of batts perpendicular to the joists with the vapor retarder facing down toward the living space. Press firmly but do not compress. Compressed batts lose R-value proportionally.
- Add a second layer of unfaced batts perpendicular to the first layer to cover joist tops and eliminate thermal bridging. This cross-hatch pattern is critical for achieving rated R-value in the finished assembly.
- Install attic ventilation baffles at each eave before laying insulation to maintain a minimum 1-inch airflow channel from soffit to ridge. Blocked soffit ventilation causes moisture buildup and roof deck damage.
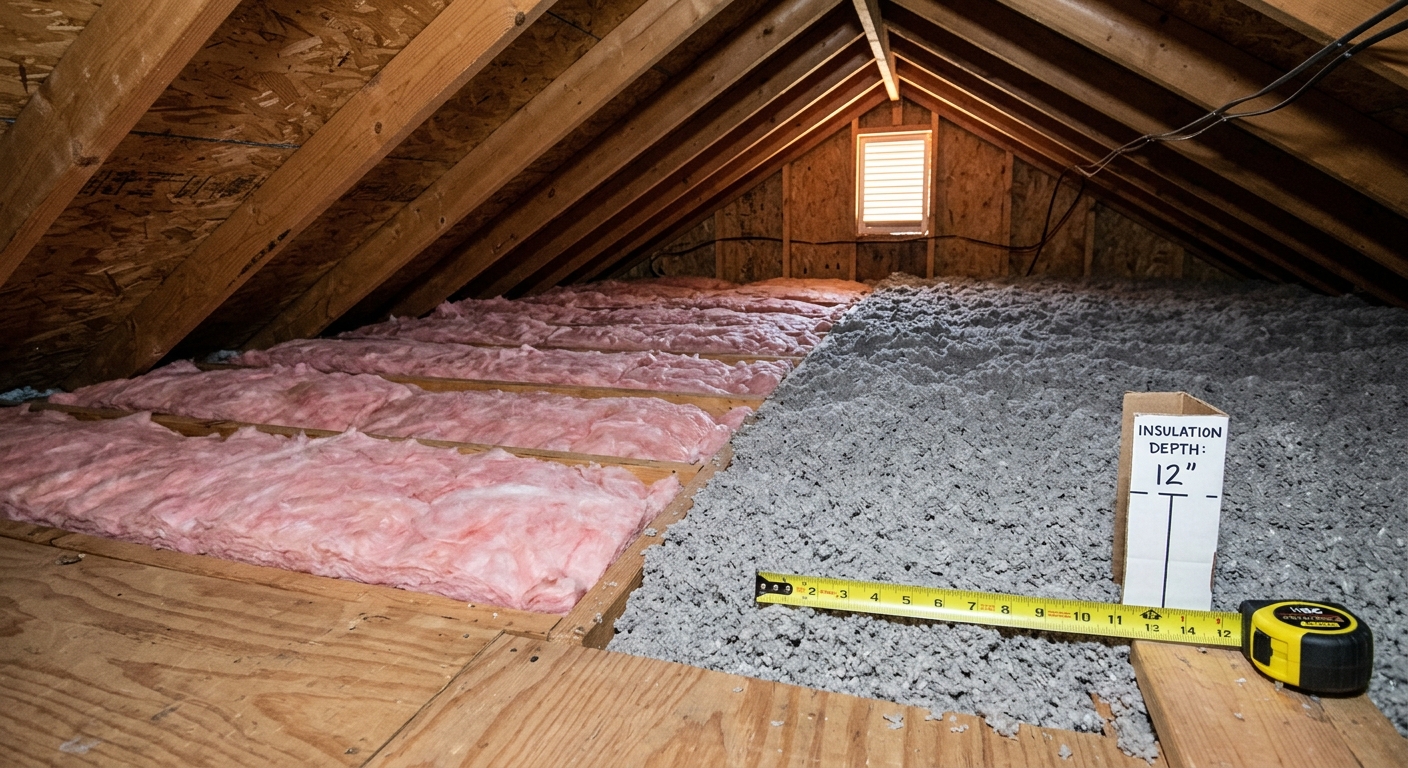
- Measure your attic square footage and current insulation depth. Use the manufacturer’s coverage chart to calculate the number of bags needed to reach your target R-value, then add 15 to 20 percent to account for settling.
- Air seal all penetrations before blowing insulation, identical to the batt approach. Rent a blower machine and run the hose to the attic access point. Have a second person load bags at the machine while you direct the hose.
- Install cardboard or foam baffles at each rafter bay along the eaves before starting. Mark your target depth on attic joists using paint or depth markers cut from wire flags so you can confirm coverage as you work.
- Start blowing from the farthest point from the attic hatch and work backward toward the exit. Hold the hose 12 to 18 inches above the existing surface and sweep slowly side to side to build even coverage.
- Check depth at multiple points using a ruler or your depth markers. Blown-in insulation should be level and uniform with no low spots near framing, walls, or corners where heat loss concentrates.
- Once complete, use a piece of rigid insulation or a door dam to block the attic hatch opening and add insulation directly on top of the hatch cover. Uninsulated hatches are a common source of significant heat loss.
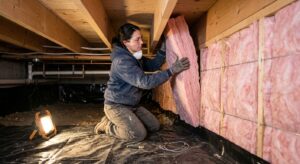
- Hire a BPI-certified insulation contractor or auditor to perform a blower door test first. This quantifies your actual air leakage rate and identifies where insulation gaps exist inside walls before any work begins.
- Discuss access method with your contractor: drill-and-fill from the exterior (siding removed or plugged through) versus interior drill-and-patch through drywall. Exterior access is more common and avoids interior finishing work.
- Request cellulose over fiberglass for wall cavities. Cellulose dense-packed to 3.5 pounds per cubic foot virtually eliminates convective air movement inside the cavity and adds meaningful sound dampening.
- After installation, verify contractor fills all drill holes properly and restores exterior cladding or interior finish to pre-installation condition. Ask for documentation of the installed R-value and density achieved.
- Schedule a post-installation blower door test if possible to confirm air leakage reduction. A good dense-pack job should reduce your home’s ACH50 (air changes per hour at 50 pascals) measurably.
Why It Works: The Benefits
Adding insulation to an underinsulated attic from R-11 to R-38 can cut heating and cooling costs by 15 to 25 percent annually, saving a typical homeowner $300 to $600 per year based on a $2,000 annual energy bill.
Proper insulation reduces temperature swings between rooms and floors. Homeowners commonly report a 3 to 5 degree Fahrenheit improvement in room-to-room consistency after upgrading attic insulation, reducing the need to constantly adjust the thermostat.
When your thermal envelope holds conditioned air longer, your furnace and AC cycle less frequently. Fewer cycles mean less wear on compressors and heat exchangers, potentially extending HVAC system life by 2 to 5 years.
Dense-packed blown-in cellulose in wall cavities can reduce airborne sound transmission by 5 to 10 decibels compared to an empty wall cavity, improving comfort beyond just temperature.
Homes with documented insulation upgrades to current DOE recommended R-values (R-49 to R-60 in attics for most U.S. climate zones) often appraise higher and sell faster, with studies suggesting a 1 to 2 percent increase in resale value.
💰 Savings Impact by Action
Sealing attic floor penetrations before insulating captures up to 20 percent of total home heat loss that bypasses insulation entirely through air movement.
Upgrading an attic from R-11 to R-38 reduces annual heating and cooling costs by 15 to 25 percent according to DOE data for most U.S. climate zones.
Dense-packing empty or underinsulated wall cavities reduces wall heat loss by up to 15 percent of total home energy use in pre-1980 construction.
Eliminating voids and thermal bypasses in insulation assemblies recovers up to 30 percent of the rated R-value lost through typical real-world batt installation defects.
Insulating an uninsulated attic hatch cover to R-30 eliminates a heat loss pathway disproportionate to its size, saving 3 to 5 percent on heating costs alone.
🏠 Key Concepts Explained
The Science Behind It
Heat moves in three ways: conduction (through solid materials), convection (through air movement), and radiation (through electromagnetic waves). Insulation primarily resists conductive and convective heat transfer. Batt insulation works by trapping still air within its fiber matrix, since still air is an excellent insulator. The problem is that batts only work as designed when they completely fill the cavity with no compression, gaps, or bypasses. Any air movement through or around the batt destroys its effectiveness because convective loops develop, circulating heat across the barrier.
Blown-in insulation, particularly cellulose dense-packed into wall cavities, works by the same principle but achieves it more reliably in real-world conditions. Cellulose installed at 3.5 pounds per cubic foot physically cannot develop convective air movement within the cavity because the fiber density suppresses air circulation entirely. This is why dense-pack cellulose in a 2×4 wall cavity at R-13 often outperforms a higher nominal R-value batt in the same wall when measured with a heat flux meter, even though the numbers on paper look similar.
The Oak Ridge National Laboratory has published extensive research showing that real-world insulation assemblies perform 20 to 40 percent below their nominal R-value ratings due to installation defects and thermal bridging through framing. This is called the “installation factor” or “real-world degradation factor.” Blown-in insulation consistently shows less real-world degradation than batts because it conforms to irregular surfaces, wraps around obstructions, and leaves fewer air pathways. The takeaway for homeowners is simple: the best insulation type is the one that achieves the most uniform coverage in your specific space, and in most existing homes with irregular framing and obstructions, that means blown-in wins on performance even when the R-values look identical on the product label.
Frequently Asked Questions
▼ My energy bills barely changed after I added attic insulation. What went wrong?
The most likely cause is that you insulated without air sealing first. Insulation slows conductive heat transfer but does not stop air movement through gaps and penetrations, which can account for 30 to 40 percent of total heat loss in older homes. Go back into the attic and look for any unsealed penetrations around electrical boxes, plumbing stacks, and top plates, then seal them with spray foam or acoustical caulk. Also confirm you did not compress the batts or leave gaps near the eaves.
▼ How do I know if my existing batt insulation is still performing properly or needs to be replaced?
Look for three red flags: visible gaps or sections where batts have fallen or shifted, any moisture staining or discoloration which indicates performance-robbing moisture absorption, and batts that are visibly compressed to less than their original thickness. Compressed or moisture-damaged batts should be removed and replaced. Batts in good condition can simply have blown-in insulation added on top without removal.
▼ Can I mix blown-in cellulose on top of existing fiberglass batts?
Yes, this is one of the most common and effective attic upgrades. Adding blown-in cellulose on top of existing fiberglass batts is fully compatible and actually fills the gaps and voids that the batts may have developed over time. Make sure the existing batts are dry and undamaged, then blow cellulose on top to reach your target total R-value. No removal is needed unless the existing insulation is wet or heavily contaminated.
▼ What if my attic access is too small for me to get in and work comfortably?
For very tight attic hatches or crawlspace-style attics, blown-in is your only practical option since you can direct a hose without fully entering the space. Extend the blower hose with additional sections and use a mirror or camera to monitor coverage. If access is truly inaccessible, a professional contractor with specialized equipment is the right call rather than risking incomplete coverage with a DIY attempt.
▼ Is blown-in insulation safe to breathe around and does it cause skin irritation like fiberglass?
Cellulose blown-in is made from recycled paper treated with borate and is generally considered lower irritation than fiberglass, but you should still wear an N95 respirator and safety glasses during installation because fine particles are released into the air. Fiberglass blown-in carries the same skin and respiratory irritation risk as batt fiberglass, so wear long sleeves, gloves, eye protection, and a respirator. Irritation from fiberglass is mechanical, not chemical, and resolves after washing and changing clothes.
Quick Tips
- Target R-49 to R-60 in your attic if you live in climate zones 4 through 7 (most of the continental U.S.). Going from R-11 to R-38 captures most of the available savings, but the jump to R-49 adds meaningful value in cold climates at minimal incremental cost.
- Use cellulose rather than fiberglass blown-in for existing attics with obstructions. Cellulose particles are smaller, fill gaps more completely, and have a higher R-value per inch. It also contains recycled content and has lower embodied energy.
- Never use faced batts as a second layer when adding insulation to an existing attic. The vapor retarder facing trapped in the middle of the insulation assembly can trap moisture and cause mold. Second layers must always be unfaced.
- Check for federal and state tax credits before purchasing. The Inflation Reduction Act allows a 30 percent tax credit (up to $1,200 per year) on insulation materials for existing homes, which can cut your out-of-pocket cost substantially and shorten your payback period to 1 to 3 years.
Variations for Your Situation
- Apartment or Condo: Renters and condo owners typically cannot modify attic or wall insulation, but can address heat loss through their unit with interior window insulation film ($30 to $60 per window), heavy thermal curtains, and door draft stoppers. If your building has a poorly insulated common attic, bring documented energy cost data to your building manager or HOA, as commercial cellulose installation across a multi-unit building often has payback periods under 2 years and can benefit everyone.
- Tight Budget (under $200): Focus on air sealing alone before spending anything on insulation material. A $40 to $60 investment in canned spray foam and acoustical caulk to seal attic floor penetrations can deliver 10 to 15 percent energy savings on its own. Once you have sealed the major bypasses, prioritize adding any insulation depth over the attic hatch specifically, since uninsulated hatches can be responsible for a disproportionate share of heat loss relative to their size.
- Older Home (pre-1980): Homes built before 1980 typically have 2×4 wall framing with little to no wall insulation, knob-and-tube or aluminum wiring concerns, and attic insulation levels of R-0 to R-11. Start with a professional energy audit ($100 to $400, often subsidized by utilities) to prioritize your investment. In these homes, dense-pack wall insulation often delivers faster payback than attic upgrades because the walls represent such a large uninsulated surface area. Always test for asbestos before disturbing any existing gray granular attic material.