If your home heats up like a greenhouse in July or feels drafty no matter how high you crank the heat in January, your windows are likely the culprit. Standard single or double-pane windows offer very little resistance to heat transfer, and even well-sealed windows radiate cold in winter and allow solar heat gain in summer. The U.S. Department of Energy estimates that windows account for 25 to 30% of residential heating and cooling energy use, making them one of the most impactful places to focus your efficiency efforts.
Thermal curtains, also called insulated or blackout curtains, address this problem without requiring a contractor, a permit, or a significant investment. A quality set of thermal curtains creates a still-air buffer between the glass and your living space, reduces radiant heat transfer, and blocks solar gain during peak afternoon hours. The result is a measurably more comfortable room and a lower monthly energy bill that you can see within the first billing cycle.
This guide covers everything you need to know to choose, hang, and use thermal curtains effectively, whether you are renting an apartment, working with a tight budget, or looking to do a whole-home upgrade. You will find real savings numbers, installation approaches for every skill level, and answers to the most common questions homeowners ask before making the switch.
What You’ll Need
Click on an item below to shop for the recommended items for this recipe on Amazon.
As an Amazon Associate, we earn from qualifying purchases.
How to Do It
- Identify your priority windows by walking through your home at noon on a sunny day and noting which rooms feel hottest, and again on a cold evening to find rooms with noticeable drafts near the glass.
- Measure your window width and add 8 to 12 inches total (4 to 6 inches per side) so the curtains extend well beyond the frame. Measure from the rod to 1 to 2 inches below the sill or all the way to the floor for maximum coverage.
- Select thermal curtains with a foam-backed or triple-weave construction and a thermal lining label. Look for products marketed as blackout-plus-thermal rather than blackout alone, which only blocks light without insulating.
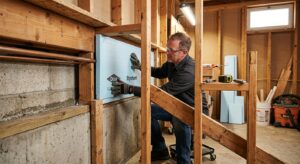
- Install a curtain rod that sits as close to the wall and ceiling as possible, ideally within 1 to 2 inches of the ceiling or crown molding. A higher rod position reduces the gap where warm or cool air can escape over the top of the curtain.
- Hang the curtains and press the side edges gently against the wall trim or use magnetic curtain tape ($8 to $15 at most home stores) to seal the sides, closing the still-air pocket and preventing the edge bypass that reduces effectiveness.
- Adopt a seasonal schedule: close south- and west-facing curtains from 11 AM to 4 PM in summer to block solar gain, and close all thermal curtains at sunset in winter to retain heat overnight.
- Measure your window opening precisely and order or sew curtains that are wide enough to overlap each side of the window frame by at least 5 inches and long enough to puddle 1 inch on the floor or overlap the sill by 4 inches, creating a full perimeter seal.
- Install a ceiling-mounted curtain track or a rod mounted 2 to 3 inches from the ceiling using wall anchors rated for the curtain weight. A track system allows the curtains to close flush against the wall with no gap at the top.
- Attach thin foam weatherstripping tape (3/8-inch wide, self-adhesive) to the inside face of the window casing trim on both sides. When the curtain is closed, the fabric presses lightly against this foam strip, sealing the sides without visible hardware.
- Add a fabric or foam pelmet (a shallow decorative box mounted above the rod) to close the gap at the top of the curtain. A basic pelmet can be built from a 1×4 piece of lumber wrapped in matching fabric for under $30 in materials, and it alone can improve curtain performance by 10 to 15% by eliminating the convective loop over the rod.
- If your windows are in a deep recess or bay, mount a second lightweight liner curtain on a tension rod inside the recess to create a double air-buffer system, which can push effective R-values toward R-6 or higher.
- Test the installation by holding a stick of incense near the edges of the closed curtain on a cold or hot day. Smoke that moves sideways indicates edge bypass; adjust the weatherstripping or curtain overlap until the smoke rises straight up.
- Audit every window in the home using your utility bills and a simple orientation check. South-facing windows are your biggest winter asset (solar gain during the day) and a summer liability after 10 AM. West-facing windows are summer heat problems after 1 PM. North-facing windows lose heat year-round with minimal solar gain.
- Purchase thermal curtains in bulk from a single manufacturer to get consistent R-values and appearance. Budget-tier options at $25 to $40 per pair still provide meaningful insulation; spending more (up to $80 per pair) typically improves appearance, durability, and light blocking rather than dramatically increasing thermal performance.
- Install motorized curtain rods or smart curtain track systems (available for $80 to $200 per window from brands like SwitchBot or IKEA FYRTUR) that can be scheduled via a smartphone app or integrated with a smart home system.
- Program your curtain schedule based on orientation: close south and west windows automatically at 10 AM in summer and reopen after 4 PM. In winter, program them to open south-facing windows at sunrise to admit free solar heat and close all windows at sunset.
- After one full billing cycle, compare your energy bill to the same month in the prior year. Most homeowners in climate zones 3 through 6 see a 10 to 20% reduction in heating or cooling costs for the treated season.
- Combine with window film on any remaining untreated windows, particularly fixed skylights or picture windows where curtains are impractical, to address solar heat gain without blocking the view.
Why It Works: The Benefits
The DOE estimates properly used thermal curtains can reduce heat loss through windows by up to 25% in winter and reduce solar heat gain by up to 33% in summer, translating to roughly 10 to 15% savings on your total energy bill depending on your home’s window-to-wall ratio.
Eliminating the cold-glass convective loop in winter and blocking afternoon solar gain in summer can stabilize room temperatures by 5 to 10 degrees Fahrenheit, removing the hot and cold spots that make some rooms uncomfortable regardless of your thermostat setting.
The multi-layer construction of thermal curtains, typically a decorative face fabric, a foam or polyester batting core, and a vapor barrier backing, also absorbs sound. Homeowners near busy streets or in urban apartments often report noticeable reductions in ambient noise, which is a comfort benefit that has no energy price tag.
Thermal curtains with blackout or tight-weave liners block 85 to 99% of UV radiation, significantly slowing the fading of flooring, upholstery, and artwork. This extends the life of furnishings that can cost hundreds or thousands of dollars to replace.
A set of quality thermal curtains for one window costs between $25 and $80. In a climate with cold winters or hot summers, the energy savings on a single treated window can pay back that cost within 3 to 6 months, making this one of the fastest-payback efficiency upgrades available to homeowners and renters alike.
💰 Savings Impact by Action
Properly installed thermal curtains reduce winter heat loss through windows by up to 25% by interrupting conductive and convective transfer at the glass surface.
Closing thermal curtains on south-facing windows during peak hours reduces summer solar heat gain by up to 33%, directly lowering cooling load.
On west-facing windows with reflective-backed thermal curtains closed in the afternoon, solar heat gain can be reduced by up to 77% due to the low angle and intensity of afternoon sun.
Homeowners who treat all major windows and follow a seasonal open-and-close schedule typically reduce total heating and cooling costs by 10 to 15% annually.
Thermal curtains with blackout liners block 85 to 99% of UV radiation, protecting flooring and furnishings from fading without any additional product.
🏠 Key Concepts Explained
The Science Behind It
Windows lose and gain heat through three simultaneous mechanisms: conduction (heat moving through the glass and frame materials), convection (air movement driven by temperature differences at the glass surface), and radiation (infrared energy traveling through the glass or radiating from warm and cold surfaces). Standard curtains address only radiation partially. Thermal curtains, with their multi-layer construction, interrupt all three pathways at once, which is why they outperform both plain curtains and simple blinds significantly.
The still-air pocket trapped between a properly sealed thermal curtain and the window glass is the key mechanism. Still air has a thermal conductivity of approximately 0.024 W/mK, which makes it one of the best insulating materials available. The challenge is keeping it still. Convective currents constantly try to circulate air from the cold glass surface downward and pull warmer room air in to replace it. A curtain that extends to the floor, overlaps the frame at the sides, and is sealed or closely fit at the top stops this circulation and allows the air buffer to do its job. Every gap, even a half-inch at the edge, creates a pathway for the convective loop to restart and drain the thermal benefit.
In summer, the physics shifts toward solar radiation management. A south-facing window on a clear day can admit 200 to 300 BTUs of solar energy per square foot per hour, which is equivalent to running a small space heater directly in front of the window. Closing a thermal curtain with a reflective or light-colored backing during peak sun hours reflects a significant portion of this radiation before it enters the room and converts to heat on your floors and furniture. The DOE data shows this can reduce solar heat gain by up to 33% on south-facing windows and up to 77% on west-facing windows when the curtain also has a tightly woven or reflective face, because western sun arrives at a lower angle with higher intensity in summer afternoons.
Frequently Asked Questions
▼ My thermal curtains are installed but the room still feels drafty near the window. What am I missing?
The most likely cause is edge bypass, where room air circulates around the sides or top of the curtain rather than being blocked by it. Check that your panels extend at least 4 to 5 inches beyond the window frame on each side and that the top of the curtain is within 1 to 2 inches of the ceiling or fitted with a pelmet. Adding magnetic curtain tape or self-adhesive weatherstripping to the window casing so the curtain presses against it when closed will resolve most edge-bypass problems within minutes.
▼ Will thermal curtains really save me money, or is this just marketing?
The savings are real but depend on how well you size, install, and use them. The DOE’s data on window heat loss is well established, and thermal curtains address documented physics. Homeowners with many windows, single-pane glass, or extreme climates (very cold winters or very hot summers) see the highest returns. If your home has good triple-pane windows already, the marginal gain from curtains is smaller, though still present for comfort and UV protection.
▼ Can I use thermal curtains in a rental apartment without damaging anything?
Yes. Tension curtain rods that fit inside the window frame or between walls require no drilling and support most thermal curtain weights up to about 10 to 12 pounds per rod. For heavier panels, adhesive-mounted curtain rod brackets rated for 20 or more pounds (such as Command Utility Hooks designed for curtain rods) work on most painted drywall without permanent damage. Remove them carefully at move-out with the manufacturer’s instructions to avoid peeling paint.
▼ How long before I see the savings on my energy bill?
Most homeowners notice a difference in their first full billing cycle after installation, particularly if they treat multiple rooms and follow a consistent open-and-close schedule. The savings show up as a smaller increase than expected during peak heating or cooling months rather than always as an absolute drop, because utility rates and weather vary year to year. Tracking your kilowatt-hour usage (not just the dollar amount) month over month gives a cleaner comparison.
▼ What if my windows are an unusual size and I cannot find thermal curtains wide enough?
Use multiple panels side by side rather than trying to find a single oversized panel. Two or three panels overlapping by 2 to 3 inches at the center actually seal better than a single wide panel, which tends to bow and create gaps. For very wide picture windows or sliding doors, floor-to-ceiling thermal curtain panels on a ceiling-mounted track are the most effective and widely available solution.
Quick Tips
- In winter, open south-facing thermal curtains during daylight hours to capture free passive solar heat, then close them at sunset to retain what was gained. This one habit can offset several dollars of heating cost per week in a cold climate.
- Layer thermal curtains over existing blinds or cellular shades rather than replacing them. The combination traps a larger still-air buffer and achieves higher effective R-values than either window treatment alone.
- Choose lighter-colored or white curtain backing for south- and west-facing rooms where summer cooling is the priority. Light colors reflect solar radiation rather than absorbing it, improving summer performance by 10 to 20% compared to dark-backed panels.
- Wash thermal curtains according to manufacturer instructions at least once per year. Dust accumulation in the insulating batting layer reduces its effectiveness, and clean curtains also hang more flatly against the frame, improving the edge seal.
Variations for Your Situation
- Apartment/Rental: Renters can get nearly the same thermal benefit without drilling by using tension rods inside the window recess and choosing lightweight thermal panels under 8 pounds per rod. IKEA MAJGULL and Amazon Basics blackout thermal panels both fit this use case at $20 to $40 per pair. Pair them with magnetic curtain tape pressed against the window frame to seal edges without leaving any marks.
- Tight Budget (under $50): Focus on one or two highest-impact windows first, typically the largest west-facing window in the room you spend the most time in. A single pair of budget thermal curtains at $25 to $35 on a $10 tension rod can measurably reduce afternoon heat gain or winter drafts in that one room and pay back within one season. Skip the hardware upgrades and pelmet for now; proper sizing and overlap give you 80% of the benefit.
- Older Home (pre-1980): Older homes often have single-pane windows with aluminum or steel frames, both of which conduct heat aggressively and can have effective R-values as low as R-0.9. In these homes, thermal curtains deliver outsized returns because the baseline heat loss is so high. Prioritize full-length floor-to-ceiling panels on all bedroom and living room windows, and add the side-sealing weatherstripping step from the DIY approach since older frames are less uniform and gaps are more pronounced.