
Your attic is the single biggest source of heat loss in most homes. During winter, warm air rises, finds the path of least resistance, and escapes straight through an under-insulated attic ceiling — taking your heating dollars with it. The U.S. Department of Energy estimates that adding insulation to an under-insulated attic can cut heating and cooling costs by 10 to 50%, depending on your climate and current insulation levels. For the average homeowner spending $1,200 to $1,500 per year on heating, that can translate to $120 to $750 in annual savings.
The frustrating part? Most homeowners have never looked. Attics are out of sight and out of mind, yet they are often the lowest-hanging fruit in any home energy audit. Insulation settles and degrades over time, pests damage it, and many homes built before 1980 were simply never insulated to modern standards. The current DOE recommendation for most of the continental U.S. is R-38 to R-60 in the attic, but millions of homes sit at R-11 or less.
This guide walks you through a quick visual inspection you can do in 15 minutes, explains exactly what you are looking for, and gives you two clear paths forward — a budget DIY insulation top-off you can do in a weekend, and a professional blown-in upgrade for maximum results. By the end, you will know your attic’s R-value, what it should be, and a realistic payback timeline for fixing it.
What You’ll Need
Click on an item below to shop for the recommended items for this recipe on Amazon.
As an Amazon Associate, we earn from qualifying purchases.
How to Do It
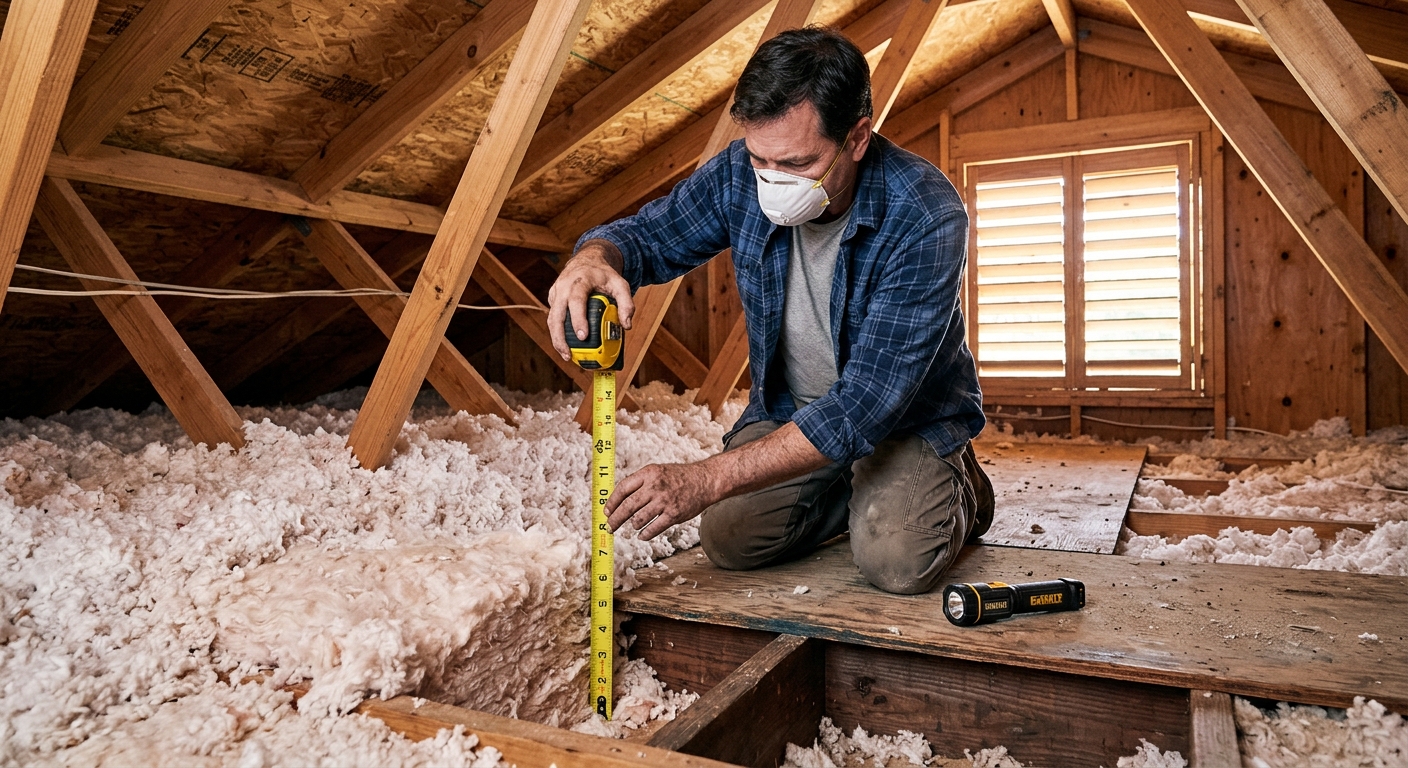
- Put on a dust mask, safety glasses, and old clothing. Bring a tape measure, a flashlight, and your phone to take photos.
- Access your attic hatch and immediately check the hatch door itself. It should have rigid foam or batt insulation attached to the attic-facing side and weatherstripping around the frame. Most do not, and an uninsulated hatch can be the equivalent of a basketball-sized hole in your ceiling.
- Measure the depth of your existing insulation with the tape measure in three or four spots across the attic floor. Fiberglass batts in 2×6 joists are roughly R-19; if the batts are flush with or below the tops of the joists, your attic is under-insulated.
- Look for visible gaps, pest damage, water stains, or matted insulation — any of these reduce performance significantly and should be addressed before adding new material.
- Check for air leaks around recessed light fixtures, plumbing vent pipes, and any wiring penetrations in the attic floor. These are the biggest energy losers and must be sealed before adding insulation.
- Use this rule of thumb: if you can see the tops of the attic floor joists, you almost certainly need more insulation. The DOE recommends a minimum of R-38 (about 12 inches of blown fiberglass or 10 inches of blown cellulose) for most U.S. climate zones.
- Before adding any insulation, seal every air leak you found during your inspection. Use canned spray foam (low-expansion) for gaps up to 3 inches around pipes and wires, and rigid foam board plus foam for larger gaps around chimneys or framing. Do not skip this step — insulating over air leaks is the most common and costly DIY mistake.
- Install an insulated attic hatch cover kit ($30 to $80 at home improvement stores) or attach 2-inch rigid foam (R-10) to the back of the hatch door and add adhesive foam weatherstripping around the perimeter.
- Install temporary walkboards across the joists so you can move through the attic without stepping through the ceiling and to create a stable work platform.
- Calculate how many bags you need: measure your attic square footage and check the bag coverage chart at your target R-value. To reach R-49 over existing R-11 fiberglass batts in a 1,000 sq ft attic, you will typically need 30 to 35 bags of blown fiberglass (at roughly $12 to $16 per bag).
- Pick up the blower machine from the store, set it up outside or in the garage, and run the hose through the attic hatch. Work from the far end of the attic back toward the hatch, applying blown-in insulation evenly. Use depth markers (simple stakes or rulers) every few feet to confirm you are hitting your target depth.
- Once complete, re-check depth in multiple spots, remove walkboards carefully, and confirm the attic hatch cover is properly sealed before closing up. Your payback begins immediately with the next heating bill.
- Get a home energy audit first if possible. Many utilities offer them free or at low cost, and the audit report gives contractors a clear target and documents your baseline energy use for before-and-after comparison.
- Request quotes from insulation contractors specifying that you want comprehensive air sealing completed before insulation is added. Ask each contractor to identify and seal top plates, penetrations, and the attic hatch as part of the scope.
- Ask about material options: blown-in fiberglass (R-2.2 per inch) and blown-in cellulose (R-3.5 per inch) are both cost-effective. Open-cell spray foam (R-3.7 per inch) applied to the roof deck instead of the attic floor creates an unvented attic that can also protect HVAC equipment and ducts from extreme temperatures, but costs significantly more at $3 to $5 per square foot.
- Confirm the contractor will install baffles (ventilation channels) at the eaves before adding insulation, to maintain proper soffit-to-ridge airflow. Without baffles, blown-in insulation can block soffit vents and cause moisture and structural problems.
- Apply for utility rebates and the federal 30% tax credit (Form 5695) before the project closes out. Get the contractor’s documentation of materials and R-values installed, as you will need it for the credit.
- Schedule a follow-up energy audit or blower door test 60 days after installation to confirm results and verify that air sealing was effective.
Why It Works: The Benefits
Bringing attic insulation up to DOE-recommended levels (R-38 to R-60) can reduce annual heating and cooling costs by 10 to 50%, with average savings of $200 to $600 per year depending on climate zone and current insulation level.
A properly insulated attic floor reduces the temperature differential between your top-floor rooms and the rest of the house, eliminating cold spots and the frustrating overwork of your thermostat trying to compensate.
When your attic is well-insulated, your furnace and air conditioner run shorter, less frequent cycles. Fewer run hours per season means less mechanical wear, potentially adding years to equipment life and delaying a $4,000 to $10,000 replacement.
Under the Inflation Reduction Act, homeowners can claim a federal tax credit of up to 30% (capped at $1,200 per year) for insulation improvements. Many utilities also offer rebates of $0.10 to $0.20 per square foot of added insulation.
In cold climates, poor attic insulation allows heat to escape through the roof, melting snow that refreezes at the cold eaves and forms ice dams. Proper insulation keeps the roof deck uniformly cold, preventing costly ice dam damage.
💰 Savings Impact by Action
Upgrading from R-11 to R-38 can reduce heating and cooling energy loss through the ceiling by up to 30% annually according to DOE data.
Sealing attic floor penetrations before insulating reduces convective heat bypass losses by up to 20% of total heating energy use.
Insulating and weatherstripping an unprotected attic hatch can eliminate a gap equivalent to leaving a window cracked open all winter, saving up to 8% on heat loss from that assembly alone.
Combining air sealing, attic floor insulation to R-49, and hatch coverage can reduce total home heating and cooling costs by 10 to 50%, with the midpoint around 45% in climate zones 5 and 6.
🏠 Key Concepts Explained
The Science Behind It
Heat always moves from warm areas to cold ones — this is the second law of thermodynamics, and it works against you every winter. The rate at which heat flows through a building assembly is governed by the temperature difference on each side and the thermal resistance (R-value) of the materials in between. A low R-value means faster heat loss, which means your furnace must cycle on more often to replace what escapes. When you double the R-value of your attic insulation, you roughly cut the rate of conductive heat loss through the ceiling in half.
But insulation only addresses conductive heat loss. Air infiltration drives convective heat loss, which is fundamentally different and often worse. Warm interior air carries latent heat energy. When that air leaks through gaps into the attic and is replaced by cold outside air leaking in at the basement or lower walls, you are not just losing resistance to temperature transfer — you are physically replacing warm air with cold air. Studies by Lawrence Berkeley National Laboratory found that air leakage can account for 25 to 40% of heating and cooling energy loss in a typical home, and much of that leakage path runs through the attic floor.
The interaction between these two mechanisms explains why the inspection sequence matters so much. Adding 10 inches of blown-in insulation over an unsealed attic floor is far less effective than adding 6 inches over a properly air-sealed floor. The insulation slows conduction, but unchecked air movement creates convective loops that carry heat right past the insulation fibers. This is why building science professionals always say: air seal first, then insulate.
Frequently Asked Questions
▼ How do I know what R-value my attic insulation is right now?
Measure the depth of your insulation with a ruler in several spots. For blown-in fiberglass, multiply depth in inches by 2.2 to get approximate R-value. For blown-in cellulose, multiply by 3.5. For standard fiberglass batts in 2×6 joists, assume roughly R-19 if they fill the joist cavity completely, or significantly less if they are compressed or partial. A depth of 3 to 4 inches or less in most homes means you are well below the recommended R-38 minimum.
▼ My heating bills are high but my attic already has some insulation. Is it worth adding more?
Yes, in most cases. The DOE’s recommended R-value for climate zones 4 through 7 (covering most of the northern U.S.) is R-49 to R-60, and the majority of homes fall short. Even going from R-19 to R-38 cuts the rate of heat loss through the ceiling roughly in half. If your insulation is older than 20 years, also check whether it has settled, been disturbed by pest activity, or been compressed by stored items — all of which reduce effective performance beyond what the depth measurement suggests.
▼ Can I just add insulation myself without sealing air leaks first?
You can, but you will get significantly less benefit. Air leaks around recessed lights, plumbing penetrations, and top plates can bypass insulation entirely and account for a large share of your heat loss. Think of it this way: insulation is a sweater, but air sealing is a windbreaker. Without the windbreaker, the sweater underperforms. Spend 60 to 90 minutes sealing the major gaps before you add any new material and you will see meaningfully better results.
▼ My home was built in the 1960s. Is there anything special I should watch out for?
Homes built before 1978 may have aluminum wiring, which requires careful attention around insulation installation — consult an electrician if you see silver-colored wiring rather than copper. Homes from this era may also have knob-and-tube wiring, which should not be covered with insulation without an electrician’s sign-off. Check for vermiculite insulation (gray, granular, pebble-like material), which was popular through the 1980s and may contain asbestos — if you see it, do not disturb it and hire a certified asbestos inspector before proceeding.
▼ How soon will I actually see savings on my bill after adding insulation?
Most homeowners see a measurable reduction on the first full heating bill after the improvement, typically within 30 to 60 days depending on your billing cycle. The savings are most visible during the coldest months when the temperature differential between inside and outside is greatest. For a full-season comparison, track your energy use in kWh or therms (not just dollar amounts, which fluctuate with rate changes) versus the same months from the prior year.
Quick Tips
- Use the DOE’s ZIP Code insulation calculator at energystar.gov to find the exact recommended R-value for your climate zone before buying materials.
- Check your insulation depth in at least five different spots — near the hatch, near the eaves, in the center, and in any corners. Uneven depth is common and tells you where heat loss is worst.
- Blown-in cellulose is made from recycled newspaper and has a higher R-value per inch than blown-in fiberglass (R-3.5 vs. R-2.2), making it the better choice when headroom is limited in your attic.
- Take before-and-after photos of your insulation depth with a ruler for your records, especially if you plan to claim the federal tax credit or a utility rebate.
Variations for Your Situation
- Apartment/Rental: Renters in top-floor units can still reduce heat loss through the ceiling by talking to their landlord about attic insulation, framing it as a moisture and structural protection issue as well as an energy issue. In the meantime, focus on interior air sealing around light fixtures and ceiling fans in your unit, and use a door snake or insulated cover on the attic hatch if it is accessible from inside your unit. A draft stopper kit runs $15 to $30 and requires no landlord permission.
- Tight Budget (under $50): The highest-impact zero-to-low-cost step is sealing your attic hatch. Buy a $5 can of spray foam and seal around the hatch frame from inside the attic, then attach a layer of 1-inch rigid foam ($8 to $12 per sheet) to the attic-facing side of the hatch door with construction adhesive. Add adhesive foam weatherstripping around the perimeter for another $10. This single fix can reduce heat loss through the hatch opening by 80% for under $35 total.
- Older Home (pre-1980): Older homes were built before modern energy codes and often have R-7 to R-11 in the attic at best, far below the current minimum recommendation of R-38. Prioritize a professional energy audit before DIYing, because older homes frequently have hazardous materials (asbestos, lead paint, knob-and-tube wiring) that affect how insulation work can be safely done. Many utilities offer free or subsidized audits plus low-interest financing for insulation upgrades specifically targeted at pre-1980 housing stock.
