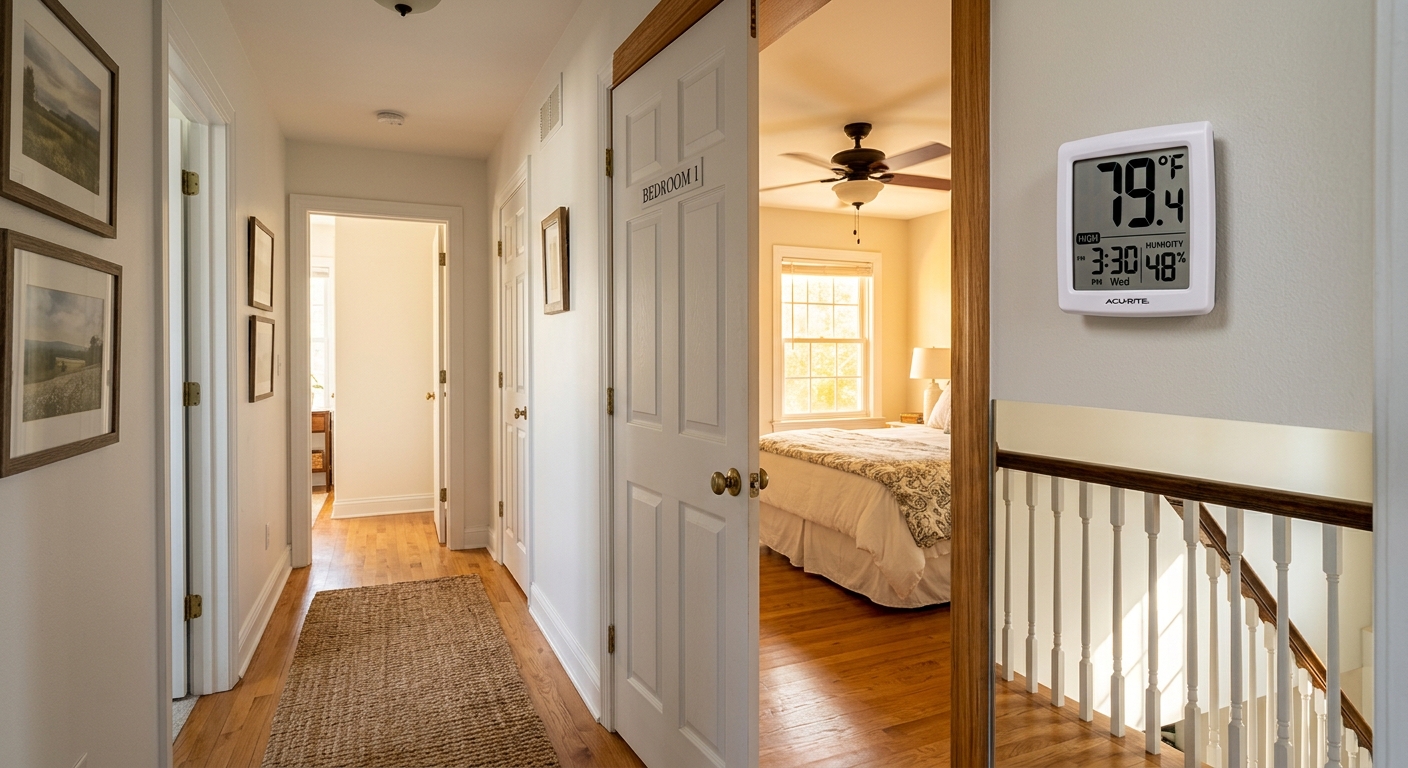
If you dread climbing the stairs in July, you are not alone. Upstairs bedrooms that run 8 to 12 degrees hotter than the main floor are one of the most common complaints homeowners bring to HVAC technicians, and the frustrating part is that cranking the thermostat lower rarely solves it. You end up with an ice-cold living room and still-stuffy bedrooms, plus a higher electricity bill to show for it.
The real problem almost never comes down to a single cause. Heat pouring through an under-insulated attic, leaky duct connections losing 20 to 30% of conditioned air before it reaches upstairs vents, and basic physics working against you all compound each other. Until you address the underlying building science issues, no thermostat setting will fully close that temperature gap.
This guide breaks down exactly why heat stacks up on your upper floor, ranks the fixes from free to professional-grade, and gives you real numbers so you can decide which approach fits your budget and timeline. Whether you have an afternoon and a caulk gun or you are ready to call in a contractor, there is a meaningful improvement you can make starting today.
What You’ll Need
Click on an item below to shop for the recommended items for this recipe on Amazon.
As an Amazon Associate, we earn from qualifying purchases.
How to Do It
- Set your thermostat fan to ON instead of AUTO so air circulates continuously and mixes between floors, reducing stratification by 2 to 3 degrees.
- Close registers on the ground floor by 25 to 30% to redirect more conditioned airflow upstairs. Do not fully close them, as this can damage your blower motor.
- Add a box fan or tower fan pointing outward in a north-facing upstairs window at night to exhaust accumulated heat. Night air below 70 degrees can cool a room 4 to 6 degrees in under an hour.
- Install blackout cellular shades on west and south-facing upstairs windows. These cut solar heat gain by up to 80% compared to bare glass and cost $25 to $60 per window.
- Check that all upstairs supply registers are fully open and not blocked by furniture or bedding. A single blocked register can raise room temperature 3 to 5 degrees.
- On a hot afternoon, walk your attic with a flashlight and infrared thermometer. Identify hot spots above bedrooms and locate all penetrations including recessed lights, plumbing stacks, electrical wires, and the attic hatch.
- Seal all gaps larger than a quarter inch with fire-rated caulk or two-part spray foam (use low-expansion foam near recessed lights). Pay special attention to the top plates of interior walls, which often have large open gaps running the length of the wall.
- Build a foam or rigid insulation dam around any recessed light cans that are not rated for insulation contact (marked IC on the housing). This prevents insulation from touching a heat source while still blocking airflow.
- Weatherstrip and insulate your attic access hatch. An uninsulated hatch is essentially a hole in your thermal barrier. Add 4 to 6 inches of rigid foam to the back of the hatch door for an estimated R-20 to R-30.
- After sealing, check your existing insulation depth with a ruler. The DOE recommends R-49 to R-60 for most of the US (roughly 15 to 20 inches of blown cellulose or fiberglass). If you are at R-19 or less, adding insulation is your highest-ROI next step.
- Re-check the upstairs temperature the following afternoon. Most homeowners report a 3 to 6 degree reduction in peak upstairs temperature after a thorough air sealing weekend.
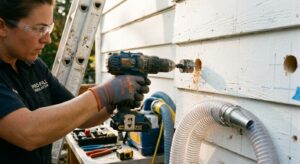
- Hire a BPI-certified energy auditor or HVAC contractor to perform a blower door test and duct blaster test. This gives you a baseline leakage number and shows exactly where your duct system is losing conditioned air.
- Have the contractor seal all accessible duct connections in the attic using mastic sealant (not duct tape, which fails within 2 to 5 years). Focus on connections near the air handler and at every branch junction.
- Request insulated flex duct or rigid metal duct with insulated wrap rated to at least R-8 for any ducts running through unconditioned attic space. Uninsulated ducts in a 150-degree attic can lose 30 to 40% of cooling capacity before the air reaches the register.
- Have blown-in insulation added to the attic floor to bring levels to R-49 or higher. For a 1,500 square foot attic, expect to pay $1,200 to $2,500 depending on current insulation levels and material choice.
- Consider requesting a whole-house zoning damper system or a ductless mini-split for the upper floor if the temperature gap persists after duct and insulation work. A mini-split for one or two upstairs bedrooms typically costs $2,500 to $4,000 installed and solves the problem permanently.
Why It Works: The Benefits
Sealing attic air leaks and upgrading insulation to R-49 can reduce cooling energy use by 20 to 30% according to ENERGY STAR data, saving a typical homeowner $200 to $400 per cooling season depending on climate and home size.
Addressing duct leakage and attic insulation together typically closes the floor-to-floor temperature gap from 8 to 12 degrees down to 2 to 4 degrees, making upper bedrooms genuinely comfortable without freezing the main floor.
When your home holds conditioned air more efficiently, your AC cycles less frequently. Shorter, less frequent cycles can extend system life by several years and reduce the chance of a costly mid-summer breakdown.
Sleep research consistently shows that a room temperature of 65 to 68 degrees Fahrenheit supports deeper, more restorative sleep. Bringing an overheated bedroom from 82 degrees down to that range is a direct quality-of-life improvement, not just an energy metric.
Sealing attic penetrations stops the infiltration of attic dust, insulation fibers, and outdoor allergens that get pulled into bedrooms through ceiling gaps when the stack effect creates negative pressure on upper floors.
💰 Savings Impact by Action
Sealing attic penetrations stops hot air bypass and reduces cooling load by up to 20% according to DOE data.
Upgrading attic insulation to R-49 reduces heat conduction through the ceiling by 15 to 25% compared to R-19 or less.
Sealing leaky attic ducts with mastic recovers 20 to 30% of conditioned air currently lost before reaching upstairs registers.
Cellular shades on south and west windows block up to 80% of solar heat gain, cutting room-level cooling load by roughly 10%.
Continuous fan circulation and night ventilation reduce thermal stratification by 2 to 4 degrees with minimal energy cost.
🏠 Key Concepts Explained
The Science Behind It
Heat moves in three ways: conduction, convection, and radiation. Your upstairs bedroom suffers from all three simultaneously on a hot summer day. Radiant heat from a sun-baked roof (which can reach 150 to 170 degrees Fahrenheit) warms the attic air and roof deck. That heat then conducts through your ceiling joists and drywall, raising the surface temperature of your bedroom ceiling and radiating warmth downward even when the air conditioner is running. This is why upstairs rooms often feel warm even when the air feels slightly cooler, the surfaces around you are acting like low-grade radiators.
Convection compounds the problem through the stack effect. Physics dictates that warm air is less dense and rises, so heat generated anywhere in your home migrates upward and collects on the top floor. Your stairwell functions as a chimney, continuously delivering rising warm air to the upper level. At the same time, any unsealed gaps in your ceiling allow hot attic air (which can be 130 to 150 degrees Fahrenheit in summer) to mix directly with your conditioned living space, a process that completely bypasses whatever insulation you have installed because it moves air rather than just resisting heat flow through solid material.
The duct system adds a third layer of inefficiency. Supply ducts routed through an unconditioned attic sitting at 130 degrees lose a significant portion of their cooling capacity to the surrounding heat before the air reaches the bedroom register. Studies from Lawrence Berkeley National Laboratory found that duct systems in unconditioned spaces can lose 25 to 40% of their delivered cooling energy. That means your air conditioner may be doing its job perfectly at the air handler, but by the time the air travels 30 feet of uninsulated flex duct through a superheated attic, it arrives at the register noticeably warmer and less capable of cooling the room.
Frequently Asked Questions
▼ Why is my upstairs still hot even though I just had new insulation blown in?
Insulation without air sealing is only part of the solution. If the contractor did not seal gaps around recessed lights, plumbing penetrations, and wall top plates before blowing in insulation, hot attic air is still bypassing your new insulation through those openings. Have a contractor perform a blower door test to quantify remaining air leakage, then seal the penetrations identified. You should see a noticeable improvement within the next hot weather cycle.
▼ My AC is only 3 years old. Can a new system really still leave upstairs that hot?
Yes, a new and correctly functioning AC system can absolutely produce an 8 to 12 degree floor-to-floor temperature gap if the underlying building envelope and duct issues are not addressed. The system capacity and efficiency are not the problem; heat gain through the attic and conditioned air lost through leaky ducts are. A new system working harder to compensate will wear out faster and cost more to run without ever fully solving the comfort problem.
▼ Can I just add a window AC unit to the hottest bedroom instead of doing all this work?
A window unit is a fast, low-cost fix (typically $150 to $350) that will absolutely cool that specific room. However, it does nothing to fix the underlying heat gain, which means your central system still runs harder to compensate for the whole upper floor, and you add the window unit’s operating cost on top. If you are renting or on a tight budget, a window unit is a reasonable short-term solution while you save for the more permanent fixes.
▼ What if I have a two-story home with the thermostat upstairs? Is that better?
Having the thermostat on the upper floor does help ensure the system runs until the upstairs reaches the set point, but it can overcool the main floor significantly in the process. A better long-term solution is a smart thermostat with a remote sensor placed in the hottest upstairs bedroom, allowing the system to average the two readings or to prioritize the upper floor during peak afternoon hours. Ecobee and Nest both offer this remote sensor capability for $150 to $250 total.
▼ How long after attic air sealing will I notice a difference on my energy bill?
You should notice a difference in the first full billing cycle after completing the work, typically 30 to 60 days. Most homeowners report a 15 to 25% reduction in cooling costs when attic air sealing is combined with adequate insulation levels. The comfort improvement, meaning a smaller floor-to-floor temperature gap, is usually noticeable within the first few hot days after the work is done.
Quick Tips
- Run a ceiling fan counterclockwise (looking up) in summer at the highest speed. This creates a wind-chill effect that makes a 78-degree room feel like 74 degrees at essentially zero energy cost beyond the fan itself.
- Check your attic insulation depth with a simple ruler through the hatch before calling anyone. Many homes built before 1990 have only 4 to 6 inches of insulation (R-11 to R-19) when R-49 is the current DOE recommendation for most US climates.
- Schedule any attic work for early morning or late evening. Attic temperatures regularly exceed 130 degrees by midday in summer, creating a genuine heat illness risk for anyone working up there.
- Ask your utility company about free or subsidized energy audits before spending money on any upgrade. Many utilities offer blower door tests and infrared scans at no cost, and some provide rebates of $200 to $800 on qualifying insulation projects.
Variations for Your Situation
- Apartment/Rental: If you are in a top-floor apartment with a hot ceiling, focus on what you can control without structural changes. Install cellular blackout shades on south and west windows ($25 to $60 each) to cut solar heat gain by up to 80%. Use a portable evaporative cooler or a portable AC unit with a window exhaust kit (no permanent installation required). Ask your building manager about having attic insulation inspected, framing it as a comfort and noise concern rather than an energy issue, since landlords are more likely to act when the request sounds maintenance-related.
- Tight Budget (under $50): Start with the fan-to-ON thermostat setting (free), partial ground-floor register closure (free), and night ventilation using an existing box fan (free). Spend your $50 on weatherstripping and insulating foam tape for the attic hatch, which is the single highest-return DIY fix available for under $30. These steps alone can reduce the temperature gap by 3 to 5 degrees and cost almost nothing.
- Older Home (pre-1980): Homes built before 1980 often have plaster ceilings, minimal wall insulation, and attics with only 3 to 4 inches of original insulation (R-11 or less). Before doing any attic work, budget $200 to $400 for an asbestos test on existing insulation if it appears granular or vermiculite-like. Older homes also tend to have more significant air sealing opportunities since original construction standards did not require sealing penetrations. A thorough air sealing job in a pre-1980 home often delivers 25 to 35% cooling savings, higher than the typical range, because the baseline leakage is so much worse.