Your basement is one of the biggest sources of heat loss in a typical home, yet most homeowners either skip it entirely or insulate the wrong surface first. Whether you have a conditioned basement you use as living space or an unheated crawl-like storage area, the choice between insulating the walls versus the ceiling has a dramatic impact on how effective your investment turns out to be — and how quickly it pays back.
The core question comes down to this: do you want your basement inside your home’s thermal envelope, or outside it? Insulating the walls pulls the basement into the conditioned space, stabilizing its temperature and protecting pipes from freezing. Insulating the ceiling treats the basement as an unconditioned buffer zone, shielding the floor above from cold. Both strategies work, but mixing them up or doing them halfway leads to wasted money, moisture problems, and comfort issues that are hard to diagnose later.
In this guide, we break down exactly when to insulate walls versus the ceiling, what materials to use, realistic cost and savings numbers, and a step-by-step approach for both the DIY homeowner and anyone ready to bring in a pro. By the end, you will have a clear decision framework tailored to your specific basement situation.
What You’ll Need
Click on an item below to shop for the recommended items for this recipe on Amazon.
As an Amazon Associate, we earn from qualifying purchases.
How to Do It
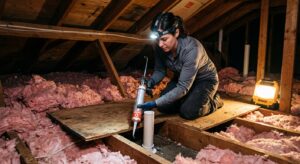
- Put on a respirator and safety glasses. Inspect the entire perimeter of the rim joist area (the band of framing sitting on top of the foundation wall) for gaps, cracks, and utility penetrations.
- Seal all gaps larger than 1/4 inch with canned expanding foam (low-expansion for around windows and doors, standard for other gaps). Pay special attention to where the sill plate meets the foundation and around any pipes or wires penetrating the rim.
- Cut rigid foam board (polyisocyanurate or XPS, minimum R-10) into snug-fitting pieces sized to fill each bay between floor joists. Each piece should compress slightly for a friction fit.
- Push each foam piece firmly into the rim joist bay so it sits flush with the interior face of the rim joist. Seal all four edges with canned foam or acoustical sealant to create an airtight and thermally continuous barrier.
- For extra performance in very cold climates, add a second layer of foam cut slightly smaller than the first, staggering the seams, to reach R-15 or higher before finishing.
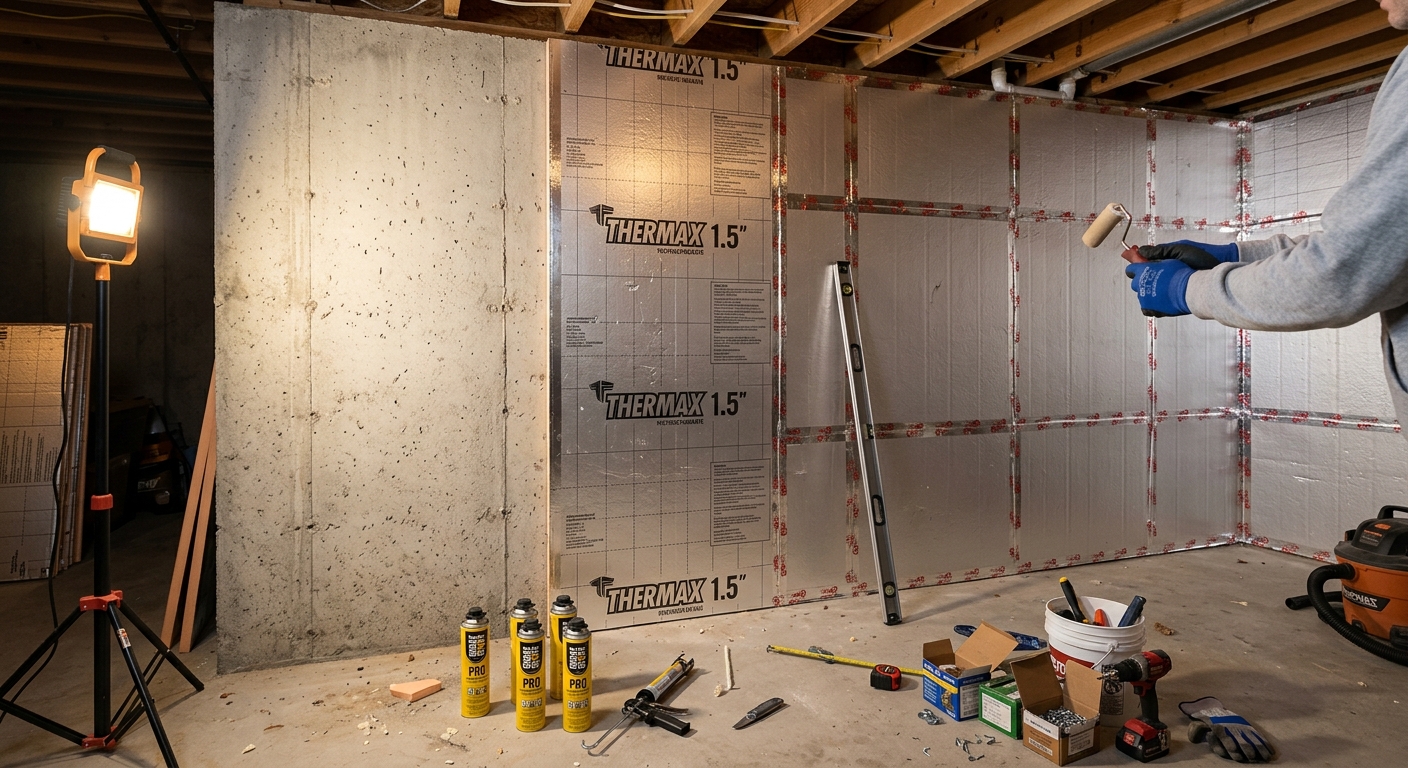
- Measure the total linear footage of your basement walls from the floor to the underside of the floor joists. Calculate square footage and add 10% for waste. Purchase 2-inch polyisocyanurate (polyiso) rigid foam board rated at R-13 or better.
- Clean the concrete walls with a stiff brush to remove dust, efflorescence, or loose material. Look for active water seepage or white mineral deposits. Do not proceed with insulation if you have active water intrusion — address drainage first.
- Apply construction adhesive rated for foam board in a serpentine pattern on the back of each foam panel, then press it firmly against the concrete wall. Work from one corner, butting panels tightly together and staggering vertical seams like brickwork.
- Seal all seams between panels with housewrap tape or foil tape (not standard duct tape). Seal the top edge where foam meets the floor joists and the bottom edge at the floor with canned foam or sealant to close the thermal envelope completely.
- In cold climates (DOE Zones 4 through 7), add a second layer of 1-inch foam staggered over the first to eliminate seam alignment and reach R-20, which meets or exceeds the 2021 IECC requirements for below-grade walls.
- Cover the foam with 1/2-inch drywall attached to furring strips or a pressure-treated stud wall built 1 to 2 inches away from the foam surface. This satisfies fire code and provides a finished surface for your basement space.
- Request quotes from at least three insulation contractors who are certified spray foam applicators. Ask specifically for closed-cell (not open-cell) foam for below-grade applications, as open-cell can absorb moisture.
- Before the crew arrives, remove stored items from the basement perimeter and protect any HVAC equipment, electrical panels, and flooring from overspray with plastic sheeting.
- The contractor will apply a minimum of 2 to 3 inches of ccSPF directly to the concrete or block walls, encapsulating the rim joist in the same pass. This creates an R-12 to R-21 seamless thermal and vapor barrier.
- Discuss coverage of the rim joist, sill plate, and any crawl space areas in the same scope of work. Bundling these together saves mobilization cost and ensures no thermal gaps in the system.
- After curing (typically 24 hours), inspect the surface with the contractor for thin spots or missed areas before they demobilize. Request a certificate of installed R-value for your home improvement records and potential future resale documentation.
- Check whether your utility offers a rebate for insulation upgrades. Many utilities and state energy offices rebate $0.10 to $0.25 per square foot of insulation installed, and closed-cell spray foam projects often qualify for the federal 25C energy efficiency tax credit worth up to 30% of project cost.
Why It Works: The Benefits
Properly insulating basement walls to R-15 or better can reduce whole-home heating energy use by 15 to 30%, with the higher end typical in cold climates like the Midwest and Northeast where basements account for a disproportionate share of the home’s heat loss.
Insulating either the basement ceiling or walls eliminates cold floor syndrome on the main level, raising floor surface temperatures by 5 to 10 degrees Fahrenheit in winter and noticeably improving comfort without changing the thermostat setting.
Bringing basement walls inside the thermal envelope keeps the basement temperature above 40 degrees Fahrenheit even in extreme cold, effectively eliminating the risk of frozen or burst pipes, which cost an average of $5,000 to $70,000 in repairs and water damage according to insurance industry data.
Wall insulation paired with a vapor barrier and finish material converts a cold, damp basement into genuinely habitable space, potentially adding 400 to 1,500 square feet of livable area without a costly addition.
A fully insulated basement reduces the temperature differential your furnace or heat pump must overcome, which can extend equipment life by reducing run cycles and may allow you to downsize equipment at replacement time, saving $500 to $1,500 on the next system purchase.
💰 Savings Impact by Action
Air sealing and insulating the rim joist alone reduces basement heat loss by 15 to 20% because it addresses the single most leaky and poorly insulated section of the basement envelope.
Insulating basement walls to R-15 or higher reduces whole-home heating energy use by 15 to 25% in cold climates by eliminating the continuous heat drain to the 50-degree surrounding soil.
Insulating the basement ceiling to R-19 when treating it as unconditioned space saves roughly 8 to 12% on heating bills by isolating cold basement air from the living space above.
Combining air sealing at the basement level with insulation reduces total home air leakage by up to 20%, improving the effectiveness of insulation by eliminating convective bypass loops.
Closed-cell spray foam at 3 inches on all basement walls and the rim joist can reduce heating bills by up to 30% because it simultaneously insulates, air seals, and vapor manages in a single continuous layer.
🏠 Key Concepts Explained
The Science Behind It
Heat moves in three ways: conduction, convection, and radiation. In a basement, conduction dominates. Concrete and block walls conduct heat roughly 25 times faster than an equivalent thickness of rigid foam, which is why an uninsulated 8-inch concrete wall has an effective R-value of only about R-1.5 to R-2. The surrounding soil acts as a giant thermal sink at a steady 50 to 55 degrees Fahrenheit, and because your conditioned basement may sit at 65 to 68 degrees in winter, there is a constant 10 to 18 degree temperature differential driving heat outward every hour of every day.
The decision between wall and ceiling insulation comes down to where you want to draw the thermal boundary. When you insulate the walls, you expand the thermal envelope to include the basement, and the entire mass of the concrete walls begins to act as thermal mass — slowly absorbing and releasing heat and moderating temperature swings. When you insulate only the ceiling, you exclude the basement from the thermal envelope entirely. The basement temperature will then track closer to the soil temperature (50 to 55 degrees), which protects pipes from freezing in many climates but can still allow cold floors above and means any HVAC equipment, ducts, or water heaters in the basement are operating in an unconditioned space, losing efficiency.
Moisture vapor behavior is the critical physics constraint that separates correct from incorrect basement insulation assemblies. Below-grade concrete walls can experience vapor drive from both directions depending on the season. In winter, warm interior air pushes moisture toward the cold concrete. In summer, moisture from warm, humid soil migrates inward through the wall. Closed-cell spray foam and foil-faced polyisocyanurate both have low vapor permeance and function as vapor retarders when applied at sufficient thickness, preventing moisture accumulation in the assembly. This is why the DOE and building science researchers consistently recommend rigid foam or spray foam on the interior face of concrete walls rather than fibrous insulation, which cannot manage moisture and frequently becomes a mold growth medium in basement applications.
Frequently Asked Questions
▼ Should I insulate basement walls or ceiling if I have a partially finished basement?
Insulate the walls in the unfinished sections first to close the thermal envelope around the entire basement. If some walls are already finished, focus on the unfinished portions and ensure the rim joist is sealed and insulated around the entire perimeter regardless of finish status. Mixing insulated and uninsulated walls in the same basement creates cold spots and moisture risk at the transitions.
▼ My basement walls are wet sometimes. Can I still insulate them?
Not until you resolve the moisture source. Active water intrusion indicates either hydrostatic pressure from poor grading or a drainage problem, or condensation from humid air hitting cold concrete. Grade the soil around your foundation so it slopes 6 inches downward within the first 10 feet from the house, extend downspouts at least 4 feet from the foundation, and run a dehumidifier to test whether condensation is the culprit. Only proceed with insulation after the walls have been dry for a full year through all seasons.
▼ Can I use fiberglass batts in my basement wall cavities to save money?
This is the most common and costly basement insulation mistake. Fiberglass batts in contact with or near concrete will absorb moisture vapor, lose R-value, and provide a growth medium for mold within a few years in most climates. If budget is the concern, rigid EPS foam board (the least expensive foam option at roughly $0.25 to $0.35 per square foot per inch) is still dramatically better than fiberglass for below-grade applications. Use batts only in above-grade stud wall cavities that are already protected from moisture by the foundation.
▼ How do I know if my basement insulation is actually working after I install it?
Check your floor temperature on the main level above the basement with an inexpensive infrared thermometer — it should read within 3 to 5 degrees of your thermostat setpoint after proper insulation. You can also monitor your heating bills month-over-month compared to the same period the prior year, adjusting for temperature differences. For a more rigorous check, hire an energy auditor to do a blower door test before and after, which will show measurable improvement in air leakage numbers if you also sealed the rim joist properly.
▼ Do I need a building permit to insulate my basement?
In most jurisdictions, adding insulation to an existing unfinished basement does not require a permit. However, if you are framing new walls, finishing the space, or applying spray foam (which requires a fire barrier), a permit is typically required. Call your local building department before starting any framing work, and always confirm fire code requirements for foam insulation — most codes require a thermal barrier such as 1/2-inch drywall over any exposed foam in an occupied or accessible space.
Quick Tips
- Insulate the rim joist first regardless of which wall strategy you choose — it is the fastest payback project in the entire basement.
- In DOE Climate Zones 4 and higher, aim for at least R-15 on basement walls and R-19 on the ceiling if treating the basement as unconditioned. The 2021 IECC actually requires R-15 continuous or R-19 cavity for new construction in these zones.
- If you plan to finish the basement in the next 5 years, do the wall insulation now before you frame. Adding foam behind a finished stud wall after the fact is nearly impossible without demolishing the finish work.
- Do not insulate the basement ceiling if you have HVAC ducts or a water heater in the basement — you would be placing them in an unconditioned space and offsetting much of your insulation savings through duct heat loss.
Variations for Your Situation
- Apartment or Condo Owner: If you own a ground-floor condo or apartment unit and have access to a crawl space or unfinished basement below, focus your effort on insulating the subfloor above the crawl space with R-19 to R-30 batts stapled between joists with a vapor barrier facing up, or better yet rigid foam glued to the underside of the subfloor. This is often within an owner’s rights and does not require landlord approval for common areas. Budget $200 to $600 in materials for a typical unit footprint.
- Tight Budget (under $300): Prioritize the rim joist exclusively — it is the single highest-return project in the basement at under $150 in materials. Buy two-inch XPS or polyiso foam board and one or two cans of expanding foam, and seal every bay around the entire perimeter. This alone can cut basement heat loss by 15 to 20% and pays back in one to two heating seasons. Skip wall or ceiling insulation until you have more budget.
- Older Home (pre-1980): Homes built before 1980 often have fieldstone, rubble, or older poured concrete foundations with highly irregular surfaces that make rigid foam board difficult to fit tightly. In these cases, spray foam applied by a contractor is often the only practical option for wall insulation because it conforms to irregular surfaces. Before any work, have the walls and any existing insulation tested for asbestos and lead paint, and budget an extra $200 to $500 for professional testing and any required remediation.