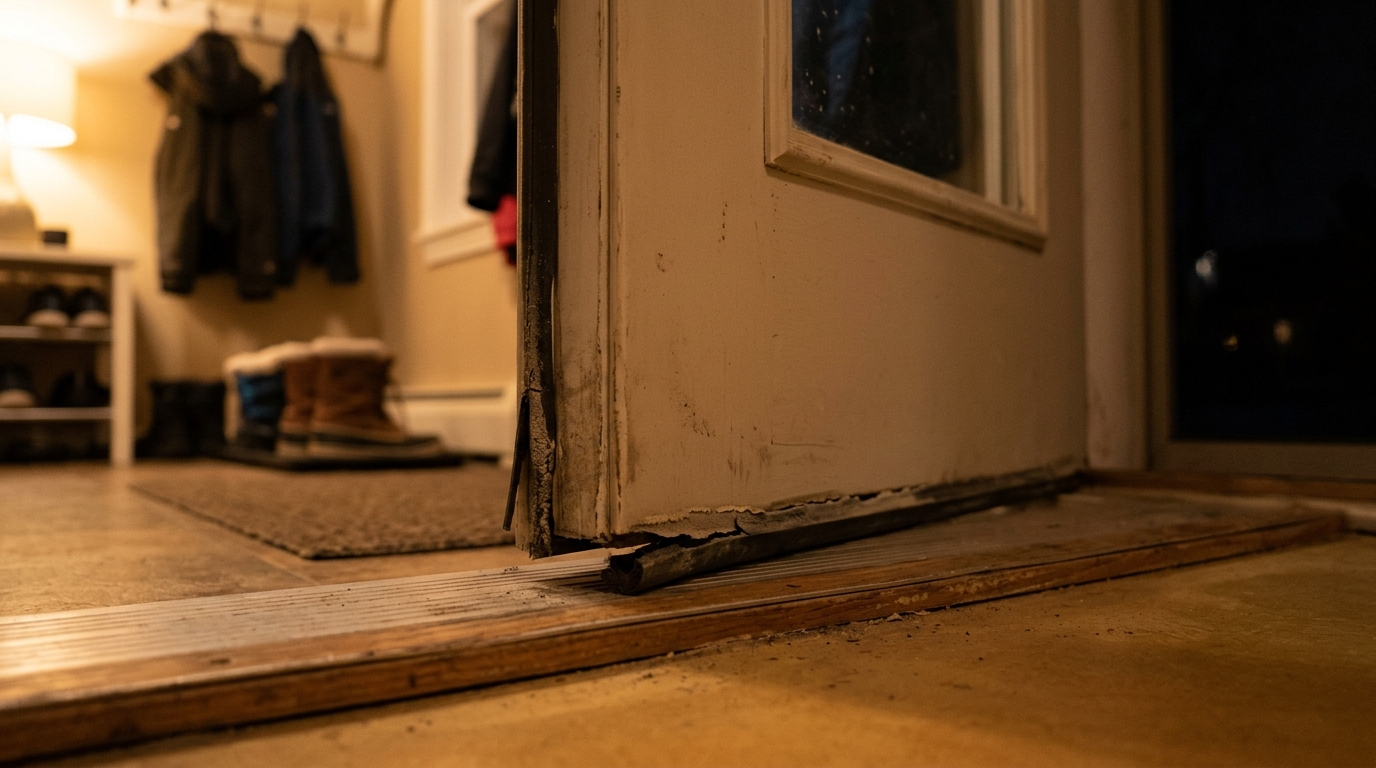
Think about how your mudroom door gets used. Kids kick it open with muddy boots, groceries bump the frame, dogs scratch at the threshold, and the door itself swings dozens of times a day. All that wear takes a toll on the weatherstripping, and because the mudroom is often a transitional space nobody thinks much about, a failing seal can go unnoticed for years.
Here is the problem: air leaks around exterior doors are among the biggest sources of wasted energy in a home. The U.S. Department of Energy estimates that air leakage accounts for 25 to 40 percent of the energy used to heat and cool a typical home, and doors are a major contributor. A gap of just 1/8 inch under a standard 36-inch door is roughly equal to a 4.5 square inch hole in your wall. At night, when outdoor temperatures drop and your furnace cycles to keep up, that leak runs around the clock.
This post walks you through how to find a failing mudroom door seal, how to fix it in as little as 15 minutes with a quick fix, and how to do a more durable DIY replacement that can last 5 to 10 years. You will also learn why the leak is worse at night, what savings to realistically expect, and when to call a pro.
What You’ll Need
Click on an item below to shop for the recommended items for this recipe on Amazon.
As an Amazon Associate, we earn from qualifying purchases.
How to Do It
- Do the dollar bill test: close the door on a bill at several points along the frame and bottom. If the bill slides out easily anywhere, that spot is leaking.
- Remove old, crumbling weatherstripping completely and clean the surface with rubbing alcohol so the new adhesive grips.
- Measure the top and both sides of the door frame, then cut self-adhesive foam or V-strip weatherstripping to length.
- Press the weatherstripping firmly into the door stop channel so it compresses about 25 to 30 percent when the door is closed.
- Attach a stick-on or screw-on door sweep to the bottom of the door, adjusting so it lightly brushes the threshold without dragging.
- Close the door and repeat the dollar bill test to confirm a snug seal.
- Pull out all existing weatherstripping and inspect the door stop and frame for rot, cracks, or gaps wider than 1/4 inch that need caulk or wood filler.
- Install kerf-in or tubular silicone weatherstripping around the top and sides, pressing it into the pre-cut groove or fastening it with a staple gun or nails per product instructions.
- Check your adjustable threshold: most have screws you can turn to raise the sill until it just touches the door bottom seal. Raise it in small increments, testing the seal each time.
- Replace the door bottom with a heavy-duty rubber or vinyl door shoe or sweep that screws to the door, trimming the length with a hacksaw if needed.
- Seal the gap between the door frame and the wall framing with low-expansion spray foam or caulk from the inside, if you can see daylight or feel air there.
- Test the finished seal with the dollar bill test and a flashlight at night: turn off lights, shine a light from outside, and look for any glow around the edges.
Why It Works: The Benefits
Sealing a leaky exterior door can reduce heating costs by 5 to 10 percent on that zone of the home. For a $150 monthly winter bill, that is $7 to $15 saved per month from one door.
Eliminating the leak removes the cold air stream that pools along your floor, making the mudroom and adjacent rooms noticeably more comfortable without raising the thermostat.
Cold air hitting warm, humid indoor air near a leaky door can cause condensation on the frame and floor. A tight seal reduces that moisture and protects wood trim and flooring.
The same gaps that let heat out let outdoor dust, pollen, and insects in. A proper seal helps keep all of them outside.
A well-sealed door can reduce outside noise by several decibels, which makes a real difference if your mudroom faces a street or garage.
💰 Savings Impact by Action
Replacing failed weatherstripping can cut air leakage through that door by 50 percent or more, reducing heating load in that zone by 10 to 20 percent.
Sealing a single leaky exterior door typically trims whole-house heating costs by 1 to 5 percent depending on home size and climate.
Adjusting the threshold and adding a quality door sweep closes the largest gap, often saving 5 to 10 percent on that door’s heat loss.
Eliminating the cold draft near the floor can raise perceived room temperature by 2 to 4 degrees, letting you lower the thermostat 1 to 2 degrees for added savings.
🏠 Key Concepts Explained
The Science Behind It
Air moves through any gap when there is a pressure difference between inside and outside. In winter, your home acts like a chimney. Warm air rises and escapes through the attic and upper walls, creating slightly lower pressure at the bottom of the house. Cold outdoor air rushes in through the lowest openings to fill that void, and an exterior door threshold is one of the lowest, largest openings in most homes. This is the stack effect, and it gets stronger as the indoor-outdoor temperature difference grows, which is why drafts feel worst on the coldest nights.
Weatherstripping works by creating a flexible barrier that fills the gap between door and frame. A good seal needs to compress, usually 25 to 50 percent depending on the material, to maintain contact despite seasonal expansion and contraction of the wood or metal. Over time, foam and rubber lose their ability to spring back. This is called compression set, and once it happens, the seal looks fine but no longer touches the door, leaving a hidden gap.
The energy cost of those gaps adds up quickly. According to the DOE, sealing air leaks around doors and windows can save 5 to 30 percent on annual heating and cooling costs when done throughout the home, and individual doors are often among the leakiest points. Because infiltration is a continuous flow rather than a one-time event, a small gap leaks heat every hour of every cold day, which is why a $20 repair can deliver outsized returns.
Frequently Asked Questions
▼ I replaced the weatherstripping but I still feel a draft. What now?
Check the bottom of the door and the threshold first, since that is the most common leak point. Adjust the threshold screws upward or install a heavier door sweep. If drafts persist at the corners, seal them with a dab of silicone caulk, and use a flashlight test at night to find hidden gaps.
▼ Can renters do this without landlord permission?
Yes, peel-and-stick weatherstripping and screw-on or adhesive door sweeps are generally considered tenant-friendly and do not damage the door. Keep receipts and original materials in case your lease requires restoring the door to its original condition. For anything involving removing hardware or modifying the frame, ask your landlord first.
▼ How long before I notice savings on my bill?
You will feel the comfort improvement immediately, but bill savings show up over the first full heating cycle. For a typical home, expect to save $15 to $60 per winter from one well-sealed door, so a $20 to $40 fix often pays for itself within 1 to 3 months of cold weather.
▼ What if my home is older than 30 years?
Older homes often have warped door frames, worn thresholds, and wider gaps that basic weatherstripping cannot fully close. Start with high-quality compression weatherstripping and a heavy door sweep, and consider adding a storm door or replacing the threshold if gaps exceed 3/8 inch. A carpenter can often rehang or shim an old door for a modest fee.
▼ Should I just replace the door instead?
Usually not as a first step. A new insulated steel or fiberglass door costs $500 to $2,000 installed, while weatherstripping fixes most air leakage for under $50. Replace the door only if it is warped, rotted, damaged, or if the frame is out of square beyond what shimming and new seals can correct.
Quick Tips
- Do the dollar bill test at 6 to 8 points around the door, not just one or two. Leaks are often uneven, especially at the latch side and bottom corners.
- Choose silicone or EPDM rubber weatherstripping over cheap foam for a mudroom door. These materials resist compression set and last 5 to 10 years versus 1 to 2 for basic foam.
- Add a door sweep with a vinyl or rubber fin if the gap at the bottom exceeds 1/4 inch. Adjustable threshold screws alone may not close large gaps.
- Inspect weatherstripping every fall before heating season. A 5-minute check can catch problems before they cost you money.
- If your mudroom door has a glass panel, check the glazing seal and caulk around the glass too, as it can leak air and lose significant heat.
Variations for Your Situation
- Apartment/Rental: Use peel-and-stick silicone weatherstripping ($8 to $15) and a stick-on or slide-on door sweep ($10 to $20). Both install without tools or permanent changes and can be removed when you move out. Add a draft stopper ($10 to $15) on the inside as a bonus layer.
- Tight Budget (under $50): Skip the premium products. Buy a roll of foam weatherstripping ($6 to $10) and a basic vinyl door sweep ($8 to $12). Use the dollar bill test to target only the worst leaks, and if you have old towels, roll one against the bottom of the door on cold nights for a free temporary fix.
- Older Home (pre-1980): Expect warped frames, worn thresholds, and larger gaps. Use thicker, more compressible weatherstripping like tubular silicone or V-strip, and seal gaps between the frame and wall with caulk or low-expansion foam. A storm door ($150 to $350) adds a second air barrier and can cut heat loss through the door by 40 to 50 percent.