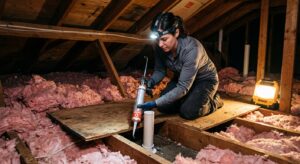
You go to bed comfortable, then wake up at 3 AM pulling the blanket tighter, wondering why the house feels colder even though the thermostat has not moved. The cause is often not your furnace. It is the invisible network of gaps in your attic floor, around light fixtures, wiring holes, plumbing stacks, and the attic hatch, that lets heated air leak out while cold air gets pulled in from outdoors.
This happens because of the stack effect. Warm air rises through those gaps, and as it escapes at the top of your house, it creates a slight vacuum that pulls cold air in through leaks lower down, like around doors, windows, and the rim joists in the basement. By the early morning hours, outdoor temperatures bottom out, the temperature difference peaks, and the stack effect is at its strongest. That is why the drop feels so noticeable around 3 AM.
The good news is that air sealing your attic is inexpensive, mostly DIY friendly, and often delivers more comfort per dollar than adding insulation alone. In this post, we walk through why it works, two practical approaches (a quick fix you can do this weekend and a full DIY upgrade), what to watch out for, and how long it takes to see real savings.
What You’ll Need
Click on an item below to shop for the recommended items for this recipe on Amazon.
As an Amazon Associate, we earn from qualifying purchases.
How to Do It
- Weatherstrip the attic hatch or pull-down stairs. Apply self-adhesive foam weatherstripping around the opening so the hatch compresses tight when closed, then add a rigid foam board cover or a pre-made insulated hatch cover on the attic side.
- Seal gaps around plumbing vent stacks and wire penetrations using a can of low-expansion spray foam or fire-rated caulk, depending on the gap size. Focus on any gap larger than a pencil width.
- Stuff and seal the open top plates and wall cavities you can see. Use pieces of rigid foam cut to fit, then seal the edges with spray foam or caulk. Do not rely on loose fiberglass alone to stop air.
- Pull back existing insulation near the attic floor edges and look for dark, dirty spots. Those stains mark where air has been flowing through the insulation, and they show you exactly where to seal.
- Replace the insulation after sealing and top it off evenly. Do not compress it, since compressed insulation loses R-value.
- Plan your attack from inside the attic. Wear a respirator, safety glasses, gloves, and long sleeves, and lay boards across the joists so you do not step through the ceiling drywall.
- Pull back insulation along the entire attic floor perimeter and over interior walls to expose the top plates. Seal the gap between the top plate and drywall with caulk or spray foam.
- Seal around every penetration: recessed light housings (use IC-rated, airtight covers or swap to sealed LED fixtures), electrical boxes, bath fan housings, wiring bundles, and plumbing stacks. Use fire-rated caulk or sealant around chimneys and flues, keeping to the clearance required by code.
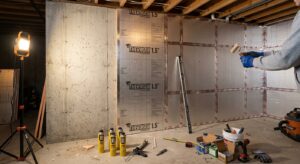
- Cover large openings such as dropped soffits, kneewall areas, and chases with rigid foam board or sheet metal. Cut each piece to fit, then seal all edges with spray foam or high-temperature caulk where needed.
- Insulate and seal the attic hatch or whole-house fan opening with a rigid foam box, a weatherstripped lid, and latches that pull it snug.
- Re-lay insulation to at least R-38 (roughly 12 to 14 inches of loose-fill fiberglass or cellulose) in most climates, higher in cold regions, and confirm that soffit vents are not blocked so the attic can still ventilate.
- Hire a certified energy auditor or insulation contractor to run a blower door test and thermal imaging scan to find leaks you cannot see.
- Ask for a written scope of work that lists exactly which penetrations, bypasses, and hatches will be sealed.
- Have the contractor seal and then insulate in that order, with a second blower door test to confirm the air changes per hour dropped.
- Check your utility company and state energy office for rebates, and ask your tax professional about federal efficiency credits that may apply.
Why It Works: The Benefits
The EPA estimates homeowners save an average of 15% on heating and cooling costs (11% on total energy costs) by air sealing and adding insulation in key areas like the attic. For a $2,000 annual energy bill, that is roughly $220 to $300 per year.
Reducing the stack effect keeps warm air where you paid to put it. Many homeowners notice bedrooms hold within 2 to 3 degrees of the thermostat setting overnight instead of drifting 5 degrees or more.
When the house loses heat more slowly, your furnace cycles less often, which reduces wear and can extend equipment life.
Warm, moist air leaking into a cold attic can cause frost, condensation, mold, and uneven roof melting that leads to ice dams. Sealing the leaks removes the moisture source.
The same air barrier that blocks heat escape in winter blocks hot attic air from seeping down in summer, easing the load on your air conditioner.
💰 Savings Impact by Action
Sealing attic bypasses and penetrations cuts heating and cooling costs by about 15% on average, per EPA ENERGY STAR estimates
A continuous air barrier at the ceiling can cut the stack-driven air exchange that spikes overnight by roughly 25% or more
Stopping airflow through insulation restores much of its rated R-value, improving real-world performance by up to 20%
Less heat loss means fewer heating cycles, reducing furnace runtime by roughly 10 to 15% during cold nights
🏠 Key Concepts Explained
The Science Behind It
Heat moves three ways: conduction, convection, and radiation. Insulation fights conduction, but air leaks are convection, and a pound of moving air carries far more heat out of your home than the same air sitting still inside insulation. That is why a leaky R-38 attic can perform like an R-19 or worse. The insulation is not failing. Air is simply bypassing it.
The stack effect makes this worse in winter. Warm indoor air is less dense than cold outdoor air, so it rises and pushes out through the highest openings in your house, mostly the attic floor. To replace that lost air, cold outdoor air gets drawn in through lower leaks. The strength of this pull grows with the temperature difference and the height of the house. In the early morning, when outdoor temperatures are lowest and the thermostat may be in setback mode, the effect is at its peak and you feel it as a drop in room temperature.
Air sealing breaks that cycle by creating a continuous air barrier at the ceiling plane. With the leaks closed, the stack effect has far less hole to pull through, so indoor air stays put and the cold stays out. The Department of Energy notes that air leakage can account for 25 to 40% of the energy used for heating and cooling in a typical home, which is why sealing is consistently one of the top recommendations from energy auditors.
Frequently Asked Questions
▼ Why is my house still cold at 3 AM even after I sealed the attic?
Attic leaks are only part of the picture. Check for gaps at the basement rim joist, around windows and exterior doors, and in your ductwork, since leaky supply ducts in unconditioned spaces can lose 20 to 30% of the air they carry. Also confirm your thermostat setback is not dropping too low overnight and that your furnace is the right size and has a clean filter.
▼ Can renters do any of this without landlord permission?
Most attic work needs landlord approval, but renters can still reduce the 3 AM chill. Use removable weatherstripping and draft stoppers on doors, close off unused rooms, and add removable window insulation film. Ask your landlord about sealing the attic hatch, since it is a cheap, quick job that benefits them too.
▼ How long before I actually notice savings on my bill?
You will usually feel the comfort improvement the first cold night. On your bill, expect to see the difference within the first full billing cycle of heating season, though weather swings can mask it. Compare the same months year over year, or use degree-day-adjusted numbers from your utility, for a fair read.
▼ What if my home is older than 30 years?
Older homes tend to benefit the most because they usually have more leaks, open wall cavities, and less insulation. Be extra careful about knob-and-tube wiring, vermiculite insulation, and old flue clearances. If you find any of those, bring in a licensed pro before you start sealing.
▼ Will sealing my attic make my house too airtight or cause moisture problems?
Most homes are far from too tight, and sealing the ceiling plane actually reduces moisture entering the attic. The key is making sure your bath fans and kitchen hood vent outdoors, and that combustion appliances can draw enough air. If you have atmospheric gas appliances, ask an auditor for a combustion safety test after major sealing.
Quick Tips
- Seal first, insulate second. Adding insulation over unsealed leaks hides the problem and wastes much of the new material’s value.
- Use the right product for the job: caulk for gaps under 1/4 inch, low-expansion foam for 1/4 to 3 inches, and rigid foam or sheet metal plus sealant for big openings.
- Do the work on a cold, dry day so you can feel drafts and spot problem areas more easily, and so the attic is not dangerously hot.
- Check your work with an incense stick or smoke pencil on a windy day. If the smoke wavers or gets pulled toward a spot, there is still a leak.
- Replace old, leaky recessed can lights with sealed, IC-rated LED retrofit kits to cut both air leakage and lighting energy use.
Variations for Your Situation
- Apartment/Rental: You likely cannot reach the attic, so focus on the sources you control. Add self-adhesive weatherstripping to the entry door and any balcony door ($10 to $20), use door sweeps ($8 to $15), and install removable window insulation film ($15 to $25 per window). Ask your landlord about sealing any shared attic hatch or ceiling penetrations above your unit.
- Tight Budget (under $50): Spend your money on one can of low-expansion spray foam, a tube of fire-rated caulk, and foam weatherstripping for the attic hatch. Seal the hatch, the plumbing stack, and the wire penetrations you can see. This 2-hour project often captures the largest, cheapest leaks and can trim 5 to 10% off heating costs.
- Older Home (pre-1980): Expect more bypasses, such as open wall cavities, uninsulated chases, and balloon-framed walls that open straight into the attic. Budget for rigid foam and sheet-metal blocking, and have an auditor check for knob-and-tube wiring or vermiculite before you disturb anything. A blower door test is especially useful here and can reveal total leakage 2 to 3 times higher than a modern home.