You turn the thermostat up, pile on the blankets, and still your feet hit a freezing floor every morning. It is one of the most common comfort complaints in homes built over crawl spaces, and it is not a thermostat problem. The floor is cold because it sits directly above an unconditioned, uninsulated, often damp space that stays close to outdoor temperature all winter.
At night the problem gets worse. Outdoor temperatures drop, your furnace cycles less aggressively if you use a setback, and cold air in the crawl space pulls heat out of the floor structure continuously. Your body also loses heat through direct contact with a cold surface far faster than it does to cold air, so a 60 degree floor feels much colder than a 60 degree room.
In this post we will look at why crawl space insulation has such an outsized effect on floor comfort, what your real options are (from a one-afternoon fix to a full encapsulation), and what each one costs and saves. Whether you are a confident DIYer or ready to hire a pro, you will come away knowing exactly where to start.
What You’ll Need
Click on an item below to shop for the recommended items for this recipe on Amazon.
As an Amazon Associate, we earn from qualifying purchases.
How to Do It
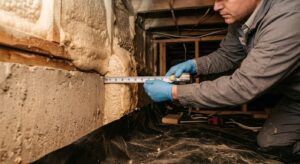
- Put on a dust mask, gloves, and long sleeves, and take a bright flashlight into the crawl space to look for obvious gaps, missing insulation, and damp spots.
- Seal visible gaps around plumbing, wiring, and duct penetrations in the subfloor using expanding foam or caulk rated for the gap size.
- Stuff or cut pieces of rigid foam board into the rim joist cavities and seal the edges with foam sealant to reduce perimeter air leakage.
- Lay a 6 mil polyethylene vapor barrier across any exposed dirt floor and overlap seams by 12 inches to cut ground moisture.
- Place thick area rugs with a dense pad over the coldest floor areas inside the house as a temporary comfort boost.
- Fix any moisture problems first, including leaking pipes, bad gutters, and standing water, because insulation over wet conditions will fail.
- Air seal the rim joist and subfloor gaps with caulk or spray foam before adding any insulation.
- Cut unfaced fiberglass batts or mineral wool batts to fit snugly between the floor joists, keeping the insulation in full contact with the subfloor above with no gaps or compression.
- Hold the insulation in place with insulation support wires (tiger claws) or netting every 16 to 24 inches so it cannot sag.
- Wrap or insulate any water supply lines and ductwork in the crawl space, since exposed pipes can freeze once the space below the floor gets colder.
- Install a vapor barrier across the ground and run it 6 inches up the foundation walls, sealing seams and edges with tape.
- Have a contractor inspect for moisture, structural issues, pests, and combustion appliance safety before any work begins.
- Seal foundation vents and air leaks, then install a heavy duty 12 to 20 mil vapor barrier across the floor and up the walls.
- Insulate the foundation walls with rigid foam or spray foam, which turns the crawl space into a semi-conditioned area rather than insulating the floor above.
- Add a dehumidifier or conditioned air supply as needed to keep relative humidity between 30 and 50 percent.
- Get documentation of the work and any warranties for the vapor barrier and drainage system.
Why It Works: The Benefits
Insulating the floor assembly to R-19 or higher can raise winter floor surface temperatures by 5 to 10 degrees, which is often the difference between uncomfortable and cozy.
The DOE estimates that insulating and air sealing a crawl space can cut heating and cooling costs by 10 to 20 percent, depending on your climate and starting condition.
Sealing the rim joist and subfloor penetrations stops cold air from sneaking into rooms, evening out temperatures from room to room.
A significant share of the air you breathe on the first floor can originate in the crawl space through the stack effect. Sealing and moisture control reduce musty odors and allergens.
A proper vapor barrier and sealed crawl space discourage mold, wood rot, and pests, protecting the structure and your repair budget.
💰 Savings Impact by Action
Sealing the rim joist and subfloor penetrations can cut whole-house air leakage by about 10 percent and reduces cold air infiltration at floor edges.
Adding R-19 to R-30 insulation between floor joists reduces heat loss through the floor by up to 15 percent of your total heating load.
Controlling ground moisture protects insulation performance and trims humidity-related heating inefficiency by around 5 percent.
Wrapping hot and cold water pipes in the crawl space reduces heat loss and freeze risk, trimming water heating costs by roughly 3 percent.
🏠 Key Concepts Explained
The Science Behind It
Floors feel cold for two reasons: the surface temperature is low, and your body loses heat to it quickly. An uninsulated wood floor over a crawl space may only have a total R-value of around R-3 to R-4, so the floor surface tracks closely with the temperature below it. If the crawl space is 40 degrees on a winter night, the floor surface can easily fall into the low 60s or even the high 50s, even when the room air is 68.
Insulation works by slowing conduction, and tight air sealing works by stopping convection. Both matter. Fiberglass or mineral wool only performs at its rated R-value when it touches the subfloor with no air gaps behind it and when moving air cannot bypass it. Gaps allow cold air to wash across the underside of the subfloor, which can cut effective performance dramatically.
Moisture adds another layer. Damp air conducts more heat, and wet insulation loses R-value while encouraging mold. That is why vapor barriers and moisture control are not optional extras. Controlling ground moisture keeps the insulation dry, the wood framing stable, and your energy savings intact for decades.
Frequently Asked Questions
▼ Why are my floors still cold after I added insulation?
Gaps, sagging batts, or uncontrolled air leaks are the usual culprits, because insulation only works when it fits snugly and air cannot wash around it. Go back with a flashlight and check that every batt touches the subfloor, then seal the rim joist and plumbing penetrations. Also confirm that ductwork or pipes in the space are not leaking cold air upward.
▼ Can I insulate my crawl space if I am a renter?
Usually not, since crawl space work involves the building structure and needs landlord approval. What renters can do is use thick rugs with dense pads, draft stoppers at exterior doors, and thermal slippers, and ask the landlord to address insulation or rim joist leaks as a maintenance item. Documenting cold floors and high bills can help your case.
▼ How long before I notice savings on my bill?
Comfort improvements show up the first cold night, usually a few degrees warmer at floor level. Bill savings appear over a full heating season, and with a typical 10 to 20 percent reduction in heating costs the payback runs about 2 to 5 years depending on your fuel prices and climate.
▼ What if my home is older than 30 years?
Older homes often have little or no floor insulation, leaky rim joists, and sometimes damp or uneven crawl space floors, which means the potential gain is larger. Check for old wiring, asbestos-containing materials, and moisture before you start, and consider having a pro evaluate it. Many older homes benefit most from air sealing plus a ground vapor barrier before adding insulation.
▼ Should I insulate the floor or the crawl space walls?
Floor insulation is cheaper and works well for vented crawl spaces. Wall insulation with a sealed vapor barrier, often called encapsulation, costs more but protects pipes and ducts and manages moisture better in humid climates. If your crawl space is damp or has HVAC equipment in it, encapsulation is usually the better long-term choice.
Quick Tips
- Insulate the rim joist first. It is small, cheap, and one of the leakiest spots in the whole house.
- Use unfaced batts in vented crawl spaces and keep them tight against the subfloor, not hanging below the joists.
- Insulate water pipes in the crawl space with foam sleeves to prevent freezing as the space gets colder.
- Check insulation each fall for sagging, pest damage, or moisture, since a quick fix now saves a bigger repair later.
Variations for Your Situation
- Apartment/Rental: You usually cannot touch the crawl space, so focus on dense area rugs with felt pads over the coldest floor zones (about $40 to $150), plug-in draft stoppers at door bottoms, and a request to your landlord to seal the rim joist or insulate the floor, which is often an inexpensive fix for them.
- Tight Budget (under $50): Spend your money on one can of expanding spray foam and a caulk tube to seal the rim joist and plumbing penetrations, then lay a 6 mil plastic sheet over any bare dirt. Add rugs over the coldest areas inside, and you can often gain several degrees of floor warmth for the cost of a pizza night.
- Older Home (pre-1980): Expect more air leakage, possible asbestos or lead-era materials, and uneven crawl space floors. Prioritize a moisture inspection and air sealing before insulation, avoid disturbing suspect materials without testing, and consider professional encapsulation if you see standing water or rot.