Every summer, millions of homeowners crank up the AC and watch their electricity bills climb, often without knowing why. The usual suspects get blamed: an aging unit, a faulty thermostat, or just the heat. But the real culprit is frequently hidden in your attic, walls, and crawl space. Inadequate or degraded insulation lets heat pour into your home all day long, forcing your cooling system to work twice as hard to keep up.
Summer insulation failures are different from winter ones. In winter, you lose heat you paid to generate. In summer, unwanted heat floods in from the attic, through poorly sealed walls, and around every gap and penetration in your building envelope. Your AC removes that heat at a significant energy cost, sometimes running nearly non-stop on hot days just to maintain a livable temperature. The Department of Energy estimates that air sealing and insulation improvements can reduce heating and cooling costs by 15 to 30% in a typical home.
This post walks you through the most common summer insulation problems, how to identify them, and what you can do about them, whether you have 20 minutes or a full weekend. We cover everything from no-cost quick wins to professional upgrades worth the investment, with real numbers so you can decide what makes sense for your home.
What You’ll Need
Click on an item below to shop for the recommended items for this recipe on Amazon.
As an Amazon Associate, we earn from qualifying purchases.
How to Do It
- Check your attic insulation depth on a cool morning. Measure the depth with a ruler at several spots near the center and near the eaves. Current DOE recommendations for most U.S. climates are R-38 to R-60, which equals roughly 10 to 15 inches of blown fiberglass or 12 to 18 inches of blown cellulose. If you are seeing joists exposed or less than 8 inches of coverage, this is your biggest problem.
- Walk your attic perimeter with a flashlight and look for gaps around recessed light housings, plumbing vent pipes, and the tops of interior walls. These bypasses are often ungapped holes that let hot attic air funnel directly into living space regardless of insulation depth.
- On a hot afternoon, hold your hand near electrical outlets and switch plates on exterior walls. Warm air seeping through indicates missing or settled wall insulation behind the plate, a common issue in homes built before 1980.
- Check the attic access hatch. Most pull-down attic stairs and hatches have zero insulation and no weatherstripping, leaking both air and heat constantly. If yours feels warm to the touch on a hot day, that is a direct heat path into your home.
- Note any rooms that are consistently 5 degrees or more warmer than the thermostat setting. These are your priority areas and point directly to insulation and air sealing problems overhead or in adjacent exterior assemblies.
- Seal attic bypasses first before adding any insulation. Use canned spray foam to fill gaps around plumbing pipes, wiring penetrations, and the tops of partition walls visible from the attic floor. Use fire-rated intumescent caulk around recessed light housings rated IC-AT, or replace non-IC fixtures with airtight LED wafer lights before insulating over them.
- Insulate and weatherstrip the attic access hatch. Purchase a pre-made insulated attic stair cover (R-10 to R-20 rated, available for $50 to $150) or build a rigid foam box that sits over pull-down stairs from the attic side. Add self-adhesive foam weatherstripping around the hatch frame to eliminate the air gap.
- Add blown insulation over existing attic insulation to bring the total depth up to the DOE recommendation for your climate zone. Zones 3 to 4 need R-38, while Zones 5 to 8 need R-49 to R-60. Many home improvement stores offer free blower rentals when you purchase a minimum number of insulation bags, bringing the per-square-foot cost down to roughly $0.50 to $1.00.
- Seal rim joists in the basement or crawl space with rigid foam board cut to fit between joists, then sealed in place with spray foam around the edges. Each rim joist bay is a direct thermal bridge between the hot or cold outside and your floor assembly. This is often the most overlooked summer air sealing project.
- Install foam gaskets behind all outlet and switch covers on exterior walls. These $0.50 foam pads take less than a minute each to install and block the air channel that runs behind outlets through the wall cavity. For a 2,000 square foot home, expect 15 to 30 of these, adding up to a $10 to $15 total cost with meaningful sealing impact.
- Schedule a home energy audit with a certified BPI (Building Performance Institute) or RESNET auditor. Ask specifically for a blower door test and thermal imaging scan. The blower door depressurizes the home to 50 Pascals and reveals exactly where air is infiltrating. Thermal imaging shows heat patterns through walls and ceilings that indicate missing or failed insulation invisible from the attic.
- Review the audit report and prioritize by payback period. Most auditors will rank improvements by cost-effectiveness. Air sealing typically pays back in 1 to 3 years. Attic insulation upgrades pay back in 2 to 5 years. Wall insulation injection (for closed walls) pays back in 5 to 10 years but significantly improves comfort.
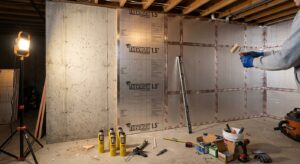
- Have dense-pack cellulose or injection foam installed in wall cavities if wall insulation is confirmed missing or inadequate. Contractors drill small holes in siding or interior drywall, inject insulation under pressure, and patch the holes. This is the best approach for older homes with empty 2×4 wall cavities and can reduce wall heat gain by 40 to 60%.
- Consider spray foam to encapsulate an unvented crawl space or seal a vented attic if the audit recommends it. Closed-cell spray foam at 2 inches delivers R-12 to R-14 and acts as both an air and vapor barrier. This is more expensive at $1.00 to $2.00 per square foot installed, but dramatically outperforms blown insulation in areas with high humidity or moisture risk.
- Ask about available rebates before signing any contract. ENERGY STAR, federal tax credits (currently 30% under the Inflation Reduction Act up to $1,200 for insulation and air sealing), and utility rebates can reduce out-of-pocket costs by 30 to 50% on qualifying work.
Why It Works: The Benefits
Sealing air leaks and upgrading attic insulation to the DOE-recommended R-38 to R-60 level can reduce cooling costs by 15 to 30% annually, which translates to $150 to $500 per year for a typical 2,000 square foot home depending on climate.
When your building envelope slows heat gain effectively, your AC cycles on and off normally instead of running near-continuously during peak afternoon heat. Shorter run times extend equipment life and reduce wear, potentially adding years to your compressor.
Hot upstairs bedrooms and uncomfortable second floors are a direct symptom of inadequate attic insulation. Fixing insulation weak spots can reduce the temperature difference between floors from 8 to 12 degrees F down to 2 to 3 degrees, making the whole home livable.
Air leaks that carry hot outside air in also bring moisture. Sealing those leaks reduces the latent cooling load, meaning your AC can remove humidity more effectively and maintain the 45 to 55% relative humidity range where comfort and indoor air quality are best.
Energy-efficient homes sell for 3 to 5% more on average according to studies from the Lawrence Berkeley National Laboratory. Documented insulation upgrades and lower utility bills are measurable selling points for buyers, especially as energy costs continue to rise.
💰 Savings Impact by Action
Sealing attic bypasses and air gaps before adding insulation reduces thermal bypass losses by up to 20% of total cooling load.
Bringing attic insulation to R-38 to R-49 reduces ceiling heat gain by 15 to 25% compared to under-insulated assemblies below R-19.
Dense-pack insulation in previously empty wall cavities reduces wall conductive heat gain by up to 60%, contributing 10 to 15% to total cooling savings.
Sealing and insulating a vented crawl space or rim joist reduces stack-effect infiltration and can cut cooling load by 8 to 12% in affected homes.
Addressing attic, wall, and crawl space insulation together delivers a combined 15 to 30% reduction in annual cooling costs per DOE estimates.
🏠 Key Concepts Explained
The Science Behind It
Heat moves through building assemblies in three ways: conduction (direct transfer through solid materials), convection (transfer through air movement), and radiation (transfer through electromagnetic waves, like the sun warming your roof). Summer insulation problems involve all three, but most homeowners only think about conduction when they think about insulation R-values. R-value measures resistance to conductive heat flow only, which is why a well-insulated home with poor air sealing still overheats: the convective and radiative pathways are wide open.
Your attic is the primary battleground in summer. Solar radiation heats your roof surface to temperatures well above the outdoor air temperature. That energy conducts through the roof deck and heats the attic air and surfaces. Without adequate insulation below the attic floor, that heat then conducts through your ceiling assembly into living space. Meanwhile, hot attic air finds any gap or penetration, enters through pressure differences, and mixes with your cooled indoor air, raising the temperature and the humidity your AC must fight. This combined load can account for 25 to 35% of your total summer cooling energy use in a home with inadequate attic insulation.
Air sealing works by eliminating the convective pathway. Even if your insulation has the correct rated R-value, a small gap allows air to bypass the insulation entirely, a phenomenon called thermal bypass. Spray foam and rigid foam board stop this because they are air barriers in addition to insulation, unlike fibrous materials such as batts and blown cellulose, which slow conduction but allow air to move through them freely. This is why building scientists emphasize that air sealing always comes before adding insulation layers: insulation without air sealing is like putting a sweater over a window screen.
Frequently Asked Questions
▼ My AC runs all day even after I added attic insulation. What am I missing?
Air leakage is likely the culprit. Adding insulation without sealing bypasses first means hot attic air is still entering the conditioned space through gaps around light fixtures, plumbing penetrations, and wall tops. Go back to the attic and look for unsealed penetrations, then fill them with spray foam before evaluating your insulation depth again. Also check whether your ductwork runs through unconditioned attic space, as leaky attic ducts can waste 20 to 30% of your cooling capacity regardless of how well the ceiling is insulated.
▼ How do I know if my wall insulation is the problem, not the attic?
Touch exterior walls on the interior surface during peak afternoon heat. Walls that feel warm or hot to the touch likely have missing or settled insulation in the cavity. A certified energy auditor with thermal imaging can confirm this in minutes, and the cost of the audit ($300 to $500) is often worth it before investing in wall work. Outlets and switch plates on exterior walls that feel drafty or warm are also a strong indicator of empty or incomplete wall cavities.
▼ Can renters do any of this without landlord permission?
Renters can do quite a bit with fully reversible steps. Install draft snakes or door sweeps on doors, use window insulating film on single-pane windows, add foam outlet gaskets (removable), and use a window AC unit with properly sealed gaps around the unit. For attic or wall improvements, you will need landlord cooperation, but you can make a strong case by showing how insulation improvements reduce utility bills and protect the property from moisture damage.
▼ How long before I see the savings on my electricity bill?
DIY air sealing and insulation top-ups typically show up on the very next monthly bill during cooling season, though the exact savings depend on how severe your pre-existing problems were. Most homeowners report a 10 to 25% reduction in cooling costs after completing attic air sealing and insulation work. To measure accurately, compare your usage in kilowatt-hours (not just the dollar amount) against the same month in prior years, since rates and weather vary.
▼ My home was built in 1965. Is it worth insulating or is it too far gone?
Older homes almost always benefit more from insulation and air sealing than newer ones precisely because they started with so little. A typical pre-1980 home has R-0 to R-11 in the attic and empty or minimally filled wall cavities, meaning the potential savings are larger. The main cautions are to test for asbestos-containing vermiculite insulation before disturbing it, check for knob-and-tube wiring in attics before adding insulation (this requires specific handling), and address any moisture problems before sealing. A BPI-certified auditor experienced with older homes is a worthwhile first step.
Quick Tips
- Check insulation depth in multiple attic locations, not just the center. Insulation near eaves is often thin or missing entirely because it was pushed back during past attic work.
- A programmable or smart thermostat works best after you fix insulation problems. In a leaky home, setback strategies save less because the house re-heats so quickly when the AC cycles off.
- Light-colored or cool roof coatings can reduce attic temperatures by 20 to 40 degrees F and are a good complement to insulation upgrades, especially in Zones 2 to 4 where radiant heat is the dominant problem.
- If you have a two-story home with hot upstairs rooms, check whether the knee walls bordering attic space are insulated. Uninsulated knee walls are one of the most common and easily fixed summer comfort problems.
- When purchasing blown insulation, use the coverage chart on the bag to calculate how many bags you need to reach your target R-value, not just to cover the floor. Adding to existing insulation: calculate the depth needed to reach your total target, subtract existing depth, and buy for only the added layer.
Variations for Your Situation
- Apartment or Rental: Renters cannot modify attic or wall assemblies but can still reduce cooling loads meaningfully. Install window insulating film ($15 to $30 per window) on west and south-facing windows, use thermal curtains rated for heat reduction, seal gaps around window AC units with foam backer rod and removable caulk, and add outlet foam gaskets on exterior walls. These steps combined can reduce your personal cooling costs by 5 to 15% with fully reversible methods that protect your security deposit.
- Tight Budget Under $100: Focus exclusively on attic bypass sealing with a single can of spray foam ($8 to $12), outlet gaskets for all exterior wall outlets ($15 to $20 for a whole-home pack), and foam weatherstripping for the attic hatch ($10). This combination targets the highest-impact air leakage points for under $50 and can deliver 10 to 15% cooling savings in homes with significant bypasses. Skip adding blown insulation until you have the budget, as sealing first gives you a much better return on the insulation you already have.
- Older Home Pre-1980: These homes need a careful sequence. First, have the attic inspected for vermiculite insulation and knob-and-tube wiring before doing anything else. Vermiculite may contain asbestos and requires professional testing. Knob-and-tube wiring must be evaluated by an electrician before insulation is added over it. Once cleared, focus on dense-pack cellulose for walls (R-3.5 to R-3.7 per inch, better air resistance than fiberglass) and blown cellulose for the attic. Cellulose is also more forgiving around irregular framing and blocking typical in older construction than batt products.