Your home is leaking money every single day, and the frustrating part is that most of it is invisible. A drafty window here, a phantom-load appliance there, an attic hatch with zero insulation sitting right above your living room ceiling. The U.S. Department of Energy estimates that the average household spends about $2,200 per year on energy, and roughly 25 to 30% of that is wasted through inefficiencies that a motivated homeowner can fix in a weekend.
The problem is that most people treat energy efficiency as an all-or-nothing project. They either ignore it completely or assume they need a $10,000 renovation to make a dent. Neither is true. The real wins come from knowing exactly where to look, room by room, and tackling the highest-impact issues first. A $3 tube of caulk sealing a gap around a pipe chase can save more energy than a brand-new ceiling fan installed in the wrong spot.
This guide gives you a structured, room-by-room walkthrough of the most common energy wasters found in typical American homes, along with two clear action tracks: a quick assessment you can knock out in under an hour, and a deeper DIY audit with specific fixes. Real savings numbers are included so you can prioritize based on your own situation and budget.
What You’ll Need
Click on an item below to shop for the recommended items for this recipe on Amazon.
As an Amazon Associate, we earn from qualifying purchases.
How to Do It
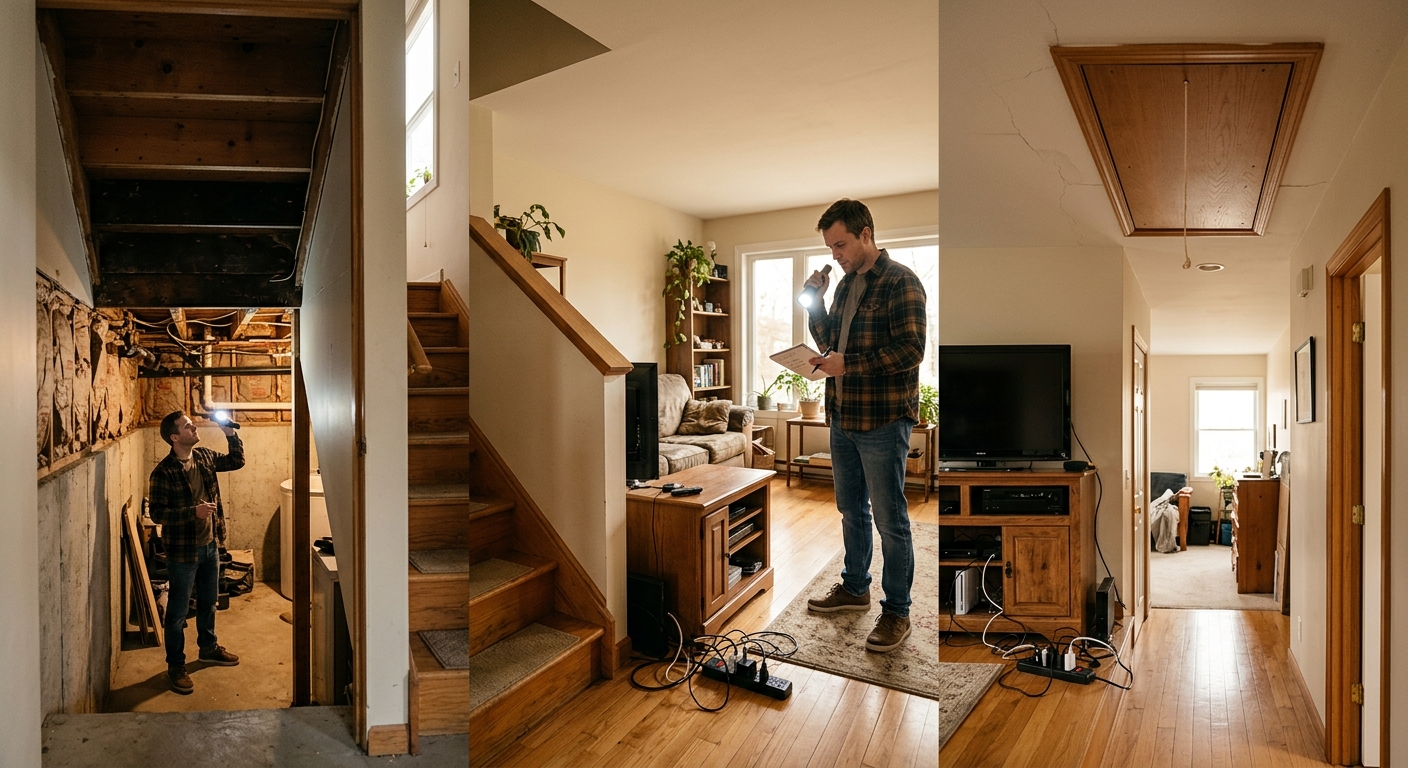
- Start at the attic hatch or pull-down stairs: press your hand against the door or hatch cover and feel for temperature difference. An uninsulated attic hatch can lose as much heat as leaving a window open. Make a note if it feels cold in winter or warm in summer.
- Walk each exterior wall in every room and hold your hand 2 inches from electrical outlets and light switches. Cold air flowing from outlets on exterior walls is a sign of missing or insufficient insulation and air sealing behind the box.
- Check every window and exterior door frame by moving a lit incense stick or a damp hand slowly around the perimeter on a windy day. Flickering smoke or a cold sensation indicates air infiltration that caulk or weatherstripping can fix for under $10 per opening.
- Open your utility or mechanical room and inspect the water heater: note the age (on the label), check the pipe connections for corrosion, and feel the tank surface. A warm tank surface means heat is escaping through inadequate insulation, a $30 insulating blanket fix on older units.
- Walk through each room and make a list of all devices that have a glowing light, display, or indicator when not in active use. These are phantom loads. Count them and note which rooms have the most clusters of standby electronics.
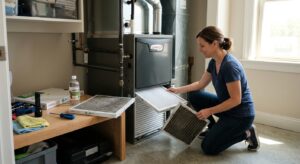
- Check your HVAC filter by pulling it out and holding it up to a light. A gray, clogged filter restricts airflow and makes your system work harder. A dirty filter alone can reduce system efficiency by 5 to 15% and should be replaced every 1 to 3 months.
- Attic: Add an insulated cover or box over your attic hatch using rigid foam board cut to fit and attached with construction adhesive. Target an R-value of at least R-38 in the cover itself. This single fix can save 1 to 2% of annual heating costs in a typical home.
- Basement and crawlspace: Use a can of expanding spray foam to seal all pipe penetrations, wire chases, and gaps where framing meets the foundation. Focus on the rim joist area (where your floor framing sits on the foundation wall) as this is often the single leakiest area in older homes.
- Kitchen: Pull the refrigerator out from the wall and vacuum the condenser coils on the back or bottom. Dusty coils make the compressor run up to 15% harder. Also check the door gasket by closing the door on a dollar bill: if it slides out easily, the gasket needs replacing.
- Bathrooms and laundry: Caulk around tubs, shower surrounds, and the base of toilets where they meet exterior walls. Seal the exhaust fan housing from the attic side with fire-rated caulk to stop conditioned air from escaping directly into the attic.
- Living areas: Install foam gaskets behind outlet and switch cover plates on exterior walls (foam outlet sealers cost about $5 for a pack of 10). Add door sweeps to exterior doors and replace weatherstripping on any door where light is visible around the frame.
- Whole house: Plug a watt meter into each outlet cluster and measure standby draw for your TV, gaming consoles, cable boxes, and phone chargers over 24 hours. Replace multi-outlet clusters with smart power strips that cut phantom loads to near zero when the primary device is off, targeting $100 or more in annual savings.
Why It Works: The Benefits
Homeowners who complete a thorough room-by-room audit and implement the identified fixes typically save 15 to 30% on annual energy costs, which translates to $330 to $660 per year on an average $2,200 energy bill.
Sealing air leaks and addressing insulation gaps eliminates the cold drafts in winter and hot spots in summer that make certain rooms uncomfortable regardless of what the thermostat says.
When your home holds conditioned air more effectively, your heating and cooling system runs fewer cycles and for shorter durations. This reduced runtime can add 3 to 5 years to the life of a typical HVAC system rated for 15 to 20 years.
Identifying and sealing uncontrolled air leaks prevents radon, mold spores, and outdoor pollutants from being pulled into your living space through the stack effect, which is especially important in basements and crawlspaces.
Many of the improvements identified in a home energy audit, including insulation, air sealing, and HVAC upgrades, qualify for the federal 25C energy efficiency tax credit (up to 30% of costs, capped at $1,200 per year) and additional state or utility rebates.
💰 Savings Impact by Action
Comprehensive air sealing of attic bypasses, rim joists, and penetrations can reduce heating and cooling energy use by 15 to 25% according to DOE data.
Eliminating standby power draw with smart strips and unplugging unused devices saves the average household $100 to $200 per year, representing roughly 5 to 10% of total electricity use.
Upgrading attic insulation from R-19 to R-38 or higher reduces heating and cooling loads by 10 to 20% depending on climate zone and existing conditions.
Replacing a clogged air filter restores proper airflow and can improve system efficiency by 5 to 15%, with the higher end seen in systems that have run on a dirty filter for 6 or more months.
Adding interior cellular shades or reflective window film to south and west-facing windows reduces solar heat gain by up to 33%, cutting summer cooling loads by 10 to 15% in sun-heavy climates.
🏠 Key Concepts Explained
The Science Behind It
Your home functions as a pressure-driven system. Any time there is a temperature difference between inside and outside, warm air rises and tries to escape through the highest points of the structure while cooler outside air is drawn in at the lowest points. This is the stack effect, and it operates 24 hours a day, 365 days a year regardless of wind or weather. The larger the temperature differential and the more gaps available, the more air moves. In a leaky older home, this process can exchange the entire volume of interior air with outside air every hour or two, forcing your heating and cooling system to condition all of that incoming air continuously.
Insulation slows conductive heat transfer, but it does essentially nothing to stop air movement. This is why a well-insulated but air-leaky home can still feel drafty and have high energy bills. The two strategies work together: air sealing stops the movement of air carrying heat energy, while insulation slows the conduction of heat through solid materials. The DOE estimates that comprehensive air sealing combined with insulation improvements can reduce heating and cooling costs by 15 to 25% compared to either strategy applied alone. This is why a room-by-room approach that catches both problems is so much more effective than simply adding insulation without addressing gaps first.
Phantom electrical loads follow a simpler but equally persistent physics principle: any device maintaining an internal circuit in standby mode draws real power from the grid continuously. A cable box left in standby can draw 15 to 20 watts around the clock, consuming as much electricity in a year as running a refrigerator for two months. Multiplied across a home full of gaming consoles, smart TVs, phone chargers, and streaming devices, standby power adds up to a real and easily fixable line item on every monthly bill.
Frequently Asked Questions
▼ I sealed everything I could find but my heating bill is still high. What am I missing?
The most commonly missed air leak locations are the tops of interior wall cavities where they open into the attic (called top plates), recessed light fixtures that penetrate the ceiling into the attic, and the area around the whole-house fan or attic pull-down stairs. Get into the attic on a cold day and look for areas where insulation is stained or discolored, as that marks where air has been moving through it. Seal those spots with expanding foam or fire-rated caulk and add an insulated cover over the attic access.
▼ My home has old single-pane windows. Should I replace them or is that not worth the cost?
Window replacement is rarely the highest-ROI energy move, despite being heavily marketed. A single-pane window in good condition with a tight frame loses far less energy than a leaky door or an uninsulated rim joist. Before replacing windows, add interior window film (which can reduce heat loss by 25 to 35% at a cost of $5 to $15 per window) or install insulating cellular shades. If you do replace windows, look for ENERGY STAR certified double-pane units with a U-factor of 0.30 or lower and use the 25C federal tax credit to offset up to 30% of the cost.
▼ How do I know if my HVAC ducts are leaking and is it something I can fix myself?
The easiest sign of duct leakage is rooms that never reach the set temperature even when the system runs constantly, or a visible gap or disconnected joint in accessible ductwork in the basement or attic. You can seal accessible duct joints yourself with UL 181-rated foil tape or water-based mastic sealant (not regular gray duct tape, which fails quickly). For ducts inside walls or inaccessible spaces, a certified HVAC technician can perform a duct blower test to measure total leakage and use aerosol sealing products like Aeroseal to fix leaks from the inside.
▼ Can I do a meaningful energy audit in an apartment without making any modifications?
Yes, and the most impactful steps require no permission. Use a watt meter to measure phantom loads and unplug or use smart strips to eliminate them. Report drafty windows and doors to your landlord in writing, since sealing them is their maintenance responsibility and also in their interest. Add removable rope caulk (which peels off cleanly) to window gaps, use draft blockers at door bases, and add thermal curtains to south and west windows. These steps together can realistically save 10 to 15% on your electricity portion of the bill.
▼ What if I find something during my audit that seems like a big problem, like wet insulation or mold?
Stop and do not disturb the material further. Wet insulation usually indicates an active moisture problem such as a roof leak, condensation from duct sweating, or a plumbing leak, and the source must be fixed before any energy work is done. Mold requires professional remediation if the affected area exceeds 10 square feet (per EPA guidelines). Document everything with photos, and get a general contractor or building inspector to assess the situation before proceeding with any sealing or insulation work.
Quick Tips
- Prioritize fixes by dollars per hour of your time: air sealing the rim joist and attic bypasses typically delivers the highest savings per hour of labor in most homes.
- Do your air leak test on a cold or windy day when the temperature differential is greatest, as small leaks become much easier to feel and locate under those conditions.
- Take photos of every issue you find during your audit and create a simple spreadsheet ranking fixes by estimated cost and estimated annual savings so you can work through them systematically over time.
- Check with your utility company before buying anything: many offer free or discounted energy audit services, free LED bulbs, and rebates on weatherstripping and smart thermostats that can cut your out-of-pocket costs significantly.
Variations for Your Situation
- Apartment/Rental: Renters should focus entirely on no-modification strategies since they cannot alter building systems. Measure and eliminate phantom loads with smart power strips (saving $100 or more per year), add removable rope caulk to window gaps at $5 per window, hang thermal blackout curtains on south and west windows to reduce solar heat gain by up to 33%, and report all drafts and HVAC filter issues to the landlord in writing. These steps cost under $100 total and require no tools.
- Tight Budget (Under $50): Prioritize the three highest-ROI free and near-free fixes: replace your HVAC filter ($10 to $15), install foam outlet gaskets on all exterior wall outlets and switches ($5 for 10), and seal visible gaps around pipes and ducts in the basement with a single can of expanding spray foam ($8). Add rope caulk to the two or three worst windows. These four steps together can realistically deliver $150 to $300 in annual savings for under $40 in materials.
- Older Home (Pre-1980): Homes built before 1980 were constructed with essentially no air sealing requirements and often have fiberglass batt insulation that has settled or been damaged over decades. Start by assuming the rim joist is uninsulated and the attic has less than R-19 (the minimum code requires R-38 to R-60 today depending on climate zone). Budget $500 to $1,500 for a professional blower door test combined with air sealing and attic insulation top-up, which typically delivers a payback period of 2 to 4 years and qualifies for the 25C federal tax credit. Also check for knob-and-tube wiring before adding insulation, as covering it can be a fire hazard requiring an electrician first.