Most homeowners think of insulation as something that goes in exterior walls and the attic, but interior walls are often completely hollow. That means sound travels freely from a loud TV in the living room straight into a bedroom, a bathroom fan echoes through the hallway, and a room over the garage stays cold while the adjacent bedroom roasts. Uninsulated interior walls are one of the most overlooked comfort problems in American homes.
Beyond noise, interior walls that separate conditioned spaces from unconditioned ones, like a wall between a finished room and an unfinished garage or a utility room, act as invisible energy drains. Heat or cold bleeds through these partitions, forcing your HVAC system to work harder and driving up monthly bills. The Department of Energy estimates that air sealing and insulation improvements, including interior applications, can reduce heating and cooling costs by 10 to 20% in a typical home.
This guide covers everything you need to know about insulating interior walls: from no-cut acoustic solutions you can implement this weekend to a full blown blown-in or batt retrofit that transforms noisy rooms into quiet retreats. You will find real cost estimates, payback periods, step-by-step approaches, and honest troubleshooting for the most common problems homeowners run into.
What You’ll Need
Click on an item below to shop for the recommended items for this recipe on Amazon.
As an Amazon Associate, we earn from qualifying purchases.
How to Do It
- Identify the loudest flanking paths by pressing your ear to walls, outlets, and where the wall meets the floor and ceiling. Use a flashlight to check for visible gaps around outlet boxes and switch plates.
- Purchase foam outlet and switch plate gaskets (sold in packs of 10 to 20 for $8 to $15). Turn off the circuit breaker, remove the cover plate, press the gasket in place, and reinstall. This step alone reduces sound transmission through electrical penetrations by a measurable amount.
- Apply acoustical sealant or paintable latex caulk along the joint where the wall meets the floor and ceiling on both sides of the partition. A single tube ($5 to $8) covers roughly 30 linear feet. Smooth with a wet finger and allow 24 hours to cure.
- Add mass to the existing drywall surface using mass loaded vinyl (MLV) hung like wallpaper, or install an additional layer of 5/8-inch drywall over the existing surface with Green Glue damping compound between the layers. The drywall-plus-Green-Glue approach costs roughly $80 to $150 per 100 square feet and adds 8 to 10 STC points without touching the cavity.
- Place heavy bookshelves, acoustic panels, or thick tapestries on the problem wall to add mass and absorption on your side of the partition. This is the fastest zero-cut option and can reduce perceived noise by 10 to 20% in a furnished room.
- Turn off all electrical circuits serving the wall and confirm with a non-contact voltage tester before touching any wiring. Photograph the wall to document outlet and switch locations before demolition.
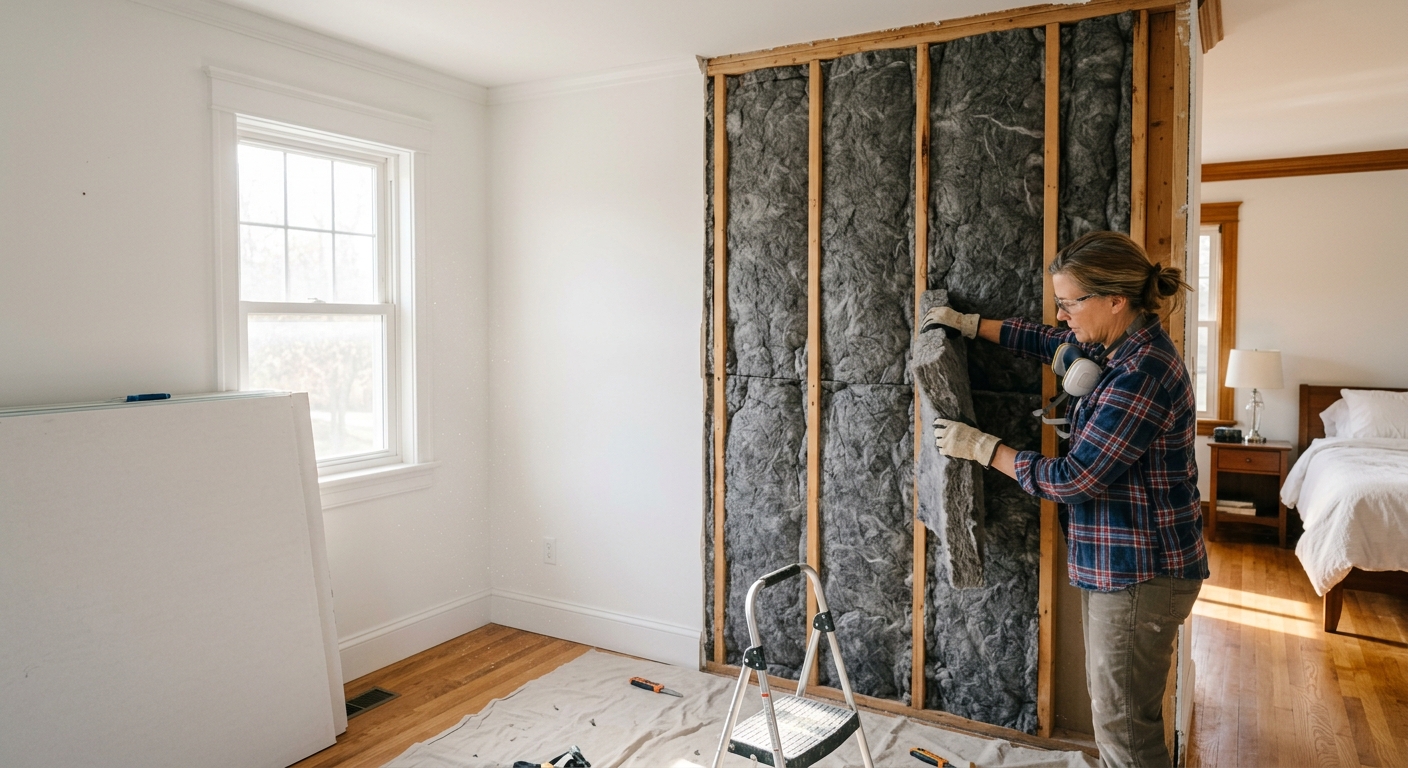
- Score the paint line at ceiling and floor with a utility knife to prevent drywall tearout from damaging adjacent surfaces. Remove drywall using a reciprocating saw set to a shallow depth (about 1 inch) to avoid cutting wires or plumbing inside the cavity.
- Inspect the cavity for any wiring, pipes, or fire blocking before installing insulation. Reposition any wiring stapled to stud faces so it runs through the center of the cavity to avoid compression by insulation batts.
- Install mineral wool batts (Rockwool Safe and Sound is the most widely available option, at around $0.60 to $0.80 per square foot) for maximum soundproofing, or fiberglass batts (R-13 or R-15) for a lower-cost thermal-focused upgrade. Cut batts 1/2 inch wider than the cavity so they friction-fit without gaps, voids, or compression. Compression reduces both thermal and acoustic performance.
- Seal all penetrations (outlet boxes, pipe pass-throughs, top and bottom plates) with acoustical sealant before hanging new drywall. Use 5/8-inch Type X drywall for better sound mass compared to standard 1/2-inch board.
- Hang drywall, tape, apply three coats of joint compound with drying time between coats, sand smooth, prime, and paint. Budget 2 to 3 additional days for finishing work, or hire a drywall finisher for $200 to $400 to speed up this phase.
- Get at least two quotes from insulation contractors with experience in dense-pack wall retrofits. Ask specifically for dense-pack cellulose at 3.5 pounds per cubic foot, the density needed to prevent settling and achieve meaningful acoustic performance.
- Confirm the contractor will use a calibrated fill tube with a pressure gauge to verify proper density in each cavity. Improperly packed blown-in insulation settles over time and leaves voids that reduce both thermal and acoustic performance.
- On installation day, the crew drills 2-inch holes every 16 to 24 inches along each stud bay (either through the drywall or from the exterior if siding allows). Material is injected until back-pressure confirms the cavity is fully packed.
- Inspect each patched hole after the crew leaves. Patches should be flush with the drywall surface and ready for skim coating. Most contractors include patching; confirm this in your contract before signing.
- After patching dries (usually 24 to 48 hours), lightly sand, prime, and repaint the affected areas. For large areas, consider repainting the entire wall for a uniform finish.
Why It Works: The Benefits
Adding mineral wool or dense-pack cellulose to an interior wall cavity can raise the STC rating from roughly 33 to 45, cutting perceived noise volume nearly in half. Bedrooms, home offices, and media rooms benefit most from this change.
Walls between conditioned and unconditioned spaces (garages, utility rooms, unfinished basements) can account for 5 to 15% of a room’s total heat loss or gain. Insulating these partitions keeps adjacent rooms within 2 to 3 degrees of each other instead of swinging 8 to 12 degrees apart.
The DOE estimates insulation and air sealing improvements can reduce HVAC costs by 10 to 20% annually. Interior wall insulation targeting unconditioned-space boundaries typically contributes 5 to 10% of that total, translating to $75 to $200 per year in savings for an average home spending $1,500 annually on energy.
Beyond pure noise reduction, insulated walls reduce the intelligibility of speech between rooms, an important comfort factor in homes with open floor plans, home offices, or multi-generational living arrangements.
Soundproofed bedrooms and home offices are increasingly listed as desirable features. Realtors in urban and suburban markets report that documented acoustic improvements can add perceived value and help homes sell faster, though quantifiable resale gains vary by market.
💰 Savings Impact by Action
Filling an empty interior wall cavity with mineral wool or cellulose reduces heat transfer through that wall section by up to 12% of the room’s total heating and cooling load when the wall borders an unconditioned space.
Sealing flanking paths at top and bottom plates and around outlet boxes reduces overall conditioned air loss by up to 8% in homes with multiple uninsulated interior partitions.
Adding mineral wool batts to a standard 2×4 stud wall raises the STC rating from approximately 33 to 45, reducing perceived loudness by roughly 35% as experienced by the human ear.
Professional dense-pack cellulose combined with acoustical sealant at all penetrations can cut perceived noise transmission by up to 45% compared to an uninsulated hollow partition.
Combining interior wall insulation on unconditioned-space boundaries with attic and exterior wall improvements contributes to a total home energy reduction of up to 10% on annual HVAC costs.
🏠 Key Concepts Explained
The Science Behind It
Sound is pressure: alternating waves of compression and rarefaction that travel through air and solid materials. When a sound wave hits a wall, it causes the drywall panel to vibrate, and that vibration is re-radiated as sound on the other side. The two main strategies for stopping this process are adding mass (heavier panels vibrate less) and adding damping (converting vibrational energy into heat). Insulation inside the wall cavity contributes primarily through damping and by killing the air resonance that would otherwise amplify certain frequencies inside the hollow space, which is why even a modest amount of fill dramatically reduces the hollow, boomy quality of uninsulated partitions.
From a thermal standpoint, an empty wall cavity is not just missing R-value from insulation. It also allows convective air movement, where warm air rises on the heated side of the cavity, transfers heat to the cooler side, and descends, creating a slow loop that continuously moves energy through the wall. Filling the cavity with any fibrous insulation stops this convective loop completely. At the same time, insulation reduces conductive heat transfer through the air itself, though conduction through wood studs still occurs regardless of fill material. This is why the combined thermal and acoustic benefits of interior wall insulation are often greater than homeowners expect from what looks like a minor upgrade.
The relationship between insulation density and acoustic performance is important to understand when choosing materials. Standard fiberglass batts at 0.5 to 0.6 pounds per cubic foot provide reasonable thermal performance (R-13 to R-15) but only modest acoustic improvement, typically 3 to 5 additional STC points. Mineral wool (rock wool) at roughly 1.7 pounds per cubic foot provides similar R-value but absorbs a much wider range of sound frequencies, often adding 6 to 9 STC points. Dense-pack cellulose at 3.5 pounds per cubic foot is the best-performing blown-in option for both thermal and acoustic goals and is the preferred choice for no-demo retrofit projects.
Frequently Asked Questions
▼ I added insulation to my interior wall but I can still hear everything. What went wrong?
The most common cause is unaddressed flanking paths. Sound is bypassing the insulated wall through gaps at the ceiling, floor, electrical outlets, HVAC grilles, or through shared ceiling and floor assemblies. Walk around the room and listen carefully to where sound seems loudest. Seal any gaps with acoustical sealant and add outlet gaskets, then reassess. If the problem persists, the issue may be that the ceiling or floor assembly itself, not just the wall, is transmitting sound.
▼ Can I insulate my interior walls without removing drywall?
Yes. The professional blown-in (dense-pack) approach uses 2-inch drill holes to fill cavities without full drywall removal. Patching the holes leaves small marks that require painting but avoids a full demolition and rebuild. Alternatively, the no-demo approach using an additional drywall layer with Green Glue or mass loaded vinyl applied over existing walls improves acoustics meaningfully without touching the cavity at all.
▼ My house was built before 1980. Is it safe to open up interior walls?
Homes built before 1978 may have lead paint on drywall surfaces and asbestos in joint compound, texture coatings, or older insulation. Before cutting or sanding, purchase a lead test swab ($5 to $10) and an asbestos test kit, or hire a certified inspector. If either hazardous material is found, you must follow EPA and state guidelines for safe removal or hire a licensed abatement contractor. Do not sand or cut these materials without proper protection.
▼ How long before I see the savings on my energy bill after insulating interior walls?
You should see the improvement on your very next monthly utility bill if the wall you insulated borders an unconditioned space like a garage or utility room. For walls between conditioned rooms, the thermal impact is smaller and harder to isolate in a single bill cycle. Track your energy use over two to three billing cycles and compare to the same period in the prior year, adjusting for weather differences.
▼ What type of insulation is best for a bathroom wall to prevent mold?
Mineral wool (rock wool) is the best choice for bathroom interior walls because it is naturally moisture-resistant, does not absorb water, and does not support mold growth. Avoid standard paper-faced fiberglass batts in wet areas. If you use unfaced fiberglass, ensure the cavity can dry to one side and there is no poly vapor barrier trapping moisture on an interior wall.
Quick Tips
- Use Rockwool Safe and Sound batts for the best acoustic-to-cost ratio in a standard 2×4 wall cavity. They are available at most big-box stores for around $0.65 to $0.80 per square foot and require no vapor barrier on interior walls.
- Seal outlet boxes with pre-cut foam gaskets before reinstalling cover plates. This single step takes five minutes per outlet and meaningfully reduces both sound and air leakage through one of the most common flanking paths.
- If you are adding a second layer of drywall over an existing surface, use Green Glue damping compound between the layers rather than construction adhesive. Green Glue converts sound vibration into heat and adds 8 to 10 STC points for about $15 to $20 per tube (each tube covers one 4×8 sheet).
- For bathroom walls, choose a closed-cell batt or moisture-resistant mineral wool product rather than standard fiberglass to prevent mold growth in the humid cavity environment.
- Prioritize the walls that matter most: walls adjacent to a home theater, a teenager’s bedroom, a home office, or an unconditioned garage will deliver the biggest comfort return per dollar spent compared to insulating interior walls between similar conditioned rooms.
Variations for Your Situation
- Apartment/Rental: You cannot open walls, but you can significantly improve acoustics by adding heavy bookshelves filled with books against the problem wall, hanging thick tapestries or acoustic panels (starting at $15 each), and sealing outlet covers with foam gaskets. An additional free-standing layer of mass loaded vinyl ($1 to $2 per square foot) hung as a curtain provides measurable STC improvement with no permanent modifications.
- Tight Budget (under $50): Focus entirely on flanking paths first. Buy a tube of acoustical sealant ($6), a pack of outlet gaskets ($10), and spend an afternoon sealing every gap where the wall meets the floor, ceiling, and any penetrations. This zero-insulation approach can eliminate 20 to 30% of sound transmission through a wall that is otherwise well-built, and it costs almost nothing.
- Older Home (pre-1980): Homes of this era often have plaster-on-lath walls rather than drywall, which are actually denser and have better baseline STC ratings than modern drywall. For these homes, the blown-in professional approach is strongly preferred because cutting plaster cleanly is difficult and expensive to repair. Dense-pack cellulose through small drilled holes preserves the plaster surface while filling the often-wider cavities (2×4 or 2×6 framing depending on era) with high-performing material.