You crank the AC to 72 degrees, but the upstairs bedrooms still feel like a sauna by 3 p.m. In winter, no matter how high you set the heat, the top floor never quite catches up. Sound familiar? The problem is almost certainly above your ceiling, not inside your HVAC system. Your attic sits between your living space and the harshest outdoor temperatures, and when it is not properly insulated and ventilated, it becomes a year-round source of discomfort and wasted energy.
In summer, an unaddressed attic can reach temperatures of 140 to 160 degrees Fahrenheit on a hot day. That superheated air radiates down through your ceiling and into your living space, forcing your air conditioner to run almost continuously. In winter, the same poorly insulated attic lets your expensively heated air escape straight out the top of your house. The Department of Energy estimates that a properly air-sealed and insulated attic can reduce heating and cooling costs by 15 to 25 percent annually, which adds up to hundreds of dollars every year.
This post walks you through exactly what is happening in your attic, how to diagnose the severity of your situation, and what you can do about it, whether you want a free fix this weekend or a professional upgrade that pays for itself in under four years. We cover insulation levels, air sealing, ventilation, and the specific order in which to tackle each so you do not accidentally make things worse.
What You’ll Need
Click on an item below to shop for the recommended items for this recipe on Amazon.
As an Amazon Associate, we earn from qualifying purchases.
How to Do It
- On a hot afternoon, place your hand flat on your ceiling in an upstairs room. If it feels noticeably warm to the touch, radiant heat transfer is significant and insulation is inadequate.
- Open your attic hatch and measure the depth of existing insulation with a ruler. The DOE recommends R-38 to R-60 for most U.S. climates, which equals roughly 10 to 16 inches of fiberglass batts or 11 to 19 inches of blown cellulose. Anything under 8 inches is significantly underperforming.
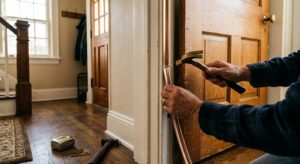
- With a flashlight, inspect the attic floor for obvious gaps around recessed light cans, plumbing vent pipes, electrical wires, and the top of interior walls. These are your highest-priority air leaks.
- Check your soffit vents from inside the attic. Push aside any insulation that has migrated over the soffit openings and blocking airflow. Restore at least 1 to 2 inches of clearance using cardboard baffles if needed.
- Using a can of low-expanding spray foam (under $10 at any hardware store), seal any gaps around pipes, wires, or framing you can safely reach from the attic hatch without walking on the ceiling joists.
- Check that your attic access hatch has weatherstripping around its perimeter and, ideally, an insulated cover. An uninsulated hatch is the equivalent of a hole in your ceiling insulation and is one of the most overlooked attic leaks in most homes.
- Rent or borrow a blower door test from a local energy auditor if possible, or at minimum do a smoke pencil test around ceiling fixtures and the attic hatch on a windy day to identify the strongest leaks before you start.
- Purchase fire-rated acoustic caulk or canned foam and systematically seal every penetration on the attic floor: recessed lights (use fire-rated covers first), plumbing stacks, electrical boxes, HVAC chases, and the top plates of all interior walls.
- For recessed light cans that cannot be directly foamed (older non-IC-rated models), build or purchase pre-made airtight covers from rigid foam board and seal them to the drywall with fire-rated caulk before adding insulation on top.
- Install cardboard or rigid foam ventilation baffles in each rafter bay along the eaves before adding insulation. These maintain the critical 1-inch air channel from soffit to ridge and prevent the new insulation from blocking airflow.
- Rent a blow-in insulation machine from a home improvement store (often free with purchase of 10 or more bags of cellulose or fiberglass). Add blown insulation until you reach R-49 to R-60, which is approximately 15 to 19 inches of cellulose.
- Install a pre-made insulated attic stair cover or build one from 2-inch rigid foam board and weatherstripping to eliminate the hatch as a bypass. This single fix can save 1 to 2 percent of annual heating and cooling costs on its own.
- Hire a BPI-certified or RESNET-certified energy auditor to perform a full blower door test and infrared thermal imaging scan. This identifies bypasses invisible to the naked eye and gives you a baseline air changes per hour (ACH) measurement to compare against after the upgrade.
- Ask the auditor to assess your attic ventilation ratio. Building code requires a minimum of 1 square foot of net free vent area per 150 square feet of attic floor. Many homes are significantly under-ventilated, which undermines even excellent insulation.
- If your home has HVAC ducts or an air handler in the attic, have the contractor prioritize duct sealing with mastic (not tape) before insulating over them. Leaky attic ducts can waste 20 to 30 percent of your conditioned air before it reaches your living space.
- Have the contractor apply two-part spray polyurethane foam (SPF) to all major bypasses and the full perimeter of the attic floor before blowing in any loose fill. Spray foam seals and insulates simultaneously and achieves the most air-tight result.
- Specify that final insulation depth is marked with depth rulers (sticks) placed every 100 square feet so you can verify the work was completed to the quoted R-value before the crew leaves.
- Schedule a post-installation blower door test to confirm air leakage was meaningfully reduced. A good contractor will bring ACH50 below 5 for most existing homes. Request the report in writing for your records and any rebate applications.
Why It Works: The Benefits
Bringing attic insulation to the DOE-recommended R-38 to R-60 level combined with thorough air sealing can reduce annual heating and cooling costs by 15 to 25 percent, typically saving $200 to $600 per year depending on climate and home size.
Homeowners who properly insulate and air-seal their attic report upstairs temperatures dropping 8 to 12 degrees Fahrenheit on a hot summer afternoon, making upper bedrooms genuinely livable without a dedicated window unit.
When the attic stops dumping heat into your living space, your AC runs fewer cycles per day. Shorter runtime reduces mechanical wear and can extend the life of your system by 3 to 5 years, delaying a $5,000 to $10,000 replacement.
Sealing attic bypasses prevents dusty, unconditioned attic air from being drawn into living spaces through the stack effect, reducing allergens, particulates, and musty odors that enter through ceiling gaps.
Proper ventilation and vapor management prevent winter condensation from forming on cold roof sheathing. Unaddressed moisture can lead to mold growth and structural rot costing $3,000 to $15,000 to remediate.
💰 Savings Impact by Action
Sealing attic bypasses reduces conditioned air loss through the stack effect by up to 20 percent of total heating and cooling energy use, per DOE research on existing homes.
Upgrading from R-11 to R-49 in the attic reduces conductive heat gain and loss through the ceiling by up to 15 percent of annual HVAC energy consumption.
Sealing leaky attic ducts with mastic recovers 20 to 30 percent of conditioned air currently lost to unconditioned attic space before reaching living areas.
Correcting attic ventilation to the 1:150 ratio can reduce attic peak temperatures by 30 to 50 degrees Fahrenheit, cutting cooling load on the ceiling by up to 12 percent.
Insulating and weatherstripping the attic access hatch eliminates a direct thermal bypass that accounts for up to 2 percent of annual heating and cooling energy loss on its own.
🏠 Key Concepts Explained
The Science Behind It
Your attic acts as a buffer zone between your conditioned living space and the outdoors, but only if it is set up correctly. Insulation works by trapping tiny pockets of air within its fibers or cells, slowing the rate at which heat moves by conduction from a hot zone to a cooler one. The key word is slowing, not stopping. Every R-unit of insulation cuts heat transfer by a fixed percentage relative to the previous level, which is why the jump from R-11 to R-38 matters far more than the jump from R-38 to R-60. Most pre-1980 homes have R-11 to R-19 in the attic, roughly half what current codes require.
Air leakage, however, moves heat by convection, not conduction, and it bypasses insulation entirely. A cubic foot of 68-degree air escaping into a 150-degree attic takes all of its thermal energy with it instantly, regardless of what R-value sits next to the gap. This is why building scientists consistently find that air sealing delivers a greater return per dollar than adding insulation alone in leaky homes. Once you have sealed the bypasses, insulation then handles the residual conductive heat flow through the solid materials of your ceiling assembly.
Attic ventilation completes the system by removing heat and moisture that accumulate despite the insulation. Ridge-and-soffit ventilation creates a convective loop: cooler outside air enters at the low soffit vents, picks up heat as it moves up the roof deck, and exits at the ridge. In summer, this can reduce attic temperatures by 30 to 50 degrees Fahrenheit compared to an unventilated attic, which directly reduces the radiant heat load on your ceiling insulation and the conductive heat pushing into your living space. Without proper ventilation, even excellent insulation is fighting a losing battle against a continuously reheated attic cavity.
Frequently Asked Questions
▼ My upstairs is still hot even after I added insulation. What am I missing?
The most common culprits are unsealed air bypasses under the new insulation, blocked soffit vents that prevent proper ventilation, or leaky HVAC ducts in the attic losing conditioned air before it reaches the rooms. Pull back a section of insulation near the eaves and verify the soffit baffles are in place and air is flowing through. If ducts run through the attic, have them tested and sealed with mastic by an HVAC contractor, as duct leakage of 20 to 30 percent is extremely common and will overwhelm even perfect insulation.
▼ How do I know if I have enough attic ventilation without hiring someone?
Measure your attic floor area in square feet and divide by 150. That is the minimum net free vent area in square feet required, split roughly 50/50 between soffit intake and ridge or gable exhaust. You can look up the net free area of your vent products on the manufacturer’s spec sheet. If you see condensation on the underside of your roof sheathing in winter or your shingles are curling and aging prematurely, you are under-ventilated. A local roofing contractor can assess and add vents typically for $300 to $800.
▼ Can I just put rigid foam board on top of my existing blown insulation to add R-value?
You can, but it is not the most cost-effective method for attic floors and creates a tripping hazard if anyone needs to access the attic later. Blown cellulose or fiberglass is significantly cheaper per R-unit for open attic floors, typically $0.25 to $0.50 per square foot per inch of depth for a DIY blow-in versus $1.00 to $2.00 per square foot for rigid foam. Save rigid foam for the attic hatch cover, knee walls, or any area where space is tight and you need maximum R-value per inch.
▼ What if my HVAC air handler is in the attic? Does that change anything?
Yes, significantly. If your air handler and ducts are in the attic, the standard approach of insulating and ventilating the attic floor actually makes those systems work harder because they are still sitting in extreme temperatures. The better long-term solution is to encapsulate the attic by insulating the roof deck instead of the floor, bringing the HVAC equipment inside the conditioned envelope. This is a more expensive project ($3,000 to $8,000) but can reduce HVAC energy use by 30 to 40 percent if your current duct leakage into unconditioned space is high. Get an energy audit before deciding.
▼ Will adding attic insulation cause moisture problems in my walls or crawl space?
Sealing and insulating the attic changes the pressure dynamics of your whole house and can reveal or worsen moisture issues in other areas. Before and after any major air sealing work, check your crawl space or basement for increased condensation. Install a crawl space vapor barrier if you do not have one, and ensure your bathroom and kitchen exhaust fans vent to the outdoors, not into the attic. If you are in a cold climate and tightening a very leaky house significantly, adding mechanical ventilation like an energy recovery ventilator (ERV) may be appropriate to maintain healthy indoor air quality.
Quick Tips
- Check insulation depth in at least five different locations across your attic floor. Insulation is rarely uniform, and a 14-inch average can hide 4-inch thin spots over heavily used areas of the house.
- Do your attic work in early morning from May through September. Attic temperatures above 100 degrees Fahrenheit develop within an hour of sunrise and create a genuine heat illness risk for anyone working in the space.
- If you have a whole-house fan, make sure it has an insulated cover for winter. An uncovered whole-house fan is one of the single largest sources of heat loss in any home that has one.
- Use a permanent marker to write the date and R-value on a piece of tape attached to a joist after any insulation upgrade. This saves significant time during future energy audits or real estate inspections.
Variations for Your Situation
- Apartment or Condo: If you live in a top-floor unit with an unconditioned attic above you, you may not have direct access or permission to improve the attic insulation. Focus instead on what you can control: add a layer of insulating window film to south and west-facing windows to cut solar heat gain by up to 40 percent, use a smart ceiling fan to push air down in summer (look for the counterclockwise setting), and ask your property manager in writing to address the attic. In many jurisdictions, landlords are required to maintain buildings to a habitable temperature standard, which can create leverage for getting insulation upgrades done.
- Tight Budget Under $200: Start with the three highest-return free or nearly free fixes: seal the attic hatch with weatherstripping and an insulated cover made from 2-inch rigid foam ($20 to $40), clear any insulation blocking your soffit vents using DIY cardboard baffles ($0), and seal the five to ten most obvious penetrations you can reach from the hatch with a single can of spray foam ($10 to $15). These three steps alone can reduce attic-related energy loss by 5 to 10 percent and cost less than one month of elevated utility bills.
- Older Home Pre-1980: Homes built before 1980 typically have only 3 to 6 inches of insulation in the attic, R-11 or less, and are riddled with large bypasses including open wall cavities that connect directly to the attic. Before you add any insulation, hire a BPI-certified energy auditor to locate these major bypasses with a blower door and thermal camera. Open wall tops and plumbing chases in older homes can be equivalent to a basketball-sized hole in your ceiling, and covering them with insulation without sealing them first accomplishes very little. Budget $1,500 to $3,000 for professional air sealing in a pre-1980 home before any insulation work begins.