Your garage door is one of the largest openings in your home, and most homeowners never think twice about it until they feel a cold draft in the mudroom or notice the attached garage dropping to near-outdoor temperatures in January. The culprit is almost always the same: a deteriorated bottom seal, gaps along the sides or top of the door, or missing weatherstripping that has cracked and shrunk over years of use. These gaps do not have to be large to matter. A continuous gap of just 1/4 inch running the full width of a 16-foot garage door adds up to roughly 4 square inches of open air passage, enough to rob your home of meaningful heat on a cold night.
If your garage is attached to the living space, those gaps affect your home directly. Cold air seeps under the door, chills the concrete slab, and drives up your furnace runtime. Even in a detached garage, a tight-sealing door protects pipes, stored belongings, and vehicles from freeze damage. The good news is that this is one of the cheapest, fastest energy fixes available to any homeowner. The materials cost under $10 at any hardware store, no special tools are required, and the whole job takes about 20 to 30 minutes.
This post covers exactly why garage doors leak air, how to identify which type of seal or gap is causing your problem, and two practical approaches to fix it: a zero-cost quick adjustment you can try right now, and a full DIY seal replacement that costs under $10 and lasts for years. You will also find real savings estimates, common mistakes to avoid, and answers to the questions homeowners most often ask about garage door weatherstripping.
What You’ll Need
Click on an item below to shop for the recommended items for this recipe on Amazon.
As an Amazon Associate, we earn from qualifying purchases.
How to Do It
- Close the garage door fully and walk along the bottom edge from inside the garage. Hold a flashlight or phone flashlight at floor level and look for light showing through gaps. Mark any problem areas with tape.
- Inspect the existing bottom seal. If it is still flexible and at least 1/2 inch thick, it may just be misaligned. Look for a metal retainer channel holding the seal: two screws at each end of the door panel typically hold this retainer in place.
- Loosen the retainer screws slightly, slide the seal down until it makes firm contact with the floor when the door is closed, then retighten the screws. Close the door and recheck for light gaps.
- Check the side and top weatherstripping as well. Press the strips flat against the door frame with your hand. If they spring back with full contact and no gaps, they are still functional.
- If the seal is cracked, brittle, or compressed flat, the adjustment will not hold. Move on to the DIY replacement approach below for a lasting fix.
- Measure your garage door width and purchase a matching vinyl T-slot bottom seal from a hardware store. A 16-foot roll of standard 3-inch T-seal typically costs $6 to $9. Also pick up a tube of garage door lubricant or dish soap to ease installation.
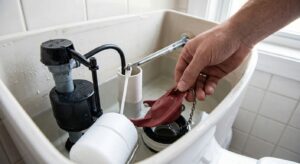
- Open the door to waist height so you can access the bottom panel comfortably. Slide out the old bottom seal by removing the two retainer end screws and pulling the worn seal out of the T-slot track.
- Cut the new seal to your door’s exact width using scissors or a utility knife. A clean straight cut ensures full contact across the entire bottom edge.
- Apply a small amount of dish soap or silicone lubricant to the T-slot ribs on the new seal. Slide one end into the metal retainer track and push the seal across the full width of the door until it exits the other side. Reinstall the end screws.
- Close the door slowly and check that the new seal compresses evenly across the full bottom edge. There should be slight resistance when closing, indicating a proper seal. Use the flashlight test again to confirm no light gaps remain.
- As a final step, inspect and replace any cracked or flattened side or top weatherstripping. Adhesive-backed foam tape for these areas costs around $3 and takes 5 minutes to apply, completing the full perimeter seal.
Why It Works: The Benefits
Sealing a standard attached garage door can reduce heating costs for adjacent rooms by 5 to 15%, according to DOE infiltration data. For a home spending $150 per month on heat in winter, that is $7 to $22 saved each month.
Stopping cold air infiltration at the garage door directly raises the average temperature of the garage and the rooms sharing a wall with it, reducing the sensation of cold floors near the garage entry.
A sealed garage holds heat 10 to 20 degrees F warmer than an unsealed one on a cold night, keeping pipes above the 32 degrees F freeze threshold and protecting vehicle fluids and batteries from extreme cold.
Weatherstripping gaps that let in air also let in fine dust, insects, and occasionally small rodents. A properly sealed door is a meaningful first line of defense against all three.
Unlike insulation upgrades that show up slowly on utility bills, a new bottom seal eliminates drafts you can physically feel, providing noticeable comfort improvement the same day the fix is installed.
💰 Savings Impact by Action
Replacing a deteriorated bottom seal eliminates up to 60% of garage door air infiltration, reducing heating load on adjacent rooms by roughly 5 to 15%.
Sealing all four sides of the garage door including top and side weatherstripping reduces total garage infiltration by up to 80%, improving adjacent room temperatures by 3 to 5 degrees F on cold nights.
Adding a floor-mounted threshold seal in combination with a new door seal creates a double barrier that reduces infiltration to near-zero for most floor gap conditions.
A door sweep on the garage-to-house entry door blocks any residual cold air that enters the garage from reaching conditioned living space, adding 5 to 10% additional savings on heating for adjacent rooms.
🏠 Key Concepts Explained
The Science Behind It
The reason a garage door gap causes such outsized heat loss comes down to how air moves under pressure. In winter, your furnace creates a warm, slightly pressurized interior. At the same time, the stack effect pulls warm air up and out through upper leaks in the building envelope, creating negative pressure at lower levels. This means your home is actively pulling cold outdoor air in through low gaps like the bottom of a garage door. A 1/4-inch gap along a 16-foot door creates roughly 4 square inches of net opening, which under typical winter pressure differences can allow 30 to 60 cubic feet of cold air infiltration per minute.
The thermal impact is compounded by the properties of concrete. Garage slabs sit directly on the ground, which stays near 50 degrees F even when outdoor air is below freezing. Cold air entering through door gaps flows across this slab, absorbing additional coldness, and then migrates under the door to living spaces. The slab also acts as a thermal mass that holds coldness for hours after outdoor temperatures recover, meaning a brief seal failure at night can keep the garage cold well into the following morning.
Vinyl and rubber seals work by maintaining a compliant barrier that compresses against surface irregularities. When a seal is new, its elastomers can deform around minor floor imperfections, maintaining contact across the full width of the door. As the material ages and loses flexibility, it hardens, and those same minor imperfections become air channels. This is why visual inspection alone is often misleading: a seal can look mostly intact but have lost the compliance needed to actually block airflow, which is why the flashlight gap test is a more reliable diagnostic than simple visual inspection.
Frequently Asked Questions
▼ I replaced the bottom seal but there is still a noticeable draft. What am I missing?
Check the side and top weatherstripping around the door frame, not just the bottom. Cold air often enters at the corners where the bottom seal meets the side strips. Also inspect the service door leading from the garage into the house, as a gap there can make it feel like the garage door is leaking even when it is not.
▼ My garage door has an uneven floor. The seal touches in the middle but there are gaps at the corners. What should I do?
A standard flat T-slot seal cannot bridge significant floor variations. Replace it with a bulb-style bottom seal or add a rubber threshold seal mounted to the floor surface with construction adhesive. Threshold seals can span up to 3/4 inch of floor unevenness and cost about $20 to $30.
▼ Can renters or condo owners do this without getting permission?
In most rentals, a garage door bottom seal is considered routine maintenance that tenants can handle without landlord approval, similar to replacing a light bulb. That said, check your lease first. If you are in a condo with shared garage infrastructure, notify your property manager before making changes to common-area doors.
▼ How long will a new vinyl bottom seal last before I need to replace it again?
A quality vinyl T-slot seal in a typical residential garage lasts 5 to 10 years with normal use. UV exposure, extreme cold, and vehicles rolling over the seal repeatedly will shorten the lifespan. Inspect it each fall and replace it when you notice it is no longer compressing against the floor under light hand pressure.
▼ Will fixing the garage door seal actually show up on my utility bill?
For attached garages sharing walls or ceilings with living spaces, yes: most homeowners see a 5 to 10% reduction in heating costs for the adjacent rooms within the first full billing cycle. The savings are most noticeable during the coldest months and in older homes that previously had no seal at all.
Quick Tips
- Do the flashlight test at night with all garage lights off for the clearest view of where light and air are passing through gaps.
- If your garage floor has a significant slope toward the center drain, consider a threshold seal mounted to the floor rather than relying solely on the door-mounted bottom seal.
- Lubricate your garage door hinges, rollers, and springs with silicone spray while you have the door open for the seal job. It costs nothing extra and prevents the misalignment that causes uneven seal contact.
- Check your side and top weatherstripping every fall as part of a simple seasonal home walkthrough. These strips typically last 5 to 7 years and are cheap to replace before they fail completely.
Variations for Your Situation
- Apartment or Condo with Individual Garage: Renters who have their own detached or attached garage unit can still perform this fix since it requires no structural changes. Purchase a self-adhesive bottom seal insert or a floor-mounted threshold seal that does not require drilling. These cost $8 to $15 and are removable if needed. Check your lease or HOA rules before proceeding.
- Tight Budget (Under $5): Skip the full perimeter weatherstripping and focus only on the bottom seal, which delivers the most impact per dollar. A basic vinyl T-seal at a discount hardware store runs $5 to $7. Alternatively, use heavy foam backer rod pressed into the T-slot as a temporary free fix using scrap material from other projects around the house.
- Older Home with Deteriorated Wood Door Frame: Homes built before 1980 often have wood garage door frames that have warped, rotted, or shifted over decades. In this case, replacing just the seal will not close gaps caused by frame distortion. Sand or shim the frame to create a flat contact surface first, then apply new weatherstripping. If the wood is soft or rotted, it needs to be repaired or replaced by a carpenter before any seal will hold effectively.