Most homeowners breathe a sigh of relief when a storm passes without obvious drama, but the real danger is often invisible from the street. A few missing shingles, a cracked flashing seal, or a subtle dent in a soffit can allow water to infiltrate your roof system, soaking insulation, rotting decking, and quietly pushing your energy bills upward. The U.S. insurance industry processes over 3 million roofing claims annually, and a significant portion involve damage that went undetected for weeks or months after the triggering storm.
The financial stakes are serious. A minor flashing repair caught early might cost $150 to $400. That same leak, left unaddressed for one winter, can escalate into decking replacement, mold remediation, and damaged drywall totaling $5,000 to $15,000 or more. From an energy standpoint, wet or compressed attic insulation loses 40 to 50% of its R-value, meaning your HVAC system works significantly harder every single day until the problem is fixed.
This guide walks you through exactly what to look for after a storm, what you can safely check yourself, and when to call a licensed roofing professional. You do not need to climb on your roof to do a meaningful first inspection, and the steps here are organized so any homeowner can complete them systematically in under an hour.
What You’ll Need
Click on an item below to shop for the recommended items for this recipe on Amazon.
As an Amazon Associate, we earn from qualifying purchases.
How to Do It
- Walk the full perimeter of your home from the ground using binoculars if available. Look for missing, lifted, or visibly buckled shingles, and note any areas where the roofline appears uneven or sagging.
- Inspect gutters and downspouts for an unusual accumulation of dark granules, which look like coarse sand or coffee grounds. Heavy granule loss after a storm is a reliable indicator of shingle surface damage from hail or wind-driven debris.
- Check all exterior penetrations you can see from the ground, including plumbing vents, skylights, and the chimney base, for visible cracks, separated flashing, or displaced caulking.
- Go into the attic during daylight with a flashlight turned off. Look for any pinpoints of light coming through the decking, which indicate holes or gaps. Then turn your flashlight on and look for water stains, dark streaks on rafters, or insulation that looks wet, matted, or discolored.
- Check your ceilings on the top floor of the home for any new water stains, bubbling paint, or soft spots in drywall. Take photos of anything suspicious with your phone so you have a timestamped record.
- Record the date of the storm, the weather conditions (wind speed if reported locally, hail size if observed), and all photos in a single folder or note. This documentation package is what you will submit to your insurer if damage is confirmed.
- Set up a sturdy extension ladder at the eave with a standoff stabilizer so the ladder does not rest against the gutter. Have a helper hold the base. Wear rubber-soled shoes with good grip.
- Begin at one end of the roof and work systematically across each plane. Press gently on shingles to check for soft spots in the decking underneath, which indicate moisture damage to the OSB or plywood sheathing.
- Inspect every flashing location up close: chimney base, skylights, pipe boots, and roof-to-wall transitions. Look for separated seams, rust staining, cracked sealant, or lifted edges. Use your hand to press on flashing edges to check if the sealant bond has broken.
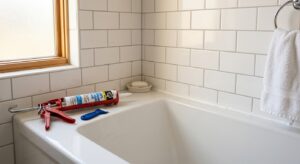
- Replace any lifted or cracked pipe boot seals using a tube of roofing sealant ($8 to $15 at any hardware store). Clean the surface, apply a bead of sealant under any lifted flashing edges, and press firmly. Smooth with a putty knife.
- Re-nail or re-secure any lifted shingles using roofing nails ($5 for a small box) driven at the manufacturer’s nailing zone, then apply a dab of roofing sealant over each nail head to prevent water entry.
- After completing the exterior check, return to the attic and use a moisture meter ($20 to $40 at hardware stores) to check the insulation and any wood surfaces near areas where you saw possible exterior issues. Readings above 19% on wood indicate moisture concern that warrants professional follow-up.
- Contact two to three licensed, locally established roofing contractors within 48 to 72 hours of the storm. Avoid out-of-town storm chasers who appear in the neighborhood immediately after major events and often disappear before warranty work is needed.
- Ask specifically for an itemized written inspection report with photos, not just a verbal estimate. A reputable contractor will document each area of damage and explain whether it warrants a repair or a full replacement.
- Share your own ground-level and attic photos with the contractor before they begin. This helps them focus on areas of concern and validates their findings against your independent documentation.
- If the contractor identifies damage that may meet your insurance deductible, contact your insurer to open a claim before any repair work begins. Have the contractor present during the adjuster’s visit if possible, as they can explain the technical findings directly.
- Get the repair scope and warranty terms in writing before signing anything. Quality roofing repairs typically carry a 1 to 5 year workmanship warranty in addition to the manufacturer’s material warranty.
Why It Works: The Benefits
Catching a compromised flashing seal or missing shingle within days of a storm typically means a repair bill of $150 to $500. The same damage discovered months later after water has soaked the decking and insulation can cost $8,000 to $20,000 to remediate fully.
Wet insulation loses up to 50% of its R-value and can add 15 to 25% to monthly heating and cooling bills until it is replaced. Early detection allows insulation to dry or be replaced before the damage becomes permanent.
Documenting damage with timestamped photos within days of a storm gives insurance adjusters clear evidence of cause and scope. This documentation can be the difference between a full payout and a disputed or denied claim.
Addressing minor post-storm damage like lifted shingles or cracked caulking at penetrations can add 5 to 10 years to a roof’s functional life by preventing the moisture cycling that degrades decking and underlayment.
Stopping moisture infiltration before mold takes hold eliminates a significant indoor air quality risk. Mold remediation in an attic costs $1,500 to $5,000 on average and may require temporary displacement if it spreads to living spaces.
💰 Savings Impact by Action
Catching damage within days of a storm reduces total repair costs by up to 90% compared to discovering the same damage after months of water infiltration have compromised decking, insulation, and drywall.
Preventing moisture infiltration into attic insulation preserves its full R-value, avoiding the 15 to 25% increase in heating and cooling costs caused by permanently compressed or wet insulation.
Addressing roof leaks before the 24 to 48 hour mold growth window eliminates remediation costs that average $1,500 to $5,000 per incident.
Homeowners who file storm damage claims with professional inspection reports and timestamped photos receive settlements 20 to 30% higher on average than those with no supporting documentation.
Addressing minor post-storm damage promptly can extend a roof’s functional lifespan by 5 to 10 years, reducing the annualized cost of a replacement by up to 20%.
🏠 Key Concepts Explained
The Science Behind It
Roofing systems work as a layered drainage plane, not a waterproof barrier. Water is expected to get under the outer shingle layer temporarily during heavy rain, and the underlayment, flashing, and decking system beneath it are designed to redirect that water to the gutters before it can penetrate the structure. When storm damage compromises any layer of that system, the redundancy fails and water finds a path inward. Because water follows the path of least resistance and travels horizontally along wood grain, a single entry point can cause damage that appears ten feet away from where the shingle was actually damaged.
Hail damage is particularly insidious because it is not always immediately visible from the ground. Hailstones above 1 inch in diameter strike asphalt shingles with enough force to fracture the fiberglass mat underneath the granule surface without creating an obvious hole. That subsurface fracture weakens the shingle’s ability to shed water and accelerates UV degradation. Within one to three years, those fractured zones begin to crack and curl, allowing water entry that the homeowner attributes to normal aging rather than the storm that was the actual root cause.
From an energy efficiency perspective, the attic is the first line of defense against heat gain and loss through the roof assembly. When insulation absorbs moisture, water molecules displace the air pockets that give insulation its thermal resistance. Wet insulation conducts heat far more readily than dry insulation, and even after the moisture source is eliminated, compressed fibers do not return to their original loft. This means that a single undetected roof leak can permanently degrade attic insulation efficiency, increasing the home’s heating and cooling load until the insulation is replaced.
Frequently Asked Questions
▼ I don’t see any obvious damage from the ground. Does that mean my roof is fine?
Not necessarily. Hail damage to shingles, cracked pipe boot seals, and lifted flashing are often invisible from street level but clearly visible from 10 to 15 feet away on the roof surface. If your area experienced hail larger than 0.75 inches or sustained winds above 50 mph, a closer inspection from the eave line or by a professional is still a smart step even when nothing looks wrong from the ground.
▼ There is a water stain on my ceiling but I can’t find any obvious roof damage. What do I do?
An interior stain tells you water is getting in, but it does not tell you where. The entry point is frequently several feet uphill from where the stain appears due to how water travels along rafters. Start your attic inspection directly above the stain and work upward toward the ridge, looking for wet wood, stained insulation, or any hint of daylight. If you cannot identify the source within an hour, call a licensed roofer since guessing and applying sealant in the wrong location often masks the real problem without fixing it.
▼ How do I know if my damage is worth filing an insurance claim?
Compare the repair estimate from a licensed contractor against your deductible. If the repair cost is within $500 to $1,000 of your deductible, it is generally better to pay out of pocket and preserve your claims history. However, if you have widespread shingle granule loss or multiple compromised areas, the cumulative cost almost always exceeds the deductible, and a claim is appropriate. Document everything before making that call, and never file a claim based on a storm chaser’s estimate alone.
▼ My roof is only 5 years old. Can a storm still cause serious damage?
Yes. Even relatively new roofs are vulnerable to hail impact damage and flashing failures, particularly if the installation quality was marginal or if the home is in a region with severe weather cycles. Newer roofs may actually have better warranty coverage and insurance claim standing precisely because the pre-storm condition is well-established. Do not skip the post-storm check just because the roof is new.
▼ What if I find damage but my insurance company says it is just normal wear and tear?
Request a written explanation of the denial and ask specifically what evidence they used to make that determination. If you have timestamped before-and-after photos and a licensed contractor’s inspection report attributing the damage to the storm event, you have grounds to request a re-inspection or file a formal dispute. Many states also allow you to hire a public adjuster to represent your interests independently in the claims process.
Quick Tips
- Set a calendar reminder to do a ground-level roof check within 24 hours of any storm that brings winds above 50 mph or hail larger than a dime (roughly 0.75 inches in diameter).
- Check your gutters from the ground immediately after a storm. A significant volume of shingle granules in the gutter after one storm is a strong indicator that hail assessment by a professional is warranted.
- Your attic inspection is just as important as your exterior check. Water that has entered through a compromised area is often visible in the attic days before any ceiling stain appears in the living space below.
- Document everything with your phone camera before touching or cleaning anything. Insurance adjusters rely heavily on photographic evidence, and a well-documented initial claim is processed faster and more accurately than a verbal description.
- If you are in a hail-prone region, ask your roofing contractor about Class 4 impact-resistant shingles when it is time to replace your roof. These can qualify you for a 20 to 30% discount on homeowner’s insurance premiums in many states.
Variations for Your Situation
- Apartment or Condo: Residents of apartments and condos are typically not responsible for the roof structure, but you are still responsible for documenting any damage that affects your unit. After a storm, photograph any ceiling stains, damaged window seals, or water intrusion around sliding doors immediately. Report these to your property manager in writing (email creates a timestamp) and keep a copy. Your renter’s insurance may cover interior damage to your belongings caused by a roof failure, even if the roof itself is the building owner’s responsibility.
- Tight Budget (under $50): You can conduct a thorough and valuable post-storm assessment for almost nothing. Binoculars ($15 to $25 if you need to buy them) and your smartphone camera are your primary tools for the exterior ground-level check. A simple flashlight you already own is all you need for the attic inspection. Focus your energy on the attic walkthrough since interior moisture evidence is the most reliable early-warning system and costs nothing to find. If you spot damage, get one free estimate from a licensed local contractor before spending any money on materials.
- Older Home (pre-1980): Homes built before 1980 are significantly more likely to have original roofing materials that are at or near the end of their service life, thinner or single-layer underlayment, and flashing details that do not meet current standards. In these homes, even a moderate storm can tip aging materials past the point of repair into full replacement territory. Prioritize getting a professional inspection rather than attempting DIY repairs, since disturbing old materials can sometimes accelerate failure. Also be aware that homes of this age may have asbestos-containing roofing materials such as certain shingles or cements, and if you encounter anything that looks like corrugated gray fiber panels or unusual cement-like roofing material, do not disturb it and consult a licensed abatement contractor before proceeding.