Every summer, millions of homeowners walk downstairs and are hit with that familiar wall of damp, stale air. The carpet feels slightly wet underfoot, the walls feel cold and clammy, and there is a faint musty smell that no amount of air freshener can mask. This is not just an annoyance, it is a sign that moisture is actively working against your home’s structure, your air quality, and your energy bills.
Basement dampness in summer is almost never caused by a single problem. It is the result of physics working against you: warm, humid outdoor air meeting cool basement walls and floors, condensation forming on every cold surface, and groundwater pushing inward through microscopic cracks in your foundation. The good news is that most cases can be dramatically improved with a combination of low-cost fixes and targeted upgrades, without tearing out walls or spending thousands on waterproofing systems.
This guide walks you through the real science behind summer basement moisture, gives you a tiered action plan from free quick fixes to professional solutions, and helps you figure out exactly which combination of steps will work for your specific situation. Whether your basement is finished or unfinished, whether you rent or own, there are meaningful steps you can take this weekend.
What You’ll Need
Click on an item below to shop for the recommended items for this recipe on Amazon.
As an Amazon Associate, we earn from qualifying purchases.
How to Do It
- Close all basement windows during the day when outdoor humidity is high, typically above 60% RH. Opening windows in summer does the opposite of what most people expect, it lets in warm humid air that condenses on cool surfaces. Check outdoor RH on a weather app before opening anything.
- Redirect all downspout extensions at least 6 feet away from the foundation. Walk your perimeter during or after the next rainstorm and confirm water is not pooling against the house. Plastic downspout extensions cost $5 to $10 each and take five minutes to install.
- Check your dryer vent exits completely outdoors and is not disconnected inside the basement. A disconnected dryer vent dumps gallons of moisture-laden air into the basement per load. Reconnect any loose duct sections and use aluminum tape, not regular duct tape, to seal joints.
- Move stored items away from foundation walls, especially cardboard boxes, fabric, and wood. These materials absorb and hold moisture, accelerating mold growth and blocking airflow. Store items on wire shelving or plastic pallets at least 2 inches from walls.
- Check that your sump pump (if installed) is operating and its discharge line carries water at least 10 feet from the foundation. Pour a bucket of water into the sump pit to confirm the float activates the pump within a few seconds.
- Test whether your moisture is condensation or intrusion: tape a 12-inch square of plastic sheeting to a damp area of your foundation wall, seal all edges with tape, and leave it for 24 hours. If moisture appears on the room-facing side of the plastic, it is condensation from interior air. If it appears behind the plastic against the wall, groundwater intrusion is the source and you need the professional approach.
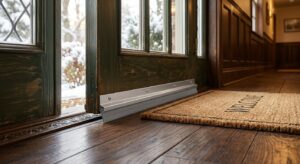
- Seal all rim joist cavities (the framed perimeter where floor joists meet the foundation wall) with 2-inch rigid foam board cut to fit each bay, followed by a bead of canned spray foam around all edges. Rim joists are the single largest air leakage point in most basements, responsible for 15 to 25% of total house air leakage.
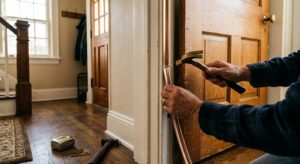
- Caulk all visible cracks and gaps in the foundation wall and floor-wall joint using hydraulic cement for active seeps and polyurethane caulk for dry cracks. Apply caulk in a continuous bead and tool smooth. This reduces vapor diffusion and liquid water entry points.
- Install a basement-rated dehumidifier sized for your square footage. For spaces up to 1,000 square feet, a 30-pint unit is typically sufficient. For 1,000 to 2,500 square feet, use a 50-pint unit. Set the target humidity to 50% and use a unit with a built-in drain hose connection so you are not emptying a bucket daily. Energy Star certified models use 15% less electricity than standard units.
- Insulate any cold water pipes running through the basement using foam pipe insulation (R-2 to R-4 coverage). Cold pipes are constant condensation points. Foam pipe insulation costs about $0.50 per linear foot and takes 30 minutes to install on a typical basement plumbing run.
- After completing the above steps, monitor your basement RH with a $10 to $15 digital hygrometer for two weeks. If RH stays consistently above 60% despite the dehumidifier running, document the readings and consult a waterproofing professional, as active groundwater intrusion may be occurring.
- Get three quotes from licensed waterproofing contractors, not general contractors. Ask each one to explain whether they recommend interior drainage (a perimeter drain and sump system) or exterior waterproofing (excavation and membrane application). Both have legitimate uses depending on your situation.
- For moderate intrusion, interior perimeter drainage with a sump pump upgrade is the most cost-effective professional solution, typically $4,000 to $8,000. The contractor installs a drain channel at the base of your foundation walls that routes water to a sump pit before it enters your living space.
- For severe cases or new construction additions, exterior waterproofing applies a membrane to the outside of your foundation wall and installs drainage board and weeping tile. This is more effective long-term but requires excavation, typically costing $8,000 to $15,000 for an average home.
- Ask contractors about a battery backup sump pump as part of any installation. Power outages often coincide with major storms. A backup pump ($150 to $300) prevents flooding during the highest-risk weather events and is far cheaper than a flooded basement cleanup.
Why It Works: The Benefits
Keeping basement RH below 50% eliminates the conditions mold needs to grow, protecting your structure, belongings, and air quality. Professional mold remediation averages $1,500 to $3,500, making prevention a smart investment.
High basement humidity forces your AC system to work harder to dehumidify the whole house, since air circulates between floors. Controlling basement moisture at the source can reduce whole-home cooling load by 10 to 15%, saving $75 to $200 per summer in most climates.
A dehumidifier running in a leaky basement works two to three times harder than it needs to. Sealing air entry points first can cut dehumidifier runtime by 30 to 50%, reducing electricity consumption and extending the unit’s lifespan by several years.
Humidity from the basement migrates upward through the stack effect. Controlling basement RH below 55% can reduce perceived mugginess on the first and second floors, allowing you to set your thermostat 1 to 2 degrees higher without sacrificing comfort.
Chronic moisture exposure causes wood framing to rot, metal fasteners to corrode, and concrete to degrade over time. Addressing dampness now prevents repair costs that can range from $500 for minor wood rot to over $20,000 for foundation repairs.
💰 Savings Impact by Action
Sealing rim joist cavities with rigid foam and spray foam eliminates up to 20% of whole-house air leakage, directly reducing moisture and conditioned air loss.
Combining air sealing with proper dehumidifier sizing reduces runtime by 30 to 50%, cutting dehumidification electricity costs proportionally.
Controlling basement humidity at the source reduces whole-home latent cooling load by 10 to 15%, lowering central AC energy consumption each summer.
Keeping RH consistently below 50% eliminates the conditions for mold growth, avoiding remediation costs that average $1,500 to $3,500 per incident.
🏠 Key Concepts Explained
The Science Behind It
The reason your basement gets damp specifically in summer comes down to a concept called the dew point. Every parcel of air can hold a certain amount of water vapor, and that capacity decreases as air cools. When warm, humid outdoor air (say, 80 degrees F at 70% relative humidity) enters your basement and contacts a concrete wall that is sitting at 60 degrees F thanks to the surrounding soil, that air is instantly chilled below its dew point and releases its moisture as liquid water on the wall surface. This is exactly the same physics that causes a cold glass to sweat on a humid day. Your basement walls are essentially giant cold glasses all summer long.
This explains a counterintuitive truth: opening basement windows in summer typically makes the dampness worse, not better. You are intentionally introducing more warm, humid air to condense on your cool surfaces. The right strategy is to limit how much outdoor summer air enters the basement, then use a mechanical dehumidifier to remove moisture from the air volume that is already inside. By keeping the air in the basement dry enough, even cold walls will not condense moisture because there is simply not enough vapor in the air to reach the dew point on contact.
Groundwater intrusion adds a second moisture pathway. Soil around foundations holds substantial water after rain events, and hydrostatic pressure pushes that water through pores and cracks in concrete at a rate that can introduce gallons of water per day. Concrete is not inherently waterproof: its porous structure allows both liquid water and water vapor to migrate inward. Exterior grading, proper drainage, and interior sealants all work to reduce this pathway. Understanding which mechanism is dominant in your basement, condensation versus intrusion, is the most important diagnostic step, because the solutions are completely different and spending money on the wrong fix will deliver no benefit.
Frequently Asked Questions
▼ My dehumidifier runs constantly but the basement is still humid. What am I doing wrong?
A constantly running dehumidifier that cannot keep up usually means one of three things: the unit is undersized for your square footage, outdoor air is entering faster than the machine can process it (common with open windows or large gaps), or you have active groundwater intrusion adding moisture faster than evaporation can remove it. First, confirm your windows and any vents are closed during humid days. Then run the plastic sheeting wall test to check for groundwater. If air sealing does not help within a week, the unit is likely undersized and you need a higher-capacity model or a second unit.
▼ How do I know if my problem is condensation or groundwater coming through the walls?
The plastic sheeting test is your most reliable DIY diagnostic. Tape a 12-inch square of clear plastic to a damp section of wall, seal all four edges completely with waterproof tape, and leave it for 24 hours. Moisture on the room-facing surface of the plastic means the air in your basement is condensing on the cool wall, which is an air sealing and dehumidification problem. Moisture behind the plastic, between the sheeting and the wall, confirms water is migrating through the concrete from the soil side, which requires crack sealing or professional waterproofing.
▼ Can I just leave a window open with a fan to dry out my basement in summer?
In most summer conditions, this will make things significantly worse. Outdoor summer air typically has a much higher absolute moisture content than your basement air, so introducing it increases the total water vapor load. The only time ventilation helps is when outdoor dew point is lower than the basement surface temperature, which during summer in most of the US is only true on rare dry days, typically when outdoor RH drops below 40%. Use a hygrometer to check outdoor conditions before opening anything.
▼ I found white chalky stuff on my basement walls. Is that mold?
White chalky or crystalline deposits are called efflorescence, not mold. They form when water moves through concrete and deposits dissolved minerals on the surface as it evaporates. Efflorescence itself is not a health hazard, but it is a reliable indicator that liquid water is migrating through your foundation walls, meaning you have a groundwater intrusion problem rather than a pure condensation problem. Brush the deposits off with a stiff brush (dry), then address the moisture source rather than painting over it.
▼ My basement smells musty but I cannot see any mold. Should I be worried?
Musty odor without visible mold almost always means mold is present but hidden, typically behind drywall, under carpet padding, or on the back side of stored cardboard and fabric items. The compound responsible for the musty smell (geosmin and microbial VOCs) is produced by mold even in small quantities. Remove any saturated carpet or cardboard immediately, check behind any finished wall sections by removing an outlet cover plate and shining a flashlight, and lower RH to below 50% consistently. If the smell persists after two weeks of controlled humidity, consult an indoor air quality professional for a mold assessment.
Quick Tips
- Set your dehumidifier target to 45 to 50% RH, not 60%. Most units default to 60%, but that is too close to the 60% threshold where mold growth begins. Setting it lower gives you a safety buffer for humidity spikes during storms.
- Place your dehumidifier toward the center of the basement or near the highest-traffic air area, not tucked into a corner. Dehumidifiers work best with good airflow around all sides, and a central position allows the unit to draw from a larger air volume.
- Run a box fan pointing upward near the basement stairway door when conditions allow. Moving air from the basement toward conditioned upper floors during dry weather can help equalize humidity. Reverse this and keep the door closed during hot, humid outdoor days.
- Install a simple $15 Wi-Fi hygrometer so you can monitor basement humidity from your phone without going downstairs. Services like Govee or Inkbird offer app-connected sensors that log trends, helping you identify whether humidity spikes happen during rain events (intrusion) or on hot afternoons (condensation).
Variations for Your Situation
- Apartment or Rental with Below-Grade Unit: Renters cannot modify foundation walls or install permanent waterproofing, but can make significant improvements. Use a portable dehumidifier ($150 to $250) set to 50% RH, keep windows closed on humid days, use foam pipe insulation on any cold pipes, and place a $15 hygrometer to document humidity levels. If conditions remain above 60% RH consistently, document readings with timestamps and notify your landlord in writing since chronic dampness creating mold risk is typically a habitability issue under most state codes.
- Tight Budget Under $50: Focus exclusively on the free and near-free steps first. Close windows during humid days, redirect downspouts, remove cardboard and fabric from contact with walls, and run the plastic sheeting test. Purchase a $10 to $15 digital hygrometer to know your actual baseline rather than guessing. If your numbers show RH above 65%, prioritize saving for a dehumidifier, as that single purchase will deliver more impact than any other sub-$200 item. In the meantime, a $25 to $35 box fan circulating air reduces surface condensation by preventing stagnant cool air from sitting against walls.
- Older Home Pre-1960: Homes built before modern foundation codes often have rubble stone foundations, no footer drains, and no vapor barrier under the slab. These homes almost always have active groundwater migration rather than condensation alone, and standard DIY sealing products will not hold against hydrostatic pressure. Start with the plastic sheeting test on multiple wall sections. If you confirm intrusion, budget for a professional interior drainage system ($4,000 to $8,000) rather than spending money on sealants that will crack and fail within one to two seasons. In the interim, a high-capacity 70-pint dehumidifier manages symptoms while you plan the permanent fix.