Most homeowners never think about their insulation until something goes wrong. It sits quietly in attics, walls, and crawl spaces doing its job until, gradually, it stops doing it well. Insulation can compress, absorb moisture, shift, get disturbed by pests, or simply become obsolete as energy codes advance. The result is higher energy bills, rooms that never seem to reach the right temperature, and an HVAC system working harder than it should.
The tricky part is that insulation problems are mostly invisible. You cannot see compressed fiberglass batts through drywall or know without measuring whether your attic has R-19 or R-49. But the symptoms show up in your utility bills, your comfort level, and in a few telltale signs you can spot with a flashlight and a tape measure. Understanding what to look for can save you thousands of dollars in wasted energy and misdirected HVAC repairs.
This guide covers the lifespan of every major insulation type, the warning signs that replacement is overdue, and two practical approaches to get your insulation where it needs to be. Whether you want to start with a thorough inspection or jump straight to an upgrade, you will find real numbers, realistic costs, and actionable steps to make the right call for your home.
What You’ll Need
Click on an item below to shop for the recommended items for this recipe on Amazon.
As an Amazon Associate, we earn from qualifying purchases.
How to Do It
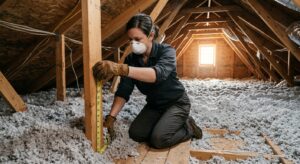
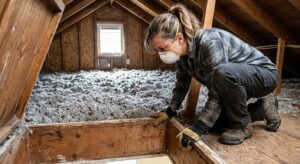
- Gather your tools: a flashlight or headlamp, a ruler or tape measure, a dust mask rated N95 or better, safety glasses, and disposable gloves. Attic insulation, especially older fiberglass or cellulose, irritates skin and lungs.
- Access your attic and measure the depth of existing insulation in three to five locations across the floor, avoiding compressed areas near the eaves. Each inch of fiberglass batt is roughly R-3.2, loose-fill fiberglass is about R-2.5 per inch, and cellulose is about R-3.7 per inch. Compare your total to the DOE recommendation for your climate zone: R-38 to R-49 in most of the US, R-49 to R-60 in cold climates.
- Look for visible red flags: dark staining or discoloration on the insulation surface (a sign of air movement through the material), compressed or flattened batts, areas of missing insulation around recessed lights or plumbing penetrations, and any signs of moisture such as staining, clumping, or visible mold growth.
- Check your crawl space or basement if applicable. Insulation between floor joists should be held snugly in place, not hanging down or missing. Vapor barrier on the crawl space floor should be intact with no tears or standing water beneath it.
- Note any insulation type that may contain vermiculite (a gray, pebble-like material found in some attics insulated before 1990) as it may contain asbestos and requires professional testing before disturbance.
- Record your findings: current R-value estimate, any damage or moisture, missing areas, and the approximate square footage of the attic floor or walls affected. This document becomes your baseline for choosing materials and getting contractor quotes.
- Air seal before you insulate. Use canned spray foam or caulk to seal all penetrations in the attic floor: electrical boxes, plumbing stacks, HVAC ducts, and the tops of interior walls. This step is often skipped but can account for 30 to 40% of a home’s heat loss on its own. Do not skip it.
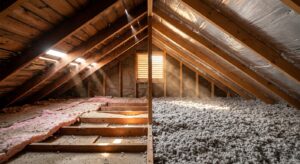
- Install cardboard or foam baffles at every rafter bay along the eaves to maintain a clear airway from soffit vents to the attic space. This prevents insulation from blocking ventilation and causing moisture problems.
- If existing fiberglass batts are compressed by more than 25%, wet, or visibly molded, remove and bag them for disposal before adding new material. Insulation that is dry and close to original thickness can be left in place and covered.
- Calculate the bags needed using the coverage chart printed on every bag of blown-in insulation. For most US climates, you are targeting a final depth of 10 to 14 inches of cellulose or 15 to 18 inches of blown fiberglass to reach R-38 to R-49. Add 10% to the bag count as a buffer.
- Set up the blower at the attic hatch or a window opening with the hose long enough to reach the far corners. Work from the farthest corners back toward the hatch, keeping the hose tip a few inches above the existing surface and using a depth gauge stick or marked reference point to track fill depth.
- After completing the fill, check depth at multiple locations and add material to any low spots. Install an insulation depth marker (a small ruler-like sign) near the attic hatch so future inspectors and HVAC technicians can confirm coverage.
- Schedule a home energy audit before calling insulation contractors. A certified auditor uses a blower door test and infrared camera to show exactly where energy is escaping, giving you a prioritized list of improvements rather than guessing. Audits cost $150 to $400 but often pay for themselves in avoided unnecessary work.
- Get three quotes from insulation contractors. Ask each to specify the insulation type, installed R-value, method of air sealing included, and whether they will remove existing material or add over it. Quotes should be itemized so you can compare them accurately.
- Ask about available utility rebates and federal tax credits before signing. The 25C federal tax credit covers 30% of insulation material and air sealing costs, up to $1,200 per year. Many state and utility programs stack additional rebates on top of this.
- Confirm that the contractor will air seal attic penetrations as part of the scope. Contractors who only blow in insulation without addressing bypasses leave significant savings on the table. This should be included in every attic insulation job.
- For walls, ask specifically about dense-pack blown-in insulation injected through small holes drilled from inside or outside. This method fills wall cavities that have settled or were never insulated without requiring drywall removal, and achieves R-13 to R-15 in a standard 2×4 wall.
- After installation, request documentation of the installed R-value and a final depth measurement or photo record. This protects you if the work is ever questioned and supports any rebate application or future home sale disclosure.
Why It Works: The Benefits
The DOE estimates that air sealing combined with insulation upgrades can cut heating and cooling costs by 15 to 40% depending on starting conditions. In older homes with original insulation, savings at the higher end of that range are common.
Failed or undersized insulation creates hot and cold spots throughout the house. Replacing or supplementing insulation in problem areas eliminates the temperature swings that make certain rooms uncomfortable regardless of where the thermostat is set.
An HVAC system compensating for poor insulation runs longer cycles and accumulates more hours on the compressor and heat exchanger. Reducing the thermal load with better insulation can extend equipment lifespan by several years and reduce maintenance costs.
Old insulation, especially fiberglass batts installed before 2000, can degrade and shed fibers. Damaged cellulose may harbor mold spores. Replacing compromised insulation removes a potential source of airborne particulates and biological contaminants from the home.
Homes with documented insulation upgrades sell faster and at a premium. Energy-efficient features, including attic insulation at current code levels, are increasingly valued by buyers and flagged by home inspectors, making upgrades a practical investment before listing.
💰 Savings Impact by Action
Upgrading attic insulation to current code levels (R-38 to R-49) with air sealing reduces heating and cooling costs by 20 to 30% in most US climates.
Sealing attic floor penetrations and bypasses alone reduces whole-home energy loss by 10 to 20% without adding a single inch of insulation material.
Dense-pack insulation in previously uninsulated or settled wall cavities reduces wall heat transfer by up to 60%, contributing roughly 10 to 15% to whole-home savings.
Insulating and encapsulating a vented crawl space reduces floor heat loss and duct losses by 10 to 18% and improves comfort on the first floor significantly.
Homes with pre-1980 insulation that complete attic, wall, and crawl space upgrades with air sealing can reduce total heating and cooling energy use by 35 to 40% according to DOE retrofit studies.
🏠 Key Concepts Explained
The Science Behind It
Insulation works by trapping still air in tiny pockets within fibers or foam cells. Still air is a poor conductor of heat, which means the more effectively a material immobilizes air, the slower heat moves through it. R-value is simply a measurement of that resistance per inch of thickness. The problem is that over time, the physical structure of insulation materials changes. Fiberglass batts compress under their own weight or from foot traffic, reducing the loft that creates those insulating air pockets. Loose-fill cellulose settles 15 to 20% in the first year after installation and continues slowly afterward. Both materials absorb moisture, which displaces air with water, a conductor roughly 25 times more effective than still air, collapsing thermal performance dramatically.
What most homeowners do not realize is that insulation and air sealing are two separate systems solving different problems. Insulation resists conductive and radiative heat transfer, the slow movement of heat through solid materials and across spaces. Air sealing addresses convective heat transfer, the movement of heat carried by actual air molecules flowing through gaps. An attic with perfect R-49 insulation but open penetrations around light fixtures and plumbing stacks is still losing enormous amounts of energy because conditioned air is being physically transported out of the building envelope. This is why the building science community consistently recommends air sealing as the first step before any insulation upgrade.
The concept of the thermal envelope is also worth understanding. Your home’s thermal envelope is the boundary between conditioned and unconditioned space, typically the attic floor, exterior walls, and floor over a crawl space or basement. Every component of that envelope needs to be continuous and connected for the system to work. A perfectly insulated attic does little good if the knee walls in a Cape Cod-style home are uninsulated, or if recessed lights in the ceiling below are open penetrations to the attic above. Energy auditors use infrared cameras to make these failures visible, showing exactly where the thermal envelope is broken so repairs can be targeted precisely.
Frequently Asked Questions
▼ My attic already has insulation but my upstairs is still hot in summer. Do I need to replace it?
Not necessarily. Heat in upstairs rooms during summer is often caused by inadequate attic ventilation, dark roofing absorbing solar heat, or air leaks rather than insulation thickness alone. First measure your existing insulation depth and compare it to the R-38 to R-49 target for your climate. If you are already at target depth, have an energy auditor check for air bypass points and assess attic ventilation before spending money on more insulation.
▼ How do I know if my insulation has asbestos?
Visual inspection alone cannot confirm asbestos. If your home was built or insulated before 1980 and you see vermiculite (small, gray, accordion-like granules), popcorn ceiling texture, or pipe wrap insulation, do not disturb it until you have a certified inspector collect a sample for laboratory testing. Testing costs $25 to $75 per sample and takes 24 to 72 hours. If asbestos is confirmed, removal requires a licensed abatement contractor and is not a DIY project.
▼ Can I just add insulation on top of my old insulation instead of replacing it?
Yes, in most cases. If existing insulation is dry, free of mold, and not compressed to less than half its original thickness, you can add new material directly on top. This is the standard approach for attic top-ups and is actually preferred because it avoids landfill disposal of old material. The exception is if you find wet, moldy, or pest-contaminated insulation, which must be removed and remediated before anything is added over it.
▼ What is a realistic payback period if I pay a contractor to redo my attic insulation?
For a home with inadequate or degraded attic insulation, a professionally installed attic insulation and air sealing job typically pays back in 3 to 7 years through energy savings, before factoring in utility rebates or the 25C federal tax credit. After applying a 30% tax credit and typical utility rebates of $200 to $500, payback often drops to 2 to 5 years. Homes in extreme climates, such as the upper Midwest or the deep South, tend to see payback at the faster end of that range.
▼ My energy bills went up but a contractor said my insulation looks fine. What else should I check?
Rising bills with apparently intact insulation usually point to one of three other culprits: duct leakage (the DOE estimates that 25 to 30% of conditioned air is lost through leaky ducts in a typical home), HVAC equipment declining in efficiency as it ages, or increased air leakage from settling foundation cracks or deteriorating window seals. Ask your contractor specifically about a duct leakage test and a blower door test to identify which system is the primary driver before investing in more insulation.
Quick Tips
- Check your attic insulation depth every five years, especially after any roofing work, pest control visits, or HVAC service calls, all of which can disturb or compress existing material.
- Insulation batts in exterior walls installed before 1980 were typically R-11 or less. Modern codes call for R-13 to R-21 in walls depending on climate zone. Dense-pack upgrades through small drilled holes are far less disruptive than full drywall removal.
- Utility companies in most states offer free or subsidized energy audits. Call your electric or gas provider before spending anything on insulation to find out what assessments and rebates are available to you.
- If your heating or cooling bills have increased noticeably over two to three years without a rate change, degraded insulation is one of the top three causes along with duct leakage and HVAC equipment decline. An insulation inspection should be part of the diagnostic process.
Variations for Your Situation
- Apartment/Rental: Renters cannot modify building insulation but can meaningfully reduce heat transfer at the unit level. Use interior window insulation film kits ($20 to $40 per window) to add roughly R-1 to R-2 at glass surfaces. Apply draft stoppers at door bottoms and use removable rope caulk on leaky window frames, which peels off without damage at move-out. Thermal curtains with a white backing add R-2 to R-4 at windows and require no landlord approval. Focus requests to landlords on common-area improvements that affect your unit, such as attic access above your unit or crawl space improvements below.
- Tight Budget (under $50): Start with air sealing, which costs almost nothing and delivers disproportionate results. A single can of spray foam ($8 to $12) used on attic penetrations, and a tube of acoustic sealant ($5 to $8) on electrical outlets on exterior walls can reduce air leakage meaningfully. Weather stripping on exterior doors ($10 to $20 per door) and a door sweep ($10 to $15) address some of the largest low-level air leaks in the home. These measures will not replace lost R-value but often capture 30 to 40% of the energy savings available from a full upgrade.
- Older Home (pre-1980): Homes of this era were built to much lower insulation standards, often with R-7 to R-11 in the attic and uninsulated wall cavities. They also tend to have higher natural air leakage rates, more penetrations, and sometimes hazardous materials in existing insulation assemblies. Prioritize a professional energy audit with a blower door test ($150 to $400) before beginning any work. This gives you a thermal map of the building and identifies whether attic, walls, or crawl space improvements will deliver the highest return. Budget for a phased approach if full replacement is unaffordable: attic and air sealing first in year one, crawl space or basement rim joists in year two, and wall insulation when budget and timing allow.