Your air conditioner might be working perfectly, but if your home has unsealed gaps around pipes, outlets, windows, and attic hatches, you are essentially trying to cool the outdoors. The U.S. Department of Energy estimates that air leakage accounts for 25 to 40% of the energy used for heating and cooling in a typical home. During a hot summer, that means your AC is fighting a constant battle against hot air sneaking in through dozens of small openings you probably never think about.
The frustrating part is that most of these leaks are invisible during normal daily life. You cannot feel a slow trickle of hot air coming through an outlet on a wall, but over 24 hours those trickles add up to serious heat gain and real dollars on your utility bill. The good news is that air sealing is one of the most cost-effective home improvements available, with materials often costing under $50 and labor measured in hours rather than days.
This guide walks you through exactly where to look for leaks, how to test for them with and without specialized equipment, and how to seal them using the right materials for each location. Whether you have 20 minutes or a full weekend afternoon, there is a level of effort here that will make a meaningful dent in your cooling costs.
What You’ll Need
Click on an item below to shop for the recommended items for this recipe on Amazon.
As an Amazon Associate, we earn from qualifying purchases.
How to Do It
- Do a visual walk-around on a hot afternoon with your AC running. Hold a lit incense stick or a thin piece of toilet tissue near outlets on exterior walls, window and door frames, where walls meet the floor, and around any pipe or wire entering from outside. Movement indicates airflow.
- Purchase foam outlet gaskets (a pack of 10 costs about $3 at any hardware store). Turn off the circuit breaker, remove the outlet or switch cover plate, press the foam gasket behind it, and replace the cover. Do every exterior wall outlet and switch in your home.
- Inspect your attic hatch or pull-down stairs. Press your hand against the edges when the AC is running. If you feel warm air moving, apply self-adhesive foam weatherstripping around the hatch frame. A well-sealed attic hatch can eliminate one of the single largest leak points in many homes.
- Check the threshold and door sweeps on any door leading to a garage, attic, or exterior. Slide a piece of paper under the door. If it slides freely with no resistance, the seal is inadequate. Replace the door sweep (about $10 to $20) if needed.
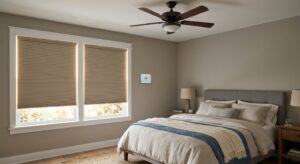
- Apply rope caulk, which is removable and requires no tools, around drafty window sashes where you feel movement. This is a seasonal fix that peels off without damage when you want to open windows again.
- Start with a DIY blower door simulation: close all windows and doors, turn on all exhaust fans (kitchen, bathrooms) simultaneously, and walk the perimeter with a stick of incense or a smoke pen. The fans depressurize the house and exaggerate air movement through leaks, making them easier to find.
- Gather your materials: a can of low-expanding spray foam (for gaps under 3 inches), paintable latex caulk (for window and door frames), fire-rated caulk or foam (for penetrations near any heat source or in the attic), and a caulk gun.
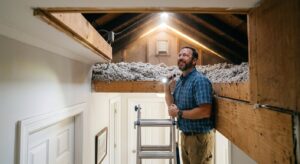
- Work from the attic down. Put on a respirator and go into the attic during cooler morning hours. Seal every penetration you can find: plumbing stacks, electrical wire bundles, recessed light housings (use fire-rated foam only), and any gap where an interior wall meets the attic floor. A single open top plate gap can leak as much air as leaving a window open an inch.
- Move to the basement or crawl space if applicable. Seal where pipes and wires enter through the rim joist (the framing at the very top of the foundation wall) using cut-to-fit rigid foam board plus caulk or spray foam around the edges. This area is responsible for 15 to 25% of total home air leakage in many older homes.
- Back inside, caulk around all window and door frames where they meet the wall, around any pipe or wire penetrations under sinks or behind appliances, and along the joint where the baseboard meets the floor on exterior walls.
- After sealing, repeat your exhaust fan depressurization test. You should notice significantly less incense movement at the spots you sealed. If a major area still shows strong movement, trace it back to the attic plane or crawl space for additional sealing.
- Contact a certified home energy auditor (look for BPI or RESNET certification) or your utility company, as many offer subsidized or free audits. Request a blower door test specifically, which measures your home’s leakage rate in CFM50 (cubic feet per minute at 50 pascals of pressure).
- During the audit, accompany the auditor throughout the home. Ask them to identify the top five leakage areas by volume and get the measurement in ACH50 (air changes per hour at 50 pascals). A well-sealed home scores below 5 ACH50; many older homes test at 10 to 15 or higher.
- Review the auditor’s prioritized recommendations. Ask for the projected savings in dollars and the estimated payback period for each measure. A professional audit produces a roadmap so you know exactly which leaks are worth fixing versus minor ones not worth the effort.
- If you opt for professional sealing, ask whether they use Aeroseal duct sealing or traditional foam and caulk. For homes with very high infiltration rates, professional sealing crews can often reduce leakage by 40 to 60% in a single visit.
- Request a post-sealing blower door test to verify improvement. Any reputable contractor will offer this. Compare the before and after ACH50 numbers to confirm you received what you paid for and to calculate your actual projected savings.
Why It Works: The Benefits
The DOE reports that thorough air sealing combined with insulation improvements can reduce annual heating and cooling costs by 15 to 30%. For a home spending $200 per month on summer cooling, that is $30 to $60 back in your pocket every month.
Less infiltration means your AC reaches and holds the target temperature faster and cycles off sooner. Many homeowners report their system running 20 to 30% less after sealing the attic plane, which also extends equipment life.
Hot summer air holds 3 to 4 times more moisture than cool indoor air. Sealing infiltration paths reduces the moisture load your AC must handle, improving comfort and preventing the clammy feeling that persists even at the right temperature.
Rooms that feel perpetually hot often have specific nearby leak points such as recessed lights, attic hatches, or unsealed wall penetrations. Sealing those spots can reduce room temperature swings by 2 to 5 degrees Fahrenheit.
Uncontrolled air leaks pull in unconditioned air from attics, crawl spaces, and wall cavities, which often carry dust, pollen, mold spores, and radon. Sealing these paths means the air entering your home goes through your filter rather than around it.
💰 Savings Impact by Action
Sealing top plate gaps and penetrations at the attic floor reduces whole-house air leakage by up to 20%, the single largest addressable leak zone in most homes.
Insulating and sealing the rim joist in basements and crawl spaces addresses 15 to 25% of total infiltration in homes built before 1990.
Foam gaskets behind exterior wall outlets and switches cost under $10 for an entire home and can reduce convective wall-cavity losses by 3 to 5%.
Weatherstripping and caulking around door and window frames addresses roughly 6 to 10% of total infiltration in a typical home, with door sweeps contributing the most.
A systematic whole-house air sealing effort addressing all major zones together can reduce annual cooling and heating energy use by 15 to 30% according to DOE data.
🏠 Key Concepts Explained
The Science Behind It
Air moves through your home’s envelope for one simple reason: pressure differences. When the indoor pressure is lower than outdoor pressure (which happens whenever an exhaust fan runs, the AC blower operates, or the stack effect pulls air upward), outdoor air is literally sucked in through any available opening. This is not a slow passive process. A modest pressure difference of just 5 pascals across a 1-square-inch gap can move several cubic feet of air per hour. Multiply that by dozens of gaps and you have a meaningful continuous load on your cooling system.
Heat transfer through air infiltration is far more efficient at moving thermal energy than conduction through walls. When a cubic foot of 95-degree outdoor air enters your home and displaces 75-degree indoor air, your AC must remove roughly 0.018 BTUs per degree per cubic foot to restore conditions. That sounds small, but at infiltration rates typical of leaky homes (500 to 1,000 cubic feet per minute under normal conditions), the continuous sensible and latent heat load adds up to thousands of BTUs per hour. That is equivalent to running one or more additional space heaters inside your home during summer.
Sealing the building envelope does not just reduce that direct heat load. It also allows your AC to maintain a consistent indoor dew point by limiting moisture infiltration. Hot outdoor summer air can carry 2 to 4 times more moisture than cool indoor air at the same relative humidity percentage. Every infiltrating air molecule carries latent heat locked in that water vapor, and your AC must condense that moisture out of the air before it can lower humidity to comfortable levels. Reducing infiltration by 50% can meaningfully reduce your AC’s latent load, which is why well-sealed homes often feel more comfortable at the same thermostat setting.
Frequently Asked Questions
▼ Why is my AC still running all day even after I sealed leaks?
Air leakage is one factor among several. Check whether your attic insulation meets recommended levels (R-38 to R-60 for most climates), since inadequate insulation allows radiant heat gain independent of air leaks. Also verify that your AC is properly sized and that refrigerant charge is correct, as an undersized or low-charge system will run continuously regardless of envelope improvements.
▼ Can renters do air sealing without landlord permission?
Most of the easiest wins are completely renter-safe. Foam outlet gaskets, rope caulk on windows, and door sweeps are all removable or replaceable with no permanent modification. Avoid spray foam in wall or attic penetrations without landlord approval, as that is permanent. Stick to weatherstripping products with adhesive backings and removable rope caulk for maximum impact without lease risk.
▼ How long before I actually see savings on my electric bill?
You should see a meaningful reduction in the first full billing cycle after comprehensive sealing, but compare kilowatt-hours used rather than dollar amounts since utility rates fluctuate. The most reliable comparison is your kWh usage in the same calendar month from the previous year. Homes with very high initial leakage rates often see 15 to 25% reductions within the first 60 days.
▼ What if my home is older than 30 years?
Older homes typically have significantly higher infiltration rates because air sealing was not a standard construction practice before the 1990s. This actually means your savings potential is larger, but you should test for asbestos in older insulation and lead paint before disturbing surfaces. Consider hiring a BPI-certified energy auditor for a blower door test first so you can prioritize the highest-leakage areas and confirm combustion safety before tightening the envelope aggressively.
▼ I sealed the obvious spots but one room still gets hot every afternoon. What am I missing?
A persistently hot room usually points to a specific nearby leak or a radiant heat source, not general infiltration. Check the ceiling for recessed lights that penetrate into the attic, inspect the exterior wall for any unsealed wire or pipe penetrations, and feel the ceiling during peak afternoon heat to see if it is unusually warm (suggesting missing or thin attic insulation directly above). Also check whether the AC supply register in that room is open, unobstructed, and delivering adequate airflow.
Quick Tips
- Seal the attic plane first. Research consistently shows the attic floor accounts for 30 to 40% of total home air leakage, making it the single highest-return target.
- Do your attic work in the early morning on a cool day. Attics can exceed 140 degrees Fahrenheit on summer afternoons, making them genuinely dangerous to work in.
- Low-expanding foam labeled ‘window and door’ is the right product around window and door frames. Standard spray foam expands with too much force and can bow frames out of square.
- After sealing, wait 30 days before checking your next utility bill. Billing cycles and weather variability mean a single month is not enough data. Compare your usage in kilowatt-hours, not just the dollar amount, against the same month in the prior year.
Variations for Your Situation
- Apartment/Rental: Focus entirely on renter-safe tactics since you cannot access attic or crawl space penetrations. Install foam outlet gaskets on every exterior wall outlet ($3 for a pack of 10), apply rope caulk around drafty window sashes ($5 per roll, fully removable), add adhesive-backed door sweeps to doors leading to hallways or exterior ($10 to $20 each), and use insulating cellular window shades to reduce both radiant heat and convective air movement near window glass. These steps together can realistically deliver 8 to 12% cooling savings with zero landlord interaction required.
- Tight Budget (under $50): Prioritize outlet gaskets ($6 for a full room’s worth), one tube of latex caulk ($5) for window and door frames, adhesive weatherstripping for the worst door ($8 to $12), and a single can of low-expanding foam ($8) for any visible large gaps around pipes under sinks. Skip the attic work for now. These targeted materials cost under $35 and address many of the most common leak points, potentially delivering 8 to 15% savings depending on how leaky your home was to start.
- Older Home (pre-1980): Homes from this era were built with virtually no air sealing intent, so infiltration rates of 10 to 20 ACH50 are common. Start with a professional blower door test ($300 to $600) rather than guessing, because the leakage is often concentrated in surprising locations like interior partition wall top plates and hidden soffit connections to attic space. Prioritize fire-rated foam at all attic penetrations and rigid foam plus foam sealant at the rim joist. Budget $800 to $1,500 for materials and labor if doing a thorough job, but expect savings of 20 to 35% annually, meaning full payback in 2 to 3 years in most climates.