
If you’ve ever felt a cold breeze near a closed window, noticed your heating bill spike in January, or found one room that never seems to reach the right temperature, drafts are likely the culprit. Most homes, especially those built before 1990, leak conditioned air through hundreds of small gaps around outlets, pipe penetrations, attic hatches, and door frames. The U.S. Department of Energy estimates that air leakage accounts for 25 to 40% of heating and cooling energy loss in a typical home — that’s real money disappearing through your walls every single month.
The good news is that air sealing is one of the highest-return home improvements you can make. Materials cost between $30 and $150 for most homes, the work requires no special licenses or heavy equipment, and the payback period is often measured in weeks rather than years. Unlike replacing windows or upgrading your HVAC system, air sealing delivers results you can feel immediately — warmer floors, fewer cold spots, and a quieter, more comfortable home.
This guide walks you through exactly how to find and seal the leaks that matter most, starting with a zero-cost inspection you can do right now. Whether you have 30 minutes or a full weekend, you’ll find an approach here that fits your schedule, your budget, and your comfort goals.
What You’ll Need
Click on an item below to shop for the recommended items for this recipe on Amazon.
As an Amazon Associate, we earn from qualifying purchases.
How to Do It
- On a cold windy day, close all windows and doors and turn off your HVAC fan. Light a stick of incense or hold a damp hand near suspect areas and watch for smoke movement or a cool sensation indicating airflow.
- Check the five highest-yield locations first: the gap under exterior doors, around the attic hatch, behind electrical outlets on exterior walls, around the dryer vent penetration, and where pipes enter under kitchen and bathroom sinks.
- Mark every leak you find with a piece of painter’s tape so you don’t lose track of them before you seal.
- Use a door sweep or roll a bath towel against the bottom of any exterior door showing daylight or strong airflow. This alone can cut under-door infiltration by 80% at zero cost.
- For outlets on exterior walls, remove the cover plate, cut a foam gasket to fit (a pack of 10 costs around $3 at any hardware store), replace the cover, and you’ve sealed one of the most overlooked leak points in most homes.
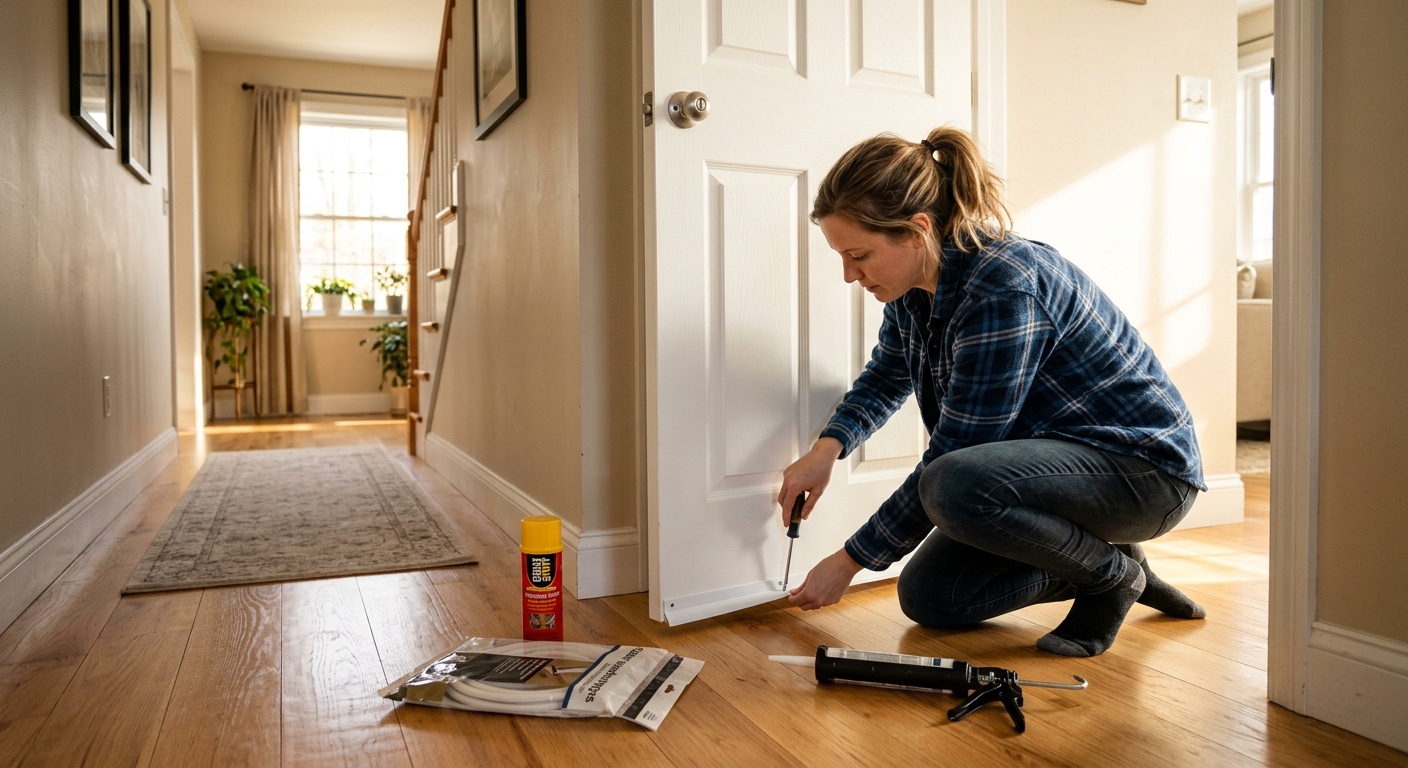
- Buy your materials before you start: one tube of paintable latex caulk, one can of expanding foam (choose low-expansion for around windows and doors), a pack of foam outlet gaskets, adhesive-backed V-strip weatherstripping, and a door sweep for each exterior door.
- Start in the attic. Push back any insulation and look for gaps where interior walls meet the attic floor, around recessed light fixtures (use intumescent caulk only around these — standard foam is a fire hazard), and where wires and pipes penetrate the ceiling drywall. Seal all gaps larger than a quarter inch with foam, and smaller gaps with caulk.
- Move to the basement or crawl space and seal the rim joist — the framing member that sits on top of your foundation wall. Cut rigid foam board (R-10 minimum) to fit each joist bay, apply foam around the perimeter to air-seal it in place, and you will reduce both drafts and heat loss significantly in this area.
- Seal all pipe and wire penetrations through exterior walls under sinks, behind appliances, and in utility closets using expanding foam. Let it cure 30 minutes, then trim the excess flush with the wall surface.
- Install adhesive V-strip weatherstripping along the sides and top of every exterior door frame and any operable windows that show air movement. Clean the surface with rubbing alcohol first to ensure adhesion.
- Install a new door sweep on every exterior door. Measure the door width, cut the sweep to length with a hacksaw, and attach with the included screws. The sweep should contact the threshold firmly but not drag heavily enough to make the door hard to open.
- Schedule a home energy audit with a BPI-certified auditor. They will install a calibrated fan in an exterior door opening and depressurize the entire house to measure the exact infiltration rate in CFM (cubic feet per minute).
- Ask for a printed report showing the ACH50 number — the air changes per hour at 50 pascals of pressure. Anything above 7 ACH50 means significant leakage. Well-sealed modern homes target 1 to 3 ACH50.
- Review the thermal imaging results. A blower door test combined with an infrared camera reveals exactly where air is entering the building envelope, including hidden leaks inside wall cavities that no visual inspection can detect.
- Use the audit report to prioritize your own DIY sealing, or get bids from weatherization contractors to seal the identified leaks. Many utilities offer rebates of $100 to $400 for completing a certified audit, which can significantly offset the cost.
Why It Works: The Benefits
The DOE estimates that thorough air sealing reduces heating and cooling costs by 15 to 30% annually. For a home spending $1,800 per year on energy, that’s $270 to $540 back in your pocket every year after a one-time material cost of $30 to $150.
Sealing drafts eliminates cold spots and floor-level chills that no thermostat adjustment can fix. Most homeowners notice a difference within 24 hours of completing the work, especially in rooms adjacent to exterior walls or above unconditioned crawl spaces.
When conditioned air stops escaping, your heating and cooling system cycles less frequently. This extends equipment life, reduces wear on the compressor and heat exchanger, and can delay costly HVAC replacement by several years.
Uncontrolled air leaks bring in pollen, dust, car exhaust, and outdoor pollutants along with unconditioned air. Sealing those gaps lets you control what enters your home through proper ventilation rather than random cracks, reducing allergy and asthma triggers.
The same gaps that let air through also let in sound. Homeowners near busy roads or flight paths often notice a 10 to 15% reduction in perceived exterior noise after a thorough air sealing project, simply because sound no longer has a direct path through the building envelope.
💰 Savings Impact by Action
Sealing wall top plates and pipe penetrations at the attic floor can address up to 40% of total home air leakage according to DOE research.
Foam gaskets behind outlet and switch cover plates on exterior walls reduce infiltration at these points by up to 90%, contributing roughly 5% to whole-home leakage reduction.
A properly fitted door sweep and frame weatherstripping reduces under-door and frame infiltration by up to 11% of total home air leakage.
Sealing and insulating the rim joist in an uninsulated basement reduces both air infiltration and conductive heat loss, accounting for 15 to 18% of total envelope losses in two-story homes.
A comprehensive DIY air sealing project addressing all major bypass locations reduces annual heating and cooling costs by 15 to 30%, with 25% being a realistic mid-range figure for homes built before 1990.
🏠 Key Concepts Explained
The Science Behind It
Air sealing works by exploiting a simple principle: air, like water, flows from high pressure to low pressure through any available opening. Your home’s building envelope — the walls, ceiling, and floor that separate inside from outside — is riddled with intentional and unintentional holes from construction. Every wire, pipe, duct, and framing connection is a potential air pathway. When wind hits your home or temperature differences create buoyancy-driven stack pressure, air moves through all of these pathways simultaneously, carrying your conditioned air out and pulling unconditioned air in.
The stack effect is the dominant force driving air leakage in cold weather. As warm air inside your home rises, it creates positive pressure near the ceiling and negative pressure near the floor. This means warm air is constantly trying to escape through gaps in your attic and upper floors, while cold outside air is being sucked in through gaps at the foundation, under doors, and around lower-floor outlets. Sealing both the top and bottom of the home breaks this chimney-like cycle. Addressing only one end actually worsens the pressure imbalance and can increase leakage through the unsealed area.
From a thermodynamic standpoint, every cubic foot of conditioned air that escapes must be replaced by unconditioned outside air that your HVAC system then has to heat or cool from scratch. On a day when it’s 20°F outside and you’re maintaining 70°F inside, every infiltrating cubic foot of air represents a 50-degree temperature differential that your furnace has to overcome. Multiply that by the thousands of cubic feet per hour leaking through a typical older home, and the energy waste becomes enormous. Air sealing directly reduces this sensible heat load on your HVAC system, which is why the payback period is measured in weeks rather than years.
Frequently Asked Questions
▼ Why do I still feel a draft near my windows even after sealing around the frame?
The gap between the window frame and the rough framing opening is likely still open, and is separate from the interior caulk joint you can see. Remove the interior trim carefully and look for the gap between the window buck and the framing — fill it with low-expansion foam, let it cure, then reinstall the trim. Also check whether the draft is actually coming through the glass itself, which indicates a failed seal in a double-pane unit that needs glazing replacement rather than air sealing.
▼ My energy bills are still high even after I did the full air sealing project. What did I miss?
The most commonly missed locations are attic bypasses at interior partition wall tops, recessed light fixtures in insulated ceilings, and the rim joist in the basement or crawl space. If you addressed all three and bills remain high, the issue may be insulation depth rather than air leakage — check your attic insulation level and compare it to the recommended R-38 to R-60 for most U.S. climates. A professional blower door test will definitively tell you whether air sealing or insulation is your next priority.
▼ Can renters air seal their apartment without getting in trouble with the landlord?
Yes, with the right products. Foam outlet gaskets behind cover plates are invisible and reversible. Adhesive-backed door sweeps are available in versions that attach with no screws. Draft snake fabric rolls placed at door bottoms require no installation at all. Focus on the five or six highest-yield spots rather than anything structural, and you can legitimately cut your heating bill by 10 to 15% with entirely reversible products costing under $30.
▼ How long before I see the savings show up on my utility bill?
If you complete the project during heating season, you should see a measurable reduction on your very next bill — usually within 30 days. The savings are most visible on the coldest months’ bills because that’s when infiltration is worst. Compare your usage in kilowatt-hours or therms (not just the dollar amount, which varies with price) against the same month last year to get an accurate read on what you actually saved.
▼ Is it possible to seal a home too tightly and create health problems?
In theory yes, but in practice very few homes reach this threshold through DIY air sealing alone. The concern is primarily for homes with combustion appliances (gas furnaces, water heaters, fireplaces) that need adequate combustion air, and for homes with chronic moisture problems where sealing could trap humidity. If you have combustion appliances, have an HVAC tech verify adequate makeup air after major sealing work. For most homeowners doing a standard weatherization project, the result is a healthier home — less dust, pollen, and uncontrolled humidity — not a worse one.
Quick Tips
- Seal on a cold, windy day when pressure differentials are highest — drafts are much easier to detect under these conditions than on a calm mild day.
- Caulk shrinks as it cures, so apply it generously and tool it firmly into the gap rather than laying a thin bead on the surface.
- Check your work by repeating the incense test after sealing. If the smoke still wavers, you have either a second gap nearby or the first seal did not fully cure.
- Foam expands significantly as it cures — for gaps around window and door frames, always use minimal-expansion foam to avoid bowing the frame inward and making the door or window harder to operate.
Variations for Your Situation
- Apartment/Rental: Renters cannot touch ductwork, attic hatches, or exterior penetrations, but can still achieve 10 to 15% savings using only renter-safe products. Buy foam outlet gaskets ($3 for a 10-pack), a fabric door draft stopper ($10 to $20), and peel-and-stick foam tape weatherstripping for the refrigerator side of sliding patio doors. These are all removable and leave no damage. Ask your landlord in writing to inspect and seal any obvious penetrations — framing it as a maintenance request protects your comfort without triggering lease concerns.
- Tight Budget (under $30): Skip the rim joist and attic work and focus exclusively on the three highest-yield low-cost fixes: foam outlet gaskets on every exterior-wall outlet and switch (about $5 total), a rolled bath towel or door snake at the worst-leaking exterior door (free), and a single tube of caulk used on all visible gaps around window trim, door frames, and pipe penetrations under sinks (about $6). This targeted approach can still deliver 8 to 12% reduction in heating bills with an immediate payback and under one hour of work.
- Older Home (pre-1980): Homes built before modern energy codes often have no insulation in the rim joist, open wall cavities behind baseboards, and knob-and-tube wiring in the attic that must not be covered with insulation. Start with a professional energy audit to identify the worst leaks safely — especially important with older wiring. Budget $80 to $150 in materials for the rim joist project alone, and expect the attic to require an electrician’s sign-off before you can properly air-seal and insulate. The payback is still excellent, but the sequence matters more in older construction.