Ever notice that the upstairs bedrooms stay stubbornly warm at 10 p.m., even though the sun went down hours ago? The culprit is usually your attic. On a summer afternoon, roof decking can hit 150°F or more, and attic air often climbs past 130°F. All that stored heat does not vanish at sunset. It keeps radiating from the underside of the roof and down onto your attic insulation and ceiling, warming the rooms below well into the night.
Most people think of insulation as the only defense, but insulation mainly slows heat that moves by conduction. A big share of attic heat travels as infrared radiation, jumping straight from the hot roof deck to the cooler surfaces below. A radiant barrier is a thin, reflective foil layer that blocks that radiant transfer. The U.S. Department of Energy reports that radiant barriers can cut cooling costs by about 5 to 10% in warm, sunny climates, with the best results in homes that have ductwork running through the attic.
In this post we will cover how radiant barriers work, where they pay off (and where they do not), a simple quick-fix approach, a full DIY staple-up installation, and the mistakes that make this upgrade underperform. If you live in the South or Southwest and your attic runs hot, this is one of the cheapest cooling upgrades you can make.
What You’ll Need
Click on an item below to shop for the recommended items for this recipe on Amazon.
As an Amazon Associate, we earn from qualifying purchases.
How to Do It
- Check that your attic floor insulation is fairly clean and level. Remove debris, and never cover recessed light housings, soffit vents, or exhaust fans.
- Measure the target area, for example the attic section above your hottest room, and buy perforated radiant barrier foil rolled out to cover it with a few inches of overlap.
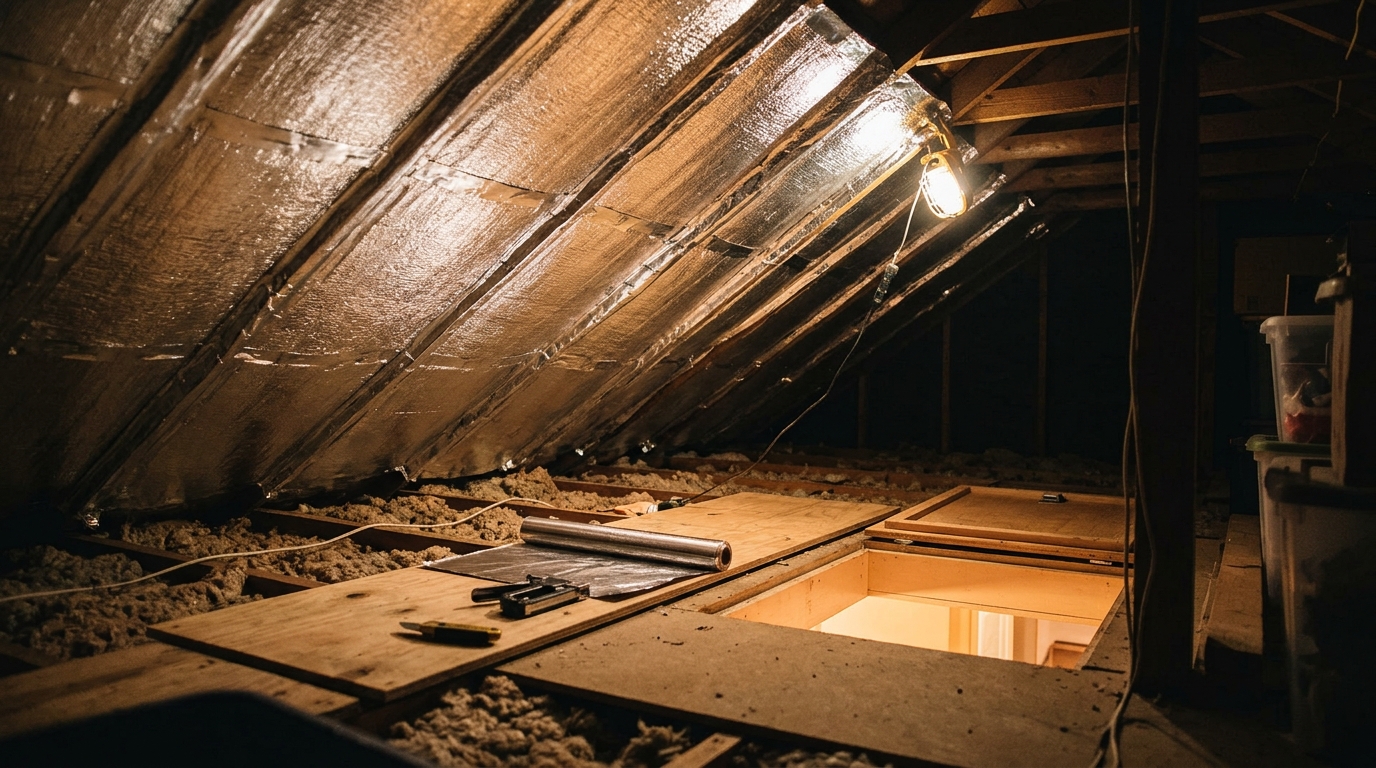
- Unroll the foil with the reflective side facing up toward the roof and a clear air space above it. Overlap seams by 2 to 3 inches and tape with foil tape.
- Leave a gap of at least 3 inches around any chimney, flue, or heat-producing fixture, and keep the foil clear of soffit vents so airflow is not blocked.
- Keep the foil from sagging into the insulation. Secure edges to joists with a few staples or lightweight weights so it stays tight.
- Wear a respirator, safety glasses, gloves, and long sleeves, and work early in the morning when the attic is cooler. Bring a bright work light and a kneeling board to rest on joists.
- Cut perforated radiant barrier foil to span from the ridge to the soffit area, between rafters or across the underside of the rafters. Leave the ridge vent and soffit vents unblocked.
- Staple the foil to the underside of the rafters with the shiny side facing down toward the attic floor. Pull it snug and use staples every 6 to 8 inches along the rafter edges.
- Overlap seams by 2 to 3 inches, or tape them with foil tape, but never seal the foil so tightly that it blocks roof ventilation. Leave a gap of about 1 to 2 inches at the ridge for airflow.
- Work around obstructions such as wires, vent pipes, and bracing by trimming the foil to fit, and keep it away from any chimney or flue by at least 3 inches.
- Finish by checking soffit baffles, ventilation openings, and light fixtures. Confirm airflow is unobstructed, and inspect your work for gaps or tears.
- Get two or three quotes and ask each contractor to show you their attic temperature targets and what product they use. Verify they will not block soffit or ridge ventilation.
- Have the contractor inspect your attic for roof leaks, wiring hazards, and ventilation problems before installing anything.
- Choose between pre-laminated foil sheathing (often used in new construction), rafter-mounted foil, or a spray-on radiant coating, depending on your roof design and headroom.
- Ask for a written scope that confirms vent clearances, fire-safe spacing around flues, and a warranty on labor and materials.
- After installation, verify with an infrared thermometer that attic peak temperatures have dropped, and keep the contractor’s documentation for your records.
Why It Works: The Benefits
The DOE estimates 5 to 10% savings on cooling costs in hot climates, which is roughly $50 to $150 per year for a home spending $1,000 to $1,500 on summer AC.
Reducing downward radiant heat can lower ceiling surface temperatures by several degrees, so bedrooms cool off faster after sundown and the AC cycles less overnight.
Many homeowners see attic peak temperatures drop 10 to 30°F after installation, which also protects stored items, roofing underlayment, and attic-mounted equipment.
With cooler air around the ducts, your system loses less cooling capacity in transit and can reach the thermostat setpoint with shorter run times.
Foil material runs about $0.25 to $0.60 per square foot, so a 1,500 square foot attic can be done for roughly $400 to $900 in materials.
💰 Savings Impact by Action
Blocking radiant heat from the roof deck can trim cooling costs by 5 to 10% in hot climates according to DOE estimates.
Lowering attic temperature by 10 to 20°F reduces heat gain through ductwork, which can otherwise waste 10 to 30% of cooling capacity.
Sealing leaks between the attic and living space can cut heating and cooling loads by up to 15% on average, per ENERGY STAR.
Topping up thin attic insulation to R-38 reduces ceiling heat gain and can save 10 to 15% of total heating and cooling costs.
🏠 Key Concepts Explained
The Science Behind It
Heat moves three ways: conduction, convection, and radiation. Fiberglass and cellulose insulation fight conduction and convection by trapping still air. But on a sunny day, your roof deck heats up and emits infrared radiation in every direction, including straight down toward your attic floor. In a typical summer attic, this radiant transfer accounts for the majority of the heat crossing the open air space between the roof and the insulation below.
A radiant barrier works because of a property called emissivity. Ordinary building materials like plywood and shingles have emissivity around 0.90, meaning they readily emit and absorb radiant heat. Aluminum foil has an emissivity near 0.05, so it emits very little radiant energy and reflects up to 95% of what hits it. When you place foil facing an air gap beneath a hot roof deck, it intercepts the radiation and sharply cuts the heat reaching your insulation and ceiling.
This also explains why it helps at night. Your roof deck and attic framing store heat all afternoon and keep radiating it for hours after sunset. The barrier reduces how much of that stored heat flows downward into your living space during the evening, when you are trying to sleep and your AC is working against residual heat. That said, a radiant barrier is not a substitute for insulation. It is a complement, and it performs best when paired with attic floor insulation around R-38 and a properly ventilated roof.
Frequently Asked Questions
▼ Why is my AC still running all day even after I installed a radiant barrier?
A radiant barrier only addresses one source of heat gain, and your AC may be fighting duct leaks, thin attic insulation, sun-facing windows, or an undersized system. Check that your attic insulation is at least R-38, seal visible duct leaks with mastic, and consider a professional duct leakage test, which can reveal 15 to 30% losses.
▼ Can renters do this without landlord permission?
Generally no, since attic work usually requires landlord approval and renters rarely control the roof structure. A better renter option is to focus on window film, blackout curtains, and portable fans, then ask the landlord about attic upgrades since it is a property improvement.
▼ How long before I actually notice savings on my bill?
You may feel cooler upstairs the first hot night, but bill savings show up over a full cooling season. Compare your summer kilowatt-hour usage to the same months last year, adjusting for weather, and expect savings in the 5 to 10% range if you live in a hot climate.
▼ What if my home is older than 30 years?
Older homes often have thin insulation and leaky ducts, so a radiant barrier alone will not fix everything, but it can still help. Inspect for knob-and-tube wiring and roof leaks first, upgrade insulation to R-38 or more, and then add the barrier for the best combined result.
▼ Will a radiant barrier help in winter or in cold climates?
The benefit is much smaller in winter, since heat flows up and out and foil mainly helps with downward summer heat. In cold climates, spend your money on air sealing and insulation first, because a radiant barrier rarely pays back there.
Quick Tips
- Pair the barrier with attic insulation at R-38 or higher, since foil handles radiant heat and insulation handles conduction.
- Seal attic air leaks around wires, plumbing, and light fixtures first, because leaks send conditioned air up and undercut your savings.
- Use an infrared thermometer on a hot afternoon before and after installation to measure the actual drop in attic and ceiling temperatures.
- Keep soffit and ridge vents fully open so the foil can do its job without trapping heat or moisture.
Variations for Your Situation
- Apartment/Rental: You usually cannot access or modify the attic, so focus on what you control. Reflective window film ($20 to $60 per window), blackout curtains with a reflective backing ($30 to $80 per window), and a ceiling fan set to run counterclockwise can cut upper-floor heat gain, and you can ask your landlord about a roof or attic upgrade as a property improvement.
- Tight Budget (under $50): Skip the full install and seal attic air leaks around light fixtures, wire penetrations, and the attic hatch using caulk, foam, and weatherstripping for about $30 to $50. Add a few feet of foil bubble insulation over the attic hatch cover to stop a major heat leak into your hallway.
- Older Home (pre-1980): Expect thin or settled insulation, leaky ceilings, and sometimes knob-and-tube wiring. Have an electrician confirm the wiring is safe, top up attic insulation to R-38 first, then add rafter-mounted perforated foil, and plan for $1,000 to $2,500 in total for the combined upgrade.