Run your hand along the edges of your front door on a cold or windy day. If you feel air moving, you are not alone. The U.S. Department of Energy estimates that air leaks through gaps around doors and windows account for 25 to 30 percent of a home’s heating and cooling energy use. An exterior door that has shifted, settled, or simply lost its weatherstripping seal can have gaps equivalent to a baseball-sized hole in your wall, and you are paying to heat or cool the outdoors every single day.
The good news is that most exterior door air leaks fall into one of two categories: a worn or missing weatherstrip, or a door that is slightly out of alignment in its frame. Both problems are fixable without hiring anyone and without specialized skills. The fixes range from a free latch adjustment you can do in 60 seconds to a full weatherstripping replacement that takes about an hour and costs under $30. Either way, the savings start immediately on the very next utility cycle.
This post walks you through how to diagnose exactly where your door is leaking, which fix applies to your situation, and how to do it correctly so the seal lasts. You will also find real numbers on what these leaks cost you, what to expect in energy savings, and answers to the most common questions homeowners run into along the way.
What You’ll Need
Click on an item below to shop for the recommended items for this recipe on Amazon.
As an Amazon Associate, we earn from qualifying purchases.
How to Do It
- Close the door slowly and watch where the latch bolt contacts the strike plate. If you hear or feel it scraping the top or bottom edge instead of dropping cleanly into the hole, the plate needs adjustment.
- Use a lipstick or crayon to mark the end of the latch bolt, then close the door and open it. The mark left on the strike plate shows exactly where the bolt is hitting versus where it needs to go.
- Loosen the two strike plate screws with a screwdriver. Do not remove them fully. Shift the plate up, down, or outward by 1/16 to 1/8 inch in the direction needed to align with the bolt mark.
- Retighten the screws, close the door, and test the latch. The door should close with a single click and no lifting or shoulder pressure required.
- With the door latched, push and pull on the door handle firmly. If there is still noticeable movement or a visible gap along the frame, move to the weatherstripping approach below.
- Diagnose the leak first. On a sunny day, close the door and look for light around the frame from the inside. Alternatively, hold a lit incense stick near each edge of the closed door and watch for smoke deflection, which reveals airflow.
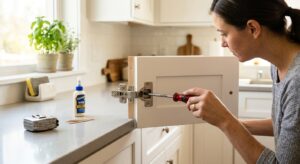
- Remove the old weatherstripping by peeling or pulling it away from the door stop molding. Most peel-and-stick foam or v-strip types pull off cleanly. Scrape any adhesive residue with a putty knife and wipe the surface clean with rubbing alcohol so the new strip bonds properly.
- Measure each of the three sides (top and both verticals) with a tape measure. Purchase self-adhesive EPDM rubber or foam-backed v-strip weatherstripping from any hardware store. EPDM foam in the 3/8-inch width works for most standard gaps. Buy 10 to 20 percent more than your measurement to allow for cuts.
- Starting at the top of the door frame, press the new weatherstrip firmly against the door stop, the part of the frame the door closes against, working from one corner to the other. For v-strip, fold it so the open side of the V faces outward toward the door edge. Press firmly along the full length and hold for 30 seconds.
- Repeat for both vertical sides, cutting the strip cleanly with scissors at each corner. The strip should compress slightly when the door closes. If it does not touch the door at all, reposition it 1/8 inch inward toward the door edge.
- Inspect the door sweep at the bottom. If daylight is visible under the door or the existing sweep is torn, unscrew it, take it to the hardware store to match the door width (typically 32, 34, or 36 inches), and screw the new sweep in place so it just brushes the threshold without dragging. A sweep that drags too hard strains the hinges and wears out quickly.
- Open the door and examine the hinge leaves on the frame side. Sagging doors often have loose screws in the top hinge, since it carries the most load. Tighten all hinge screws fully. If screws spin without gripping, the holes are stripped.
- To fix stripped hinge screw holes, remove the hinge leaf, dip wooden toothpicks in wood glue, pack them into the hole, let dry for 30 minutes, then snap them off flush. Reattach the hinge. The toothpicks give the screw fresh wood fiber to grip and this fix holds reliably for years.
- For persistent sagging, replace the two short screws in the top hinge with 3-inch screws (No. 9 or No. 10 size). These reach past the door stop molding into the structural stud behind, dramatically increasing the hinge’s resistance to the door’s weight pulling it down.
- Close the door and re-evaluate the gap uniformity around the frame. The gap should be roughly even (about 1/8 inch) on all sides. Mark any areas where the gap remains too large with painter’s tape.
- On the hinge side, adding a thin cardboard shim behind the bottom hinge leaf rotates the door slightly and closes a top-corner gap on the latch side. On the latch side, shimming behind the top hinge leaf closes a bottom-latch-corner gap. Experiment with cereal-box cardboard cut to match the hinge leaf size.
- Once the door hangs evenly, complete the weatherstrip and door sweep replacement described in the DIY approach above to finish sealing all four edges.
Why It Works: The Benefits
A properly sealed exterior door eliminates detectable airflow around the frame the same day the fix is applied, improving comfort in rooms near the entry within hours, not weeks.
The DOE estimates that sealing air leaks throughout a home can reduce heating and cooling costs by 10 to 20 percent annually. A single well-sealed door can contribute 3 to 5 percent of that total, translating to $30 to $80 per year on an average utility bill.
When conditioned air stays inside, your furnace or AC reaches the thermostat setpoint faster and cycles off sooner, reducing compressor and blower hours and extending equipment lifespan by reducing unnecessary runtime.
Sealing door gaps reduces the uncontrolled entry of outdoor dust, pollen, and humidity, which is especially valuable for allergy sufferers and in humid climates where moisture infiltration can contribute to mold risk.
Tight door and window seals consistently score high in home energy audits and buyer inspections. Addressing visible air leaks costs under $30 but signals proactive maintenance, which matters in both appraisals and buyer confidence.
💰 Savings Impact by Action
Replacing worn weatherstripping and door sweeps on exterior doors reduces infiltration-related heating and cooling loss by up to 15 percent per door.
Aligning a misaligned latch so the door closes flush against the weatherstrip captures 5 percent of the potential sealing gain at zero cost.
Installing or replacing a door sweep eliminates the largest single gap on most exterior doors, cutting bottom-of-door infiltration by up to 70 percent and reducing total door leakage by roughly 10 percent.
Correcting a sagging or out-of-square door so weatherstrip contacts the door evenly around all four edges adds up to 8 percent improvement in seal effectiveness compared to weatherstrip on a misaligned door.
🏠 Key Concepts Explained
The Science Behind It
Air moves from high pressure to low pressure, always seeking equilibrium. Your home’s interior is rarely at the same pressure as the outdoors because HVAC systems, exhaust fans, and the stack effect all create slight pressure differentials. On a cold day, the warm interior air rising toward the ceiling and escaping through upper openings creates a slight negative pressure at lower levels, actively pulling cold outdoor air through any available gap, including the millimeter-wide spaces around a poorly fitting door frame. This is not a slow passive seep; it is a continuous, pressure-driven air exchange that runs 24 hours a day.
Weatherstripping works by creating a continuous compressible barrier that conforms to slight irregularities between the moving door and the fixed frame. The material must be resilient enough to spring back after each door opening, flexible enough to conform to the surface, and durable enough to withstand temperature extremes. EPDM rubber outperforms basic foam in all three categories, which is why it is the material recommended in DOE weatherization guides. It maintains its sealing properties from roughly negative 40 degrees Fahrenheit to 250 degrees Fahrenheit, making it effective in every U.S. climate zone.
The door bottom sweep addresses a different physics problem. Unlike the frame gaps, which are relatively narrow and consistent, the space under a door varies with floor material, threshold height, and whether the door has shifted. A good automatic door sweep uses a spring-loaded or magnetic mechanism that drops a seal to the floor when the door closes and lifts slightly when it opens, reducing drag and wear. Even a simple fixed-blade sweep cuts infiltration at the door bottom by 70 to 80 percent compared to no sweep, according to weatherization field data, making it one of the highest return-per-dollar sealing upgrades available in residential construction.
Frequently Asked Questions
▼ I replaced the weatherstripping but I can still feel a draft. What did I miss?
Check the door sweep first, since the bottom gap is often the largest leak and is easy to overlook. Also inspect the corners of the door frame where the top strip meets the vertical strips, because gaps at the mitered corners are common and need a small dab of flexible caulk to seal. Finally, check the door threshold itself: if it is adjustable (look for screws along its top face), raise it until it makes firm contact with the door sweep.
▼ My door is hard to close and the weatherstripping looks fine. What is causing this?
A door that resists closing is usually binding on the hinge side or has a strike plate that is out of alignment. Try the lipstick test on the latch bolt to confirm the bolt is seating cleanly. If the door physically rubs the frame at the top or bottom of the hinge side, tighten all hinge screws and replace any stripped ones with 3-inch screws into the stud. Forcing the door repeatedly accelerates hinge wear and can crack the frame, so address the alignment rather than the weatherstrip.
▼ Can I do this on a steel door? Will the adhesive stick?
Yes, and steel doors often seal better than wood because they do not expand and contract seasonally. Clean the door stop surface with rubbing alcohol or acetone to remove any paint wax or grease before applying adhesive-backed weatherstrip. EPDM foam and v-strip with peel-and-stick backing bond reliably to primed or painted steel. Avoid foam tape products without a backing; they peel off steel surfaces within a few months.
▼ How long before I see savings on my energy bill?
You will feel the draft reduction immediately, but the savings appear on your next full billing cycle, typically 30 days. In winter, a well-sealed exterior door can reduce heating energy use by 3 to 5 percent on its own. If your home has multiple leaky doors, combined savings of 10 to 15 percent are realistic within the first full heating month after sealing.
▼ I am a renter. Can I do any of this without damaging the door?
Yes. The strike plate adjustment and peel-and-stick weatherstripping are both reversible and leave no permanent modification. Peel-and-stick EPDM strips remove cleanly from painted wood and steel with a hair dryer to soften the adhesive. A door sweep attached with screws should be approved by your landlord first, but a draft stopper placed at the base of the door requires no tools and no permission, and a good fabric draft stopper cuts bottom-gap infiltration by 50 to 60 percent.
Quick Tips
- Replace weatherstripping in fall before heating season and inspect it again in spring. Temperature cycling causes more degradation than age alone.
- If your door has a mail slot, add a mail slot cover with a brush seal on the interior side. An open mail slot is equivalent to a 2-inch hole in your door year-round.
- Paint or varnish bare wood door stops before applying new adhesive weatherstrip. Bare wood absorbs adhesive and the strip will peel within months.
- For a quick temporary fix before a cold snap, apply rope caulk (a pliable non-hardening caulk sold in rolls) in the worst gaps. It pulls off cleanly in spring without damaging the finish.
Variations for Your Situation
- Apartment/Rental: Focus on the peel-and-stick weatherstrip approach and a fabric or weighted draft stopper for the door bottom, since both are tool-free and fully reversible. Self-adhesive EPDM weatherstrip costs $8 to $12 per door and is the single best renter-safe upgrade. Ask your landlord in writing to fix a door that visibly sags or has gaps larger than 1/4 inch, as this qualifies as a habitability maintenance issue in most states.
- Tight Budget (under $20): Start with the free strike plate adjustment and the dollar-bill test to identify only the worst-sealing zones. Buy a single roll of foam weatherstrip (about $5) and apply it only to the sections that failed the dollar-bill test. A basic door sweep costs $8 to $12 and is the highest-impact single purchase. Skip the EPDM upgrade for now and revisit when budget allows.
- Older Home (pre-1980): Homes built before modern framing codes are more likely to have settled frames and door openings that are noticeably out of square. Check all four gap widths before buying weatherstrip, since uneven gaps larger than 3/8 inch may require a combination of hinge shimming and wider-profile weatherstrip (5/8-inch foam rather than 3/8-inch) to bridge the gap. Also inspect the door threshold for rot or warping, which is common in older wood thresholds and requires replacement before a new sweep will seal properly.