If your bonus room above the garage swings from freezing in January to sweltering in July, you are not imagining it. The garage below is essentially an unconditioned outdoor space, and without a proper thermal barrier between that cold concrete slab and your living area above, your HVAC system works overtime just to keep one room comfortable. Many homeowners spend years tolerating this problem, not realizing a targeted insulation upgrade can fix it permanently.
The challenge with bonus rooms above garages is that they have multiple thermal weak points: the floor assembly sitting over the garage, the sloped knee walls on the sides, and often poorly insulated exterior walls and ceiling. Miss any one of these and you will still feel the cold creeping in or the heat radiating down. Getting all of them right requires understanding how heat moves through each surface, which is exactly what this guide covers.
Whether you are dealing with a home office that is unusable half the year, a guest bedroom that gets complaints every winter, or a playroom that never feels right, this post walks you through every insulation layer in plain language. You will get specific R-value targets, realistic cost estimates, and a clear path from a basic improvement all the way to a full professional air-sealing and insulation system.
What You’ll Need
Click on an item below to shop for the recommended items for this recipe on Amazon.
As an Amazon Associate, we earn from qualifying purchases.
How to Do It
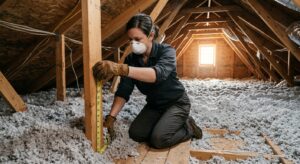
- Access the garage ceiling below the bonus room. If drywall is already installed, you will need to either remove it or use blown-in insulation through small holes. If it is open framing, you can install batts directly.
- Seal all penetrations in the floor assembly first using fire-rated caulk or two-part spray foam. Target gaps around wiring, plumbing pipes, HVAC ducts, and the perimeter rim joists. This step must come before insulation.
- Install R-30 to R-38 unfaced fiberglass or mineral wool batts between the floor joists in the garage ceiling. Cut batts 1 inch wider than the joist bay so they friction-fit without gaps. In cold climates (Zone 5 and above), target R-38.
- Staple insulation support rods or wire mesh across the bottom of the joists to hold batts firmly against the subfloor above, preventing sagging that would create air gaps.
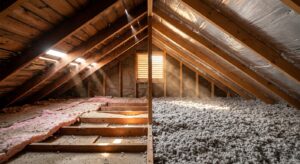
- Locate the knee wall access hatches or panels in the bonus room. Open them and insulate the knee wall surface itself with R-15 to R-21 batts, then add rigid foam board (R-5 per inch) as a continuous layer over the studs to reduce thermal bridging.
- Install a rigid foam or plywood air barrier on the attic floor behind the knee wall, extending 2 feet out from the knee wall base, to block cold attic air from undercutting the insulation.
- Schedule an energy audit or insulation assessment first. A contractor should measure existing R-values, locate all air leaks with a blower door test if possible, and identify moisture risks before specifying foam type and thickness.
- Have the contractor apply 2 inches of closed-cell spray polyurethane foam (approximately R-12 to R-14) to the underside of the floor assembly from the garage. This simultaneously air-seals and insulates in one step, with no separate vapor barrier needed.
- For the knee wall areas, have the contractor apply either closed-cell spray foam directly to the sloped roof deck and knee wall framing, converting the space to unvented conditioned space, or install open-cell foam plus a continuous rigid foam layer on the knee wall faces.
- Have the contractor address the rim joists at the perimeter of the floor assembly with closed-cell foam, which is one of the highest-impact single improvements in the entire project.
- After foam cures (typically 24 hours), have any required ignition barrier drywall or intumescent paint applied over exposed foam per local fire code. Most codes require foam to be covered in habitable spaces.
- Request a post-installation thermal imaging scan to confirm there are no cold spots, voids, or areas where foam did not fully adhere before the contractor leaves the site.
- Measure the garage ceiling and purchase 2-inch polyisocyanurate (polyiso) rigid foam boards, which provide approximately R-13 per 2-inch panel. This adds a continuous thermal break over the entire ceiling surface.
- Apply construction adhesive rated for foam board to the back of each panel and press firmly against the existing garage ceiling drywall. Supplement with screws and large washers driven into ceiling joists for mechanical fastening.
- Tape all seams between foam panels with foil-faced tape to complete the air barrier. Pay special attention to the perimeter where the foam meets the walls.
- Cover the exposed foam with a layer of 5/8-inch Type X drywall for fire code compliance. Fasten through the foam into ceiling joists using 3-inch drywall screws. This layer also adds thermal mass.
- Finish drywall joints with joint compound and prime for painting. The finished garage ceiling will be several inches lower but will dramatically reduce heat transfer into the bonus room above.
Why It Works: The Benefits
Properly insulating the floor, knee walls, and ceiling of a bonus room above a garage can reduce heating and cooling energy use for that zone by 20 to 30%, translating to $150 to $400 per year in savings depending on climate and home size.
Eliminating the thermal weak points in this room can reduce temperature swings by 10 to 20 degrees Fahrenheit, turning an unusable seasonal space into a comfortable room that reaches setpoint in less time and holds temperature steadily.
When a bonus room stops draining conditioned air, the HVAC system serving it cycles less frequently and for shorter durations, extending equipment life and reducing maintenance costs over time.
Sealing the floor assembly blocks garage air, which often contains vehicle exhaust, stored chemical fumes, and dust, from infiltrating the living space above. This is a meaningful health benefit beyond just comfort.
A conditioned, comfortable bonus room adds real usable square footage to your home. A poorly insulated room that is listed as finished space but is uncomfortable year-round can actually detract from buyer perception and appraised value.
💰 Savings Impact by Action
Sealing all penetrations in the floor assembly before adding insulation can reduce infiltration-driven heat loss by up to 30%, making it the single highest-impact step in the entire project.
Upgrading the garage ceiling floor assembly from uninsulated to R-30 reduces conductive heat loss through the floor by up to 70%, cutting total room heating load by approximately 25%.
Adding R-15 batts plus an air barrier to the knee walls and attic access areas reduces lateral heat loss into adjacent unconditioned attic space by approximately 15% of the room’s total load.
Sealing and insulating the rim joists at the floor assembly perimeter with closed-cell foam can reduce whole-house air leakage by 10% because rim joists are among the leakiest areas in any home.
Insulating HVAC ducts running through unconditioned knee wall spaces recovers 20 to 40% of the heating and cooling energy that would otherwise be lost before reaching the room’s supply registers.
🏠 Key Concepts Explained
The Science Behind It
Heat always moves from warm to cold, and it does so through three mechanisms simultaneously: conduction, convection, and radiation. In a bonus room above a garage, all three are working against you. The floor joists conduct heat directly out of the room and into the cold garage air. Convection allows cold air from the garage to infiltrate through gaps and replace warm conditioned air. And the cold garage ceiling radiates coldness upward toward the floor surface, which your feet feel even when the air temperature seems acceptable. Good insulation addresses conduction; good air sealing addresses convection; radiant barriers or sufficient insulation thickness address radiant exchange.
The R-value system measures resistance to conductive heat flow. Each R-1 of insulation reduces heat flow by a defined amount per square foot per degree of temperature difference. A floor assembly with R-19 batts in a Climate Zone 5 location (think Minneapolis or Denver) might see 30 to 50 degrees of temperature difference between the bonus room floor and the garage in winter. Without adequate R-value, that temperature difference drives significant heat flow 24 hours a day. Closing that gap from R-11 to R-38 can cut conductive heat loss through the floor by more than 70%, a dramatic improvement for a relatively modest investment in materials.
Vapor management matters in this specific assembly because the garage is semi-outdoor space. In winter in cold climates, warm moist air from the living space above wants to drive downward through the floor assembly toward the cold garage. If it reaches the dew point before exiting the assembly, it condenses inside the insulation and framing, reducing R-value and promoting mold. Closed-cell spray foam solves this elegantly because it is both an air barrier and a Class II vapor retarder, stopping moisture movement and thermal loss in a single material. For batt insulation systems, a vapor retarder (like kraft facing or a sheet of polyethylene on the warm side of the insulation) is important in Climate Zones 5 through 8.
Frequently Asked Questions
▼ I insulated the floor above my garage but the bonus room is still cold. What did I miss?
The most common culprit is the knee walls and sloped ceiling sections, which are often ignored during a floor-only project. Open the knee wall access hatches and check whether those surfaces are insulated and whether there is an air barrier blocking cold attic air from flowing behind and below the knee wall insulation. Also check the rim joists at the perimeter of the floor assembly using a thermal camera or laser thermometer. Those areas are frequently missed and are responsible for a disproportionate share of heat loss.
▼ My garage ceiling already has drywall. Can I still insulate without tearing it down?
Yes. You have two good options. First, a blown-in insulation contractor can drill 2 to 3 inch holes in the drywall every 16 or 24 inches (matching joist spacing), blow in dense-pack cellulose or fiberglass, then patch the holes. This typically costs $1.50 to $3.00 per square foot installed. Second, you can add a continuous layer of rigid foam board over the existing drywall as described in the continuous rigid foam approach above, then re-cover with new drywall for code compliance.
▼ How do I know what R-value I need in my specific climate?
The DOE recommends R-30 to R-60 for floors over unconditioned spaces depending on climate zone. In Climate Zones 1 to 2 (Deep South), R-19 to R-25 is typically adequate. Zones 3 to 4 (Mid-Atlantic, Pacific Northwest) call for R-25 to R-30. Zones 5 to 8 (Midwest, Mountain, Northern states) warrant R-38 to R-60 for maximum benefit. Look up your county’s climate zone at the DOE Building Energy Codes website and use that as your minimum target.
▼ Is there a risk of carbon monoxide or fumes from the garage getting into the bonus room after I seal the floor?
Air sealing the floor assembly actually reduces that risk rather than increasing it, because vehicle exhaust and chemical fumes travel upward through gaps in the floor. A fully air-sealed floor assembly is a meaningful safety improvement. The concern to manage is ensuring that any gas appliances in the garage still have adequate combustion air after sealing, so check with your HVAC contractor if you have a furnace or water heater in the garage.
▼ Can I use regular spray foam cans from the hardware store instead of hiring a spray foam contractor?
One-component DIY spray foam cans (like Great Stuff) are excellent for air sealing small gaps and penetrations, and you should absolutely use them for that purpose before installing batts. However, they cannot build up the 2-inch continuous thickness needed to deliver meaningful R-value across a large floor assembly. For R-value, use batt or rigid foam insulation. Reserve canned spray foam for sealing, not insulating.
Quick Tips
- Use a laser thermometer to scan your bonus room floor surface in winter before starting. A floor that reads 55 to 60 degrees Fahrenheit when the room air is 70 degrees tells you exactly how much work the floor assembly needs.
- Mineral wool batts (Rockwool or similar) outperform fiberglass in floor assemblies because they resist compression, do not absorb moisture, and retain R-value even in cold conditions. The cost premium is typically 20 to 30% but the performance advantage is real.
- If your bonus room has HVAC supply and return ducts running through unconditioned knee wall spaces, insulate around those ducts or better yet relocate the run inside the conditioned envelope. Ducts in unconditioned space lose 25 to 40% of their delivered energy before reaching the register.
- Add insulated access covers to any knee wall hatches. A standard plywood hatch with no insulation is effectively an R-0 hole in your thermal envelope. Glue 2-inch foam board to the back of the hatch door for an easy, cheap R-13 upgrade.
- Check that your bonus room door to the rest of the house has good weatherstripping. If the bonus room is struggling to stay warm, a leaky door undermines all your insulation work by letting cold room air bleed into adjacent hallways and stairwells.
Variations for Your Situation
- Tight Budget (under $500): Focus entirely on air sealing first. Buy two or three large cans of fire-rated spray foam and seal every visible gap in the floor assembly from the garage side: all wire and pipe penetrations, rim joist gaps, and the perimeter where the subfloor meets the framing. Then add unfaced fiberglass batts (R-19 minimum) using wire support rods from a hardware store. Total material cost is typically $150 to $400 and addresses the two highest-impact problems without any professional help.
- Older Home (pre-1980): Homes built before modern energy codes often have floor assemblies with no insulation at all and significant structural gaps. Before starting, test any existing insulation material for asbestos if your home predates 1980. Hire a certified inspector for $200 to $400 if in doubt. Once cleared, these homes benefit most from the professional spray foam approach because their air leakage rates are substantially higher than newer construction, and air sealing alone can deliver dramatic comfort improvements even before full R-value targets are reached.
- Finished Bonus Room (cannot access floor from below): If the garage ceiling is drywalled and finished and you cannot access the floor assembly easily, the best DIY path is the continuous rigid foam approach applied to the garage ceiling surface. Alternatively, on the bonus room side, you can install a floating floor system: a layer of 1.5-inch polyiso foam board covered by a plywood subfloor and new finish flooring. This adds R-10 to R-13 under the floor surface, raises the floor height by about 2 inches, and requires no access to the existing floor assembly. Cost is typically $4 to $8 per square foot in materials.