Your attic is the single biggest source of heat loss in winter and heat gain in summer, responsible for up to 25% of a home’s total energy waste. Yet most homeowners never set foot up there, let alone check whether their insulation is actually doing its job. The good news is that assessing your attic insulation is one of the easiest DIY home checks you can do, requiring nothing more than a flashlight, a ruler, and about 20 minutes of your time.
Building codes and energy efficiency standards have changed dramatically over the decades. A home built in the 1970s may have only 3 to 4 inches of insulation, which translates to roughly R-11, far below the R-38 to R-60 that the Department of Energy recommends for most U.S. climate zones today. That gap between what you have and what you need is quietly costing you money every single month on your utility bills.
This post walks you through two approaches: a simple visual inspection you can do in minutes, and a more thorough DIY assessment that gives you a complete picture of your attic’s thermal performance. You will learn how to measure what you have, compare it to DOE recommendations for your region, spot common problem areas like gaps around recessed lights and attic hatches, and figure out whether a DIY top-up or a professional job makes the most sense for your situation.
What You’ll Need
Click on an item below to shop for the recommended items for this recipe on Amazon.
As an Amazon Associate, we earn from qualifying purchases.
How to Do It
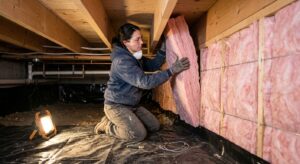
- Put on a dust mask and wear long sleeves before entering the attic. Fiberglass particles and cellulose dust are irritants you do not want to breathe or get on your skin.
- Locate your attic access hatch, typically in a hallway ceiling or closet. Open it slowly and shine a flashlight up before climbing in to check for any obvious issues.
- Once inside, stand or crouch on the joists only. Never step between joists onto the drywall ceiling below, as it will not support your weight.
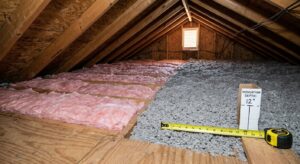
- Look across the attic floor. If you can clearly see the tops of the wooden joists (typically 2×6 or 2×8 boards that stick up above the insulation), your insulation is almost certainly below the recommended R-value. Joists are usually 5.5 to 7.5 inches tall, and insulation should ideally be flush with or above them.
- Check the attic hatch itself. If the hatch cover has no insulation attached to it, you have a significant energy loss point that can be fixed in under an hour with a foam kit or pre-cut rigid foam board.
- Take a quick photo of what you see for reference when comparing to DOE recommendations or getting contractor quotes.
- Gather your supplies before going up: a tape measure or rigid ruler marked in inches, flashlight or headlamp, dust mask rated N95 or better, old long-sleeve shirt, gloves, and a notepad or phone for photos.
- Identify your insulation type before measuring. Fluffy pink or yellow material is fiberglass batts or blown-in fiberglass. Gray or light brown loose fill is cellulose. White granular material may be old vermiculite (stop and do not disturb it; have it tested for asbestos before proceeding). Rigid foam boards are uncommon in open attics but have their own measurement rules.
- Push your ruler straight down into the insulation at five or six spots spread across the attic floor, including the center, near the eaves, and near any penetrations like light fixtures or plumbing stacks. Record each depth in inches.
- Convert depth to R-value using these standard approximations: blown-in fiberglass is about R-2.5 per inch, blown-in cellulose is about R-3.7 per inch, and fiberglass batt insulation is about R-3.1 per inch. Multiply your average depth by the appropriate number to get your current R-value.
- Look up your DOE climate zone at energystar.gov or energysaver.gov using your zip code. Compare your calculated R-value to the recommended target, which ranges from R-38 (Zone 1 to 2, southern states) to R-60 (Zone 6 to 8, northern states).
- Inspect for air sealing gaps while you are up there. Check around recessed can lights, plumbing vent pipes, electrical boxes, and where interior walls meet the attic floor. Any gap with visible daylight or felt air movement should be sealed before adding insulation.
- Document your findings with measurements and photos. This record is useful for DIY insulation planning, contractor quotes, and tax credit paperwork.
- Contact your utility company first. Many offer free or heavily discounted energy audits, and their auditors are certified BPI or RESNET professionals who will assess the attic along with the whole house.
- During the audit, a blower door test depressurizes your home and measures total air leakage in CFM (cubic feet per minute). This reveals whether air sealing is a higher priority than adding more insulation depth.
- The auditor will use a thermal imaging camera in the attic to identify cold spots, thermal bridges, and hidden moisture, problems that a ruler and flashlight cannot detect.
- Ask the auditor for a prioritized improvement list with estimated costs and projected savings for each measure. This gives you a roadmap to spend your improvement budget in the right order.
- Use the audit report to apply for utility rebates, state energy programs, and the federal 25C tax credit. Many audit reports include the documentation required for these applications.
Why It Works: The Benefits
Upgrading attic insulation from R-11 to R-38 can reduce annual heating and cooling costs by 15 to 25%, often saving $200 to $600 per year depending on home size and local energy rates.
Adequate attic insulation eliminates hot ceilings in summer and cold floors in winter, reducing the temperature swings between rooms that cause one part of the house to feel uncomfortable no matter how the thermostat is set.
When the thermal envelope is tighter, your heating and cooling system runs shorter cycles to maintain setpoint. This directly extends equipment life and reduces maintenance costs over time.
A visual attic inspection often reveals secondary issues like roof leaks, pest intrusion, bathroom fans venting into the attic instead of outside, and moisture damage before they become expensive repairs.
Knowing your current R-value is the first step to qualifying for the federal 25C energy efficiency tax credit, which covers 30% of insulation upgrade costs up to $1,200 per year, as well as many utility rebate programs.
💰 Savings Impact by Action
Upgrading from R-11 to R-38 reduces heat transfer through the ceiling by up to 65%, translating to 15 to 25% savings on total annual heating and cooling costs.
Sealing gaps around penetrations and the attic hatch before adding insulation improves effective R-value performance by up to 50% and reduces whole-house air leakage by 10 to 20%.
Adding R-10 rigid foam to an uninsulated attic hatch eliminates a common thermal weak point and can cut ceiling heat loss near the hatch by more than 80%.
Restoring insulation depth at the eaves to match the attic center eliminates a disproportionate heat loss zone that can account for 10 to 15% of total attic heat transfer.
🏠 Key Concepts Explained
The Science Behind It
Heat always moves from warm areas to cooler ones through three mechanisms: conduction (direct contact transfer), convection (movement of air), and radiation (infrared energy traveling through space). Attic insulation primarily interrupts conductive transfer by trapping tiny pockets of still air within its fibers or particles, and those trapped air pockets are what create resistance to heat flow. The R-value number is literally a measure of how much resistance one square foot of material provides to one BTU of heat trying to pass through it per hour under a one-degree Fahrenheit temperature difference.
Depth matters because more material means more trapped air and more resistance to heat flow. Doubling your insulation depth roughly doubles your R-value, and this has a non-linear impact on energy use. Going from R-11 to R-22 cuts heat loss through the ceiling nearly in half. Going from R-22 to R-38 cuts it by another third. Beyond R-60, the returns diminish significantly, which is why DOE recommendations cap out where they do rather than recommending ever-thicker insulation. The sweet spot for most climates is R-38 to R-49, where the cost of adding more insulation is balanced against meaningful energy savings.
Air sealing works alongside insulation but through a completely different mechanism. Insulation slows conductive heat transfer, but a single gap around a recessed light fixture allows warm air to flow directly into the attic by convection, bypassing the insulation entirely. Studies by the Building Science Corporation have shown that a 1% open area in a ceiling can account for 50% of the total heat loss through that ceiling assembly. This is why building scientists consistently recommend sealing air leaks before adding insulation depth, because insulation layered over unsealed gaps delivers a fraction of its theoretical performance.
Frequently Asked Questions
▼ I can not tell what type of insulation I have. How do I figure it out?
Blown-in fiberglass looks fluffy and yellowish or white, similar to cotton candy, and feels very lightweight. Blown-in cellulose is gray or brownish, denser, and looks like shredded newspaper (which is essentially what it is). Fiberglass batts are the familiar pink or yellow blanket rolls you may recognize from home improvement stores. If you see small white pebbles or granules that resemble cat litter, stop and do not disturb them — that is likely vermiculite, which may contain asbestos and needs professional testing before you proceed.
▼ My insulation looks fine but my house is still cold. What else could be the problem?
Adequate insulation depth does not guarantee performance if there are significant air leaks underneath it. Check for gaps around recessed light fixtures, the attic hatch, plumbing pipes, and where interior walls meet the attic floor. Also inspect the insulation near the eaves, as it almost always thins out to 2 to 3 inches in those corners even when the center looks acceptable. A blower door test from a certified energy auditor will quantify your air leakage and pinpoint the biggest problem areas.
▼ How do I know if my attic hatch is a problem?
Hold your hand near the hatch frame on a cold day while the heat is running. If you feel air movement or the hatch cover feels noticeably cold to the touch, it is leaking. Most standard attic hatches are thin pieces of drywall with zero insulation value, essentially a hole in your thermal envelope. You can fix this with a pre-cut rigid foam board (R-10 or higher) attached to the top of the hatch cover, plus adhesive foam weatherstripping around the frame, for a total cost under $30 and about 30 minutes of work.
▼ Can I just add more insulation on top of what I already have?
Yes, in most cases you can blow or lay additional insulation directly on top of existing material as long as the existing insulation is dry, mold-free, and not vermiculite. If adding fiberglass batts, lay the new layer perpendicular to the old one and use unfaced batts so moisture can move freely. If your existing insulation has a foil vapor barrier on top, you should either remove it or have a professional assess whether adding on top is appropriate for your climate zone, as trapping moisture between layers can cause long-term damage.
Quick Tips
- Use a piece of rigid cardboard marked with inch lines as a depth gauge so you can photograph your readings clearly for documentation.
- Check your insulation depth in winter when the attic is cool, not summer when temperatures can exceed 130 degrees Fahrenheit and pose a heat risk.
- If your insulation has a foil or kraft paper facing visible on top, it was installed facing the wrong direction (facing should always be toward the conditioned space below). This reduces effectiveness and can trap moisture.
- Mark your attic joists with a Sharpie at the DOE target depth before you leave the attic. It gives you a clear visual target when adding insulation later and lets you check progress at a glance.
Variations for Your Situation
- Apartment/Rental: Renters in top-floor units should focus on what they can access without modifying the unit. If you have attic access through a hatch inside your unit, you can measure depth and share the findings with your landlord in writing, framing it as a cost-saving and comfort improvement. For immediate results without attic access, use a draft stopper on your ceiling hatch if you have one, add a thermal curtain to any skylights, and use a contact thermometer on your ceiling to document temperature differentials that support a landlord conversation.
- Tight Budget (under $50): You do not need to spend anything to measure your insulation. A standard tape measure, a flashlight you already own, and an N95 mask from any hardware store for around $2 are the only requirements. If your measurement reveals a clear shortfall, focus first on the attic hatch, which you can insulate with a $15 to $25 rigid foam board and $5 of foam weatherstripping. This single fix in a previously uninsulated hatch can have a payback period of under six months.
- Older Home (pre-1980): Homes built before 1980 often have a mix of insulation types, sometimes with original batt insulation partially covered by a later cellulose blow-in from the 1990s. Measure through all layers and note where you hit each material type. Also be alert for knob-and-tube wiring (ceramic knobs with cloth-wrapped wires), which requires an electrician’s sign-off before you add insulation over it. These homes also tend to have higher air leakage rates, so budgeting for professional air sealing alongside any insulation upgrade typically delivers 30 to 40% better results than adding insulation alone.