Every spring, millions of homeowners fire up their AC without ever checking whether their insulation survived the winter. Freeze-thaw cycles, ice dams, moisture intrusion, and settling all degrade your home’s thermal envelope over the cold months, and a compromised envelope means your cooling system works harder, runs longer, and costs more all summer long. The U.S. Department of Energy estimates that air leaks and inadequate insulation together account for up to 30% of a typical home’s heating and cooling costs.
The good news is that a thorough spring inspection takes only a few hours and costs nothing if you do it yourself. Catching a compressed batt of attic insulation, a cracked rim joist, or a deteriorated door sweep now, before July heat sets in, can translate to real monthly savings of $20 to $80 depending on your home’s size and climate zone. More importantly, it protects against moisture damage that quietly destroys structural wood and creates mold conditions over the summer.
This post gives you a room-by-room, zone-by-zone checklist covering attic, walls, basement, crawlspace, and all the in-between spaces that most homeowners never think about. We include two action tracks: a quick-fix walk-through you can complete in an afternoon, and a deeper DIY upgrade path with specific materials and realistic cost estimates. By the end, you will know exactly where your home is losing conditioned air and what to do about it.
What You’ll Need
Click on an item below to shop for the recommended items for this recipe on Amazon.
As an Amazon Associate, we earn from qualifying purchases.
How to Do It
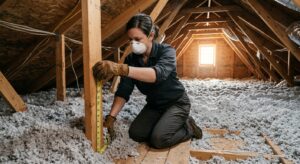
- Start in the attic on a mild morning. Bring a flashlight and look for daylight visible through eave vents or gaps around plumbing stacks and electrical boxes, which signals air bypasses. Check that insulation is evenly distributed at least 10 to 12 inches deep across the entire floor, including the corners near eaves where it often thins out.
- Inspect the attic hatch or pull-down stair. Press your hand against the back side of the hatch cover in the morning before it warms up. If it feels noticeably cold or warm relative to the rest of the attic floor, the hatch has no insulation and is a priority fix.
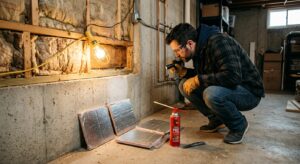
- Check rim joists in the basement or crawlspace. These are the framing members that sit on top of your foundation wall. Look for missing, fallen, or discolored insulation batts. Discoloration or staining on the wood indicates past or ongoing moisture intrusion.
- Walk the perimeter of every exterior door and run your hand two inches from the frame on a breezy day. Detectable airflow means weatherstripping has failed. Check door sweeps by sliding a piece of paper under the closed door. If it slides freely, the sweep needs replacement.
- Look at window trim and electrical outlets on exterior walls. Outlets and switches are notorious air leakage points. Press a tissue near an outlet on a windy day. Any flutter means conditioned air is bypassing the insulation through the wall cavity.
- Record all findings with photos and create a prioritized list. Fix attic bypasses and rim joists first since they offer the fastest payback, then address weatherstripping and door sweeps, then consider wall or window upgrades.
- Seal attic bypasses before adding any insulation. Use a can of low-expanding spray foam ($6 to $10) to seal around all plumbing stacks, wiring penetrations, and recessed light housings visible from the attic floor. For larger gaps around chimneys or dropped soffits, cut rigid foam board to fit and seal edges with fire-rated caulk or acoustical sealant.
- Add blown-in attic insulation if depth is under 10 inches. Rent a blower machine from a home improvement store (often free with purchase of a minimum number of insulation bags) and bring depth to at least 13 to 16 inches of blown fiberglass or cellulose, targeting R-38 to R-60 depending on your climate zone. Use wood baffles at each rafter bay to maintain ventilation channels before blowing.
- Insulate the attic hatch. Cut two layers of 2-inch rigid polyisocyanurate foam board (R-6.5 per inch) to fit the hatch cover, glue them together, and attach to the attic-side face of the door or hatch panel with construction adhesive. Add foam weatherstripping around the hatch frame so it seals when closed. Total cost is roughly $15 to $25.
- Insulate rim joists with cut-and-cobble rigid foam. Measure each rim joist bay, cut 2-inch rigid foam board to fit snugly, and press it into place. Seal all four edges with spray foam. This approach achieves approximately R-13 with a nearly complete air seal, far outperforming fiberglass batts in this location, and costs $80 to $200 for an average basement perimeter.
- Replace failed weatherstripping on exterior doors using foam or felt-and-vinyl compression strips. Remove the old material, clean the frame with isopropyl alcohol, and press or nail the new strip into the door stop so it compresses slightly when the door closes. Replace door sweeps with adjustable aluminum sweeps with vinyl inserts for a tight seal at the threshold.
- Install foam gaskets behind outlet and switch covers on exterior walls. Turn off the circuit at the breaker, remove the cover plate, slide a pre-cut foam gasket (sold in multipacks for under $5) over the device, and replace the cover. This takes about 2 minutes per outlet and measurably reduces air infiltration through wall cavities.
- Request a home energy audit from a BPI-certified or RESNET-certified auditor. The auditor will conduct a blower door test that depressurizes your home and precisely measures total air leakage in CFM50, giving you a baseline number and identifying exactly where the leaks are located.
- Review the auditor’s thermal imaging report. Infrared cameras reveal insulation voids, thermal bridges, and air bypass locations inside walls that are completely invisible to the naked eye. This is especially valuable in older homes where original insulation has settled or was installed inconsistently.
- Get bids from two or three insulation contractors for any work the audit recommends. Ask specifically whether the bid includes air sealing before insulation is added, because skipping air sealing and just adding insulation is a common mistake that leaves 30 to 50% of potential savings on the table.
- If contractor work includes blown-in wall insulation via drill-and-fill, verify they will patch and paint all holes and confirm the R-value being installed versus the rated R-value, as dense-pack cellulose in walls typically achieves R-3.5 to R-3.8 per inch and also acts as an air barrier.
- After work is complete, request a post-improvement blower door test to verify that air leakage was actually reduced. A quality contractor should be willing to do this, and many rebate programs require it for verification before issuing payment.
Why It Works: The Benefits
Sealing attic bypasses and adding insulation to R-38 or higher can reduce cooling loads by 15 to 25%, which translates to $150 to $400 in savings over a typical cooling season in a 1,500 to 2,500 square foot home.
A well-sealed envelope means your AC cycles less frequently, reducing compressor wear and extending equipment life by 2 to 5 years on average.
Addressing insulation gaps in rim joists, attic hatches, and knee walls eliminates the hot spots and cold drafts that make certain rooms uncomfortable regardless of thermostat setting.
Catching and repairing damaged insulation in spring, before high-humidity summer months, prevents the mold and wood rot that can cost $3,000 to $15,000 to remediate if left unchecked.
Insulation improvements that meet ENERGY STAR specifications may qualify for the federal 25C tax credit, which covers 30% of project cost up to $1,200 per year, significantly shortening payback periods.
💰 Savings Impact by Action
Sealing attic bypasses before adding insulation reduces conditioned air loss by up to 20% and makes existing and new insulation perform at its rated R-value.
Bringing attic insulation to the DOE-recommended level for your climate zone reduces heating and cooling loads by 15 to 25% compared to under-insulated attics.
Insulating and air-sealing rim joists with rigid foam can eliminate up to 10% of total home air leakage since these cavities are often completely uninsulated.
Replacing failed weatherstripping and door sweeps on three to four exterior doors reduces infiltration-driven cooling load by 5 to 8% with materials costing under $60.
Foam gaskets behind exterior-wall outlet and switch covers reduce infiltration by 2 to 4% in homes with standard framed construction and no other air sealing.
🏠 Key Concepts Explained
The Science Behind It
Your home’s insulation works through three heat transfer mechanisms: conduction, convection, and radiation. Insulation materials like fiberglass and cellulose resist conductive heat flow by trapping millions of tiny air pockets within their fibers. The R-value rating you see on packaging measures this resistance, with higher numbers indicating slower heat transfer per inch of thickness. What the R-value label does not capture is how dramatically air movement destroys that performance. When air bypasses a batt through a gap around a wire or pipe, convective currents carry heat directly from one side of the assembly to the other, effectively short-circuiting the insulation entirely.
This is why building scientists emphasize that air sealing and insulation are not interchangeable. They address different mechanisms. Rigid foam board installed in a rim joist achieves modest R-value but also creates a nearly complete air barrier, which is why it often outperforms a fiberglass batt with a higher R-rating in that location. The batt fills the cavity but leaves gaps at the edges, allowing convective bypass. The foam, sealed with spray foam at its perimeter, eliminates the bypass entirely.
Spring is the optimal inspection window because of how thermal and moisture conditions interact. After winter, any areas where warm indoor air was leaking out into cold attic or wall cavities will show visible staining, frost residue, or compressed insulation from condensation cycles. These signatures are easy to spot in spring before summer heat makes attic access impractical. Additionally, inspecting before cooling season means any repairs you make will immediately benefit your most expensive utility months, maximizing the financial return on your time investment.
Frequently Asked Questions
▼ My energy bills are still high even though my attic has plenty of insulation. What am I missing?
Adequate depth alone does not guarantee performance if there are air bypasses underneath the insulation. Push the insulation aside in several spots and look for gaps around top plates, plumbing, and electrical penetrations. Also check whether your ductwork runs through the attic, since leaky attic ducts can waste 20 to 30% of conditioned air before it reaches living spaces and are often more impactful than the insulation itself.
▼ Can renters do any of this without landlord permission?
Renters can safely install outlet foam gaskets, door sweeps, and weatherstripping on exterior doors without structural modifications, and most landlords will not object since these protect the property. Avoid anything requiring cutting, drilling, or permanent attachment. Focus on removable draft stoppers, cellular window shades for thermal resistance, and area rugs over cold slab floors, which together can meaningfully reduce your comfort costs without lease violations.
▼ How do I know if my insulation has mold and whether it is safe to handle?
Discolored insulation (gray, black, or green staining), a musty odor, or visible fuzz or growth on facing are all red flags. Do not disturb suspected mold-contaminated insulation yourself. Contact a certified mold inspector or industrial hygienist for assessment. If the contamination is confirmed, the remediation must address the moisture source first, then remove and replace the material under proper containment protocols.
▼ My house was built in the 1960s. Is it worth insulating or should I just replace windows?
Air sealing and insulation almost always deliver better return on investment than window replacement in older homes. Windows account for roughly 10 to 25% of heat loss while the attic, floors, and wall bypasses typically account for 50 to 70%. Weatherize the envelope thoroughly first, then evaluate windows. A single-pane window upgraded to double-pane may save $15 to $30 per year per window, but a properly sealed and insulated attic in a 1960s home can save $300 to $700 annually at far lower cost.
▼ How long will it take to see lower bills after completing these fixes?
Air sealing improvements show up in the very next billing cycle, especially if you complete the work in late spring before your first full cooling month. Insulation upgrades have a slightly longer lag because the savings are spread across the entire season. Most homeowners completing a full attic air seal and insulation upgrade see measurable bill reductions within 30 to 60 days and recoup the investment within one to two cooling seasons.
Quick Tips
- Photograph your attic insulation depth next to a ruler or tape measure. This gives you a baseline record and makes it easy to communicate what you have with a contractor or auditor.
- Check your climate zone at the DOE’s website to find your target R-value. Zone 4 homeowners should target R-38, Zone 5 and 6 homeowners should target R-49 to R-60 in the attic.
- In older homes, pull back a small section of insulation near an interior wall partition in the attic. Gaps and air channels running through interior wall top plates are invisible from above and are among the biggest sources of stack-effect driven air leakage.
- Use a stick of incense or a smoke pencil instead of your hand to detect air leaks precisely. The visible smoke trail reveals even very slow airflow that fingers cannot sense, making it easier to find and mark every leak before sealing.
Variations for Your Situation
- Apartment or Condo: Focus entirely on in-unit improvements since building envelope work requires management approval. Install foam gaskets behind all outlet covers on exterior walls, apply V-strip weatherstripping to sliding patio doors, use thermal cellular shades on windows, and place a door sweep on your front door if permitted. These zero-permission steps cost under $50 and can cut infiltration-related discomfort noticeably.
- Tight Budget (under $50): Prioritize spray foam cans and outlet gaskets first, as they deliver the highest air-sealing impact per dollar. A single $10 can of foam used to seal attic bypasses around plumbing and wiring can eliminate the equivalent of a softball-sized hole in your ceiling. Add weatherstripping on the worst-performing exterior door for another $8 to $12. Skip insulation additions until budget allows and focus entirely on stopping air movement.
- Older Home (pre-1980): Assume significant insulation settling and widespread air bypass routes that were never sealed during original construction. Budget extra time for the attic inspection and look specifically at interior partition wall top plates, which were rarely blocked in older framing. Dense-pack cellulose blown into wall cavities via drill-and-fill is often the highest-impact upgrade for these homes, and many were built without any wall insulation at all. Get a professional blower door test to establish a baseline before spending money, since the leakage level will determine which fixes offer the fastest payback.