Every winter, hundreds of thousands of homeowners discover the hard way that an unprotected outdoor faucet is one of the most expensive oversights in home maintenance. When water trapped inside a hose bib freezes, it expands with roughly 2,000 pounds per square inch of force, splitting pipes, cracking fittings, and sometimes flooding finished basements or walls without any visible warning until the thaw arrives. The average water damage claim from a burst pipe runs between $5,000 and $15,000, and that number climbs fast if drywall, flooring, or personal property is involved.
The good news is that protecting your hose bibs before the first hard freeze is one of the cheapest and fastest wins in all of home maintenance. A foam faucet cover costs $3 at any hardware store. Upgrading to a frost-free sillcock runs about $25 in parts and a Saturday morning of work. Either option pays for itself the moment temperatures drop below 28 degrees Fahrenheit, which meteorologists consider the threshold at which exposed pipes are at serious risk. Most climates in the continental U.S. hit that mark at least a few nights each year.
This guide walks you through everything from a two-minute quick fix to a proper DIY replacement, plus what to look for if you suspect damage has already occurred. Whether you have a single spigot on a starter home or six hose bibs on an acreage property, the steps are the same and the stakes are real enough to act on today.
What You’ll Need
Click on an item below to shop for the recommended items for this recipe on Amazon.
As an Amazon Associate, we earn from qualifying purchases.
How to Do It
- Disconnect and store any garden hoses attached to the faucet. A hose left connected traps water in the spout and defeats every other freeze protection measure.
- Turn the hose bib to the fully open position and let it drain for 30 to 60 seconds to clear any residual water from the spout.
- If your home has a dedicated indoor shutoff valve for this hose bib (check the basement or crawlspace wall closest to the faucet), turn it clockwise to close it, then go back outside and open the exterior faucet again to drain the remaining water in the line. Leave the exterior faucet open or cracked so pressure can equalize.
- Fit a foam faucet insulation cover over the spout. The cover should snap or cinch snugly against the siding with no gaps. These are sold at hardware stores for $3 to $6 each and are reusable for several seasons.
- Check the cover after the first hard frost to confirm it has stayed seated. Wind can dislodge loose-fitting covers.
- Shut off the water supply to the hose bib at the dedicated indoor shutoff valve or at the main. Open the existing exterior faucet to relieve pressure and drain the line.
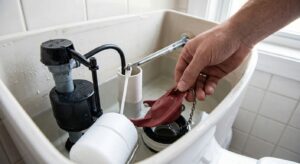
- Go outside and unscrew the existing hose bib from the wall. Most are held by two screws into the siding or rim joist, with the threaded or soldered connection accessible from inside.
- Measure the stem length you need. The frost-free sillcock stem should be long enough to position the shutoff valve inside the conditioned wall cavity, typically 6, 8, 10, or 12 inches. Choose based on your wall thickness.
- Cut the supply pipe cleanly with a pipe cutter, leaving enough clearance to attach the new fitting. If using a SharkBite push-fit connector, deburr the pipe end and push the fitting on firmly until it clicks. If soldering, apply flux, heat evenly, and flow solder until it wicks around the joint.
- Insert the new frost-free sillcock through the wall, caulk the exterior flange generously with exterior-grade silicone to prevent water and air infiltration, and secure it with screws into the rim joist or framing.
- Restore water supply, test for leaks at all connections, and confirm the faucet drains when closed by opening and shutting it twice. You should hear water briefly draining back after closing.
- Contact a licensed plumber and describe the hose bib location, wall material (brick, stucco, or wood siding), and whether you have an indoor shutoff valve. This helps them quote accurately.
- Ask the plumber to inspect the supply line from the meter or main to the hose bib for any signs of prior freeze damage, pinhole corrosion, or undersized shutoffs while they are on site.
- Request a frost-free sillcock with a built-in vacuum breaker, which prevents backflow contamination of your potable water supply. This is required by code in most jurisdictions and is a standard feature on quality sillcocks.
- After installation, confirm the plumber caulks the exterior flange and tests for leaks before closing the job. Ask for the shut-off location of the new valve in writing or mark it yourself.
Why It Works: The Benefits
A single burst pipe behind an exterior wall can release hundreds of gallons per hour. The average insurance claim for this type of damage is $10,000 to $15,000, with deductibles typically running $1,000 to $2,500 out of pocket.
Multiple freeze-related claims can trigger a premium increase or policy non-renewal. Preventive maintenance keeps your claims history clean and your annual premiums stable.
Water damage behind walls causes mold growth within 24 to 48 hours of wetting. Remediation adds $2,000 to $6,000 on top of the pipe repair and can flag on a disclosure form, reducing what buyers are willing to pay.
Even minor freeze-thaw cycling that does not cause a burst will wear out rubber washers, crack valve seats, and cause slow drip leaks. A dripping hose bib wastes 3 to 10 gallons per day and shortens the faucet’s functional life by years.
Once protected, you can watch a polar vortex forecast without worrying about your plumbing. A $3 to $30 investment made in October eliminates a stressor that costs homeowners billions in aggregate damage every winter nationwide.
💰 Savings Impact by Action
Proper winterization with a frost-free sillcock and disconnected hose eliminates nearly all freeze-burst risk, preventing average repair costs of $5,000 to $15,000 per incident.
Replacing a worn hose bib that drips 5 gallons per day eliminates roughly 1,800 gallons of wasted water annually, saving $15 to $30 per year on water bills.
Caulking the exterior flange of a hose bib and sealing the wall penetration reduces cold air infiltration through that opening by up to 30%, improving comfort near exterior walls.
Homeowners who winterize all exterior faucets annually reduce their probability of filing a freeze-related water damage claim by an estimated 90% compared to those who take no action.
🏠 Key Concepts Explained
The Science Behind It
The physics of frozen pipes comes down to one fact: water is one of the rare substances that expands when it freezes rather than contracting. Ice takes up about 9% more volume than liquid water. Inside the rigid metal body of a hose bib, that expansion has nowhere to go, so it builds pressure until the weakest point in the system fails. Copper fittings crack, cast brass bodies split, and soldered joints blow apart. The failure typically does not happen at the point where ice forms; it happens wherever pressure builds up between the ice blockage and a closed valve, which is often deep inside the wall cavity.
Frost-free sillcocks solve this elegantly by repositioning the valve. Instead of closing at the exterior wall face, the valve closes 6 to 12 inches inside the building, in space that stays above 32 degrees because it is within or adjacent to the conditioned envelope. The long exposed stem between the valve and the spout is hollow. When you close the faucet, gravity and atmospheric pressure drain that water back through the stem and out the spout, leaving the tube empty. Empty tubes do not burst, regardless of exterior temperature.
Foam insulation covers exploit a different principle: thermal resistance. The rate at which a metal faucet body loses heat to cold air is governed by the temperature differential and the insulation value between them. A bare brass faucet on a 10-degree night loses heat quickly. A foam cover adds an insulating layer with an R-value of roughly R-2 to R-4, plus traps a pocket of still air which has an effective R-value near R-1 per inch. That combined resistance slows the rate of heat loss enough to buy several more hours before freezing occurs, which is often all you need for a moderate overnight freeze before temperatures recover the next afternoon.
Frequently Asked Questions
▼ How do I know if my hose bib already froze and cracked this winter?
Turn the water on at the hose bib in spring and look for reduced pressure, water spraying sideways from the faucet body or wall, or wet spots appearing on interior drywall within a few feet of the faucet. Even if the exterior looks fine, the pipe inside the wall may have a hairline crack that only leaks under pressure. If you suspect damage, shut off the dedicated indoor valve and call a plumber before using the faucet again.
▼ My house does not have a shutoff valve for the hose bib. What do I do?
This is common in older homes. Your best immediate option is the foam cover combined with disconnecting the hose every fall. The permanent fix is to have a plumber install a dedicated shutoff valve on the supply line inside your basement or crawlspace while replacing the exterior faucet with a frost-free model. Budget $150 to $350 for this combined job and it eliminates the problem for decades.
▼ My frost-free sillcock is still dripping after I close it. Is that normal?
A brief trickle for 5 to 10 seconds after closing is normal drainage from the stem. Continuous dripping after that is not normal and usually means the internal rubber washer or seat is worn. This is a critical repair before winter because a dripping frost-free faucet is holding water in the stem, which can still freeze. Replace the washer or the entire faucet before temperatures drop.
▼ Can I use heat tape on a hose bib instead of replacing it?
Pipe heat tape is a reasonable option for supply lines in unheated crawlspaces but is generally overkill and unnecessarily complicated for a hose bib when frost-free sillcocks are inexpensive and permanent. If you use heat tape, choose a self-regulating product rated for potable water contact, follow the manufacturer’s overlap and connection instructions exactly, and plug it into a GFCI outlet. Improperly installed heat tape is a fire hazard.
▼ Does homeowner insurance cover a burst hose bib?
Most standard HO-3 homeowner policies cover sudden and accidental water damage from a burst pipe, including a hose bib, but they typically exclude gradual leaks or damage resulting from homeowner neglect. If an adjuster determines the freeze was foreseeable and preventable, the claim may be denied. Document your prevention steps each fall and keep receipts for any faucet covers or upgrades purchased.
Quick Tips
- Set a recurring reminder on your phone for October 1st each year labeled ‘Winterize hose bibs.’ It takes less time than it sounds and costs almost nothing.
- If you have an irrigation system, the backflow preventer and any above-ground valves need the same treatment as hose bibs. A plumber can blow out the lines with compressed air in under an hour.
- After installing a frost-free sillcock, always disconnect hoses before the first freeze. A connected hose holds water in the spout and can force the frost-free feature to fail even on a premium sillcock.
- Check all exterior hose bibs in early spring for dripping or reduced flow, which can indicate a hairline crack from winter freeze damage. Catching this in April costs far less than discovering it mid-summer or after water has migrated into framing.
Variations for Your Situation
- Apartment or Condo: Renters typically do not have access to outdoor hose bibs, but if your unit has a private patio spigot, ask your property manager in writing to winterize it before the first freeze. If they decline or delay, a foam faucet cover costs $4 and can be installed in 30 seconds without landlord permission. Keep the written request in your records in case of a damage dispute.
- Tight Budget (under $10): Disconnect your garden hose, open the faucet to drain it, and fit a foam insulation cover from any hardware store. This three-step process costs $3 to $6 and takes under five minutes. In climates where temperatures rarely drop below 20 degrees Fahrenheit for more than a few hours at a time, this combination provides adequate protection for most winters.
- Older Home (pre-1980): Homes built before 1980 almost universally have standard hose bibs rather than frost-free models, and many have galvanized steel or older copper supply lines that are already narrowed by corrosion. When replacing the hose bib, have a plumber inspect 12 to 18 inches of the supply line for scale buildup or corrosion. Replacing a corroded section costs $50 to $100 extra now and avoids a much larger failure later. Also check that indoor shutoff valves still turn freely since older gate valves often seize when not operated regularly.