Your dryer works harder than almost any other appliance in your home, and when its vent is clogged with lint, it has to run longer, hotter, and more expensively just to do the same job. The U.S. Fire Administration estimates that failure to clean dryer vents causes over 2,900 house fires every year, making this one of those rare home tasks that simultaneously saves money and protects your family. Most homeowners never clean their vent until something goes wrong.
The good news is that a full vent cleaning takes about 30 minutes, requires only basic tools you may already own, and delivers results you will notice immediately. If your clothes are taking more than one cycle to dry, your dryer feels hot to the touch, or you cannot remember the last time you cleaned the vent, this post is for you. Expect to shave 20 to 40 minutes off every drying cycle after you complete this.
This guide walks you through two approaches: a quick DIY clean using a standard brush kit that handles most homes, and a more thorough method for longer or bent vent runs that collect the most lint. We will also cover how often to clean, warning signs of a serious blockage, and when to bring in a professional.
What You’ll Need
Click on an item below to shop for the recommended items for this recipe on Amazon.
As an Amazon Associate, we earn from qualifying purchases.
How to Do It
- Unplug the dryer from the electrical outlet or turn off the gas shutoff valve if it is a gas dryer. Safety first before you touch anything behind the machine.
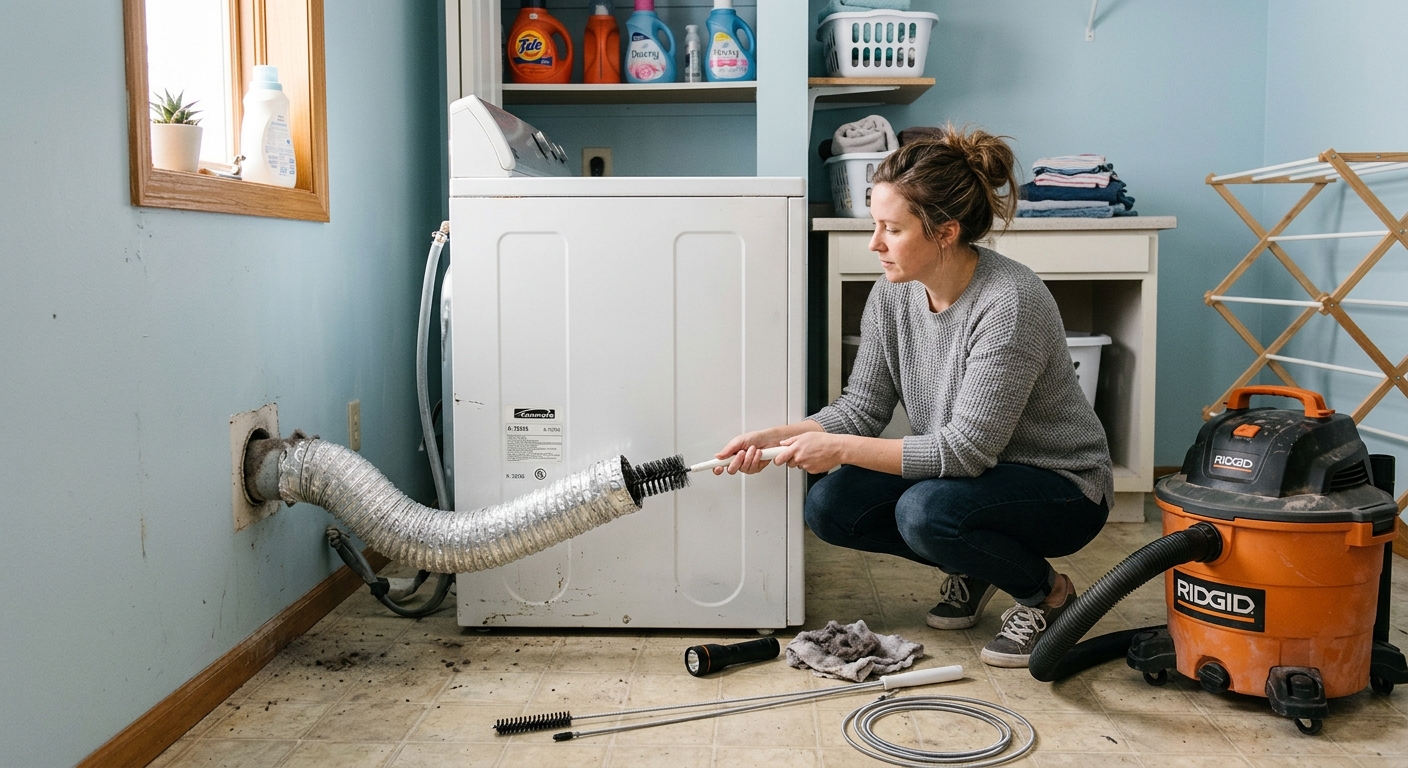
- Pull the dryer 12 to 18 inches away from the wall. Disconnect the flexible duct from the back of the dryer by loosening the clamp with a screwdriver or by hand if it uses a friction fit.
- Insert the dryer vent brush kit into the duct opening at the back of the dryer and push it in with a rotating motion, working it back and forth to dislodge lint from the duct walls.
- Extend the brush with additional rods as you work toward the exterior wall. Most kits include 12-inch flexible rods that connect together to reach 10 to 12 feet total.
- Go outside and remove the exterior vent cover. Insert the brush from the outside and push inward to knock loose any lint packed near the flap end, which is the most common blockage point.
- Use a shop vacuum or a vacuum hose attachment to clear all loosened lint from both ends of the duct, from inside the dryer’s duct collar, and from behind the dryer. Reattach the duct, push the dryer back, reconnect power, and run the dryer on air-only for 10 minutes to blow out any remaining debris.
- Unplug the dryer and disconnect the gas supply if applicable. Take photos of the duct connection before disassembly so you know exactly how to reassemble everything.
- Disconnect the full length of flexible duct between the dryer and the wall duct entry. Inspect the flexible duct carefully. If it is plastic accordion style, white vinyl, or has visible cracks or sags, replace it now with a 4-inch rigid aluminum duct or UL-listed semi-rigid metal duct before reassembling. This single upgrade significantly reduces future lint buildup and fire risk.
- Use a drill-powered spinning brush attachment (available in dryer vent cleaning kits for $30 to $60) inserted into the wall duct. Run the drill at low speed and feed the flexible shaft through the duct in sections, allowing the rotating brush to scrub the interior walls thoroughly.
- At the exterior end, remove the vent hood cover completely. Many covers are held by two screws. Clean the flapper damper and its hinge, as sticky lint on the flapper is a common cause of partial blockages and pest entry.
- Blow compressed air or use a leaf blower at the exterior opening for 30 seconds to push remaining lint back toward the interior where your vacuum can collect it. Have a helper hold the vacuum at the dryer end while you blow from outside.
- Vacuum the interior cabinet of the dryer itself by removing the lint trap housing and vacuuming the slot and surrounding cavity with a narrow crevice tool. Reconnect all ducts with foil tape (not duct tape, which degrades with heat) at every joint, restore power, and run a timed 15-minute heat cycle to confirm strong airflow at the exterior vent.
- Search for a certified dryer vent cleaning technician through the Chimney Safety Institute of America (CSIA) or the Air Duct Cleaning Association (NADCA). Avoid generalist handymen for this specific job since proper equipment matters.
- Ask the technician to use a rotary brush system with a high-powered vacuum, not just a leaf blower. Confirm they will inspect the full duct length and report on duct material, length, and any damage or code violations.
- Request that the technician measure airflow at the exterior vent before and after cleaning. A healthy dryer vent should produce a strong sustained draft. Before-and-after measurements confirm the cleaning was effective.
- Ask about the condition of your duct material. If you have plastic flex duct or foil accordion duct, the technician can replace it with rigid metal duct during the same visit for an additional $50 to $150 depending on run length.
- Schedule annual or biannual service going forward, especially if your household runs more than 5 loads of laundry per week, has pets, or has a vent run longer than 15 feet.
Why It Works: The Benefits
A fully cleaned vent can reduce drying time by 25 to 50%, cutting a 60-minute cycle down to 30 to 45 minutes. That adds up to 1 to 2 hours of machine time saved per week for an average household.
Electric dryers consume about 5 kWh per cycle. Cutting cycle length by 30% saves roughly 1.5 kWh per load. At $0.15 per kWh and 6 loads per week, that is nearly $35 per year saved from this one task alone.
Running a dryer hot and long under restricted airflow stresses the heating element, motor, and drum bearings. Regular vent cleaning can add 2 to 4 years to the life of a dryer that typically lasts 10 to 13 years, deferring a $400 to $900 replacement cost.
Cleaning the dryer vent once a year eliminates the primary cause of the roughly 2,900 dryer fires reported annually in the U.S. This is the single most impactful dryer safety task a homeowner can perform.
Excess heat from a restricted vent degrades fabric fibers, causes shrinkage, and accelerates fading. A properly vented dryer runs at its designed temperature, protecting your clothing and reducing the lint shed that accumulates in the trap.
💰 Savings Impact by Action
Removing lint blockages restores designed airflow and can cut per-cycle drying time by 25 to 50%, reducing energy use by up to 40% per load.
Cleaning the lint trap before every load maintains the first stage of airflow and reduces cycle length by roughly 10% compared to skipping it regularly.
Replacing plastic or accordion flex duct with smooth rigid metal duct reduces interior surface friction and can improve sustained airflow by 15 to 20% over time.
Reducing vent length and eliminating unnecessary elbows lowers resistance and improves exhaust velocity, cutting cycle times by 10 to 15% on long runs.
🏠 Key Concepts Explained
The Science Behind It
A dryer works on a simple principle: forced convection. A heating element raises air temperature to 125 to 135 degrees Fahrenheit, a blower fan pushes that hot air through the tumbling drum, and moisture evaporates from wet clothes into the airstream. That humid air must exit quickly through the exhaust duct. The speed at which moisture leaves your clothes is almost entirely determined by how fast fresh, dry hot air can replace the humid air, which means duct airflow is the limiting factor in drying performance.
Fluid dynamics tells us that resistance in a pipe increases dramatically as the diameter decreases. Halving the effective diameter of a duct does not halve the airflow; it can reduce it by 75% or more because flow resistance scales with the fourth power of the radius (Poiseuille’s Law). A modest lint buildup around the duct walls, say reducing the interior diameter from 4 inches to 3 inches, creates a flow restriction far greater than it appears visually. Add a 90-degree elbow or two, and you can effectively choke the dryer to the point where it is recirculating warm, humid air rather than exhausting it.
The thermal consequences compound the airflow problem. With exhaust restricted, the drum and duct temperature climbs above design parameters. The dryer’s thermal cutoff fuse and high-limit thermostat, which are safety devices and not efficiency devices, cycle the heating element off to prevent fire. The drum keeps tumbling with no heat, consuming electricity while doing essentially nothing useful. This is why a badly clogged dryer can feel like it is running but never actually dries the load. Restoring full duct diameter restores the designed airflow, the designed operating temperature, and the designed moisture removal rate simultaneously, which is why improvement after cleaning is immediate and dramatic.
Frequently Asked Questions
▼ I cleaned the vent but my dryer still takes two cycles to dry a load. What did I miss?
The most common culprit after a DIY cleaning is a section of kinked or partially collapsed flexible duct inside the wall that your brush could not fully reach. Pull the dryer out again and inspect every inch of visible flex duct for sharp bends or crushed sections. If the flex duct looks fine, check the exterior vent cap for a secondary screen insert, which some older caps include, that may be completely packed with lint. If both check out, the issue may be a failing heating element or a tripped thermal fuse, which requires a technician.
▼ How do I know if my dryer vent is clogged vs. the heating element just being broken?
Run the dryer for 5 minutes on a heat setting, then open the door and feel inside the drum. If the drum is hot but clothes are still damp and steam is minimal, the heat is working but airflow is poor, pointing to a vent blockage. If the drum feels barely warm after 5 minutes, the heating element, thermal fuse, or thermostat is likely the failure point, not the vent. In that case, vent cleaning will not help and you need a dryer repair technician.
▼ My dryer vent exits through the roof instead of the wall. Can I clean it myself?
Roof-exit dryer vents are longer, have more bends, and are significantly harder to clean effectively without professional equipment. You can attempt cleaning from the dryer end with an extended brush kit (look for kits with 25 to 30 feet of flexible rods), but accessing the roof cap safely for the exterior portion is a real fall risk for most homeowners. For roof-exit vents, a professional cleaning every 6 to 12 months is strongly recommended given the greater lint accumulation risk and access difficulty.
▼ Can renters clean the dryer vent themselves or do they need landlord permission?
For in-unit dryers in apartments or condos, renters can absolutely clean the vent themselves up to the point of disconnecting the machine. Purchase a standard dryer vent brush kit and clean from both the dryer connection and the exterior cap if you can access it safely. If the exterior cap is in a common area or on the building exterior, contact your landlord since this is technically their maintenance responsibility. Documenting a clogged vent in writing is useful because a landlord who ignores a known fire hazard has liability exposure.
▼ How often should I actually clean my dryer vent?
The general recommendation is once per year for an average household running 4 to 5 loads per week. If you have a large family running 8 or more loads per week, have pets that shed heavily, or have a vent run longer than 15 feet, clean it every 6 months. If you notice clothes taking longer than usual to dry or the exterior of the dryer feels unusually hot during operation, clean the vent immediately regardless of when you last did it.
Quick Tips
- Clean the lint trap before every single load, not just occasionally. A clogged lint trap reduces airflow into the vent and is the first restriction point in the system.
- Inspect the exterior vent cap each spring for bird nests, which are a shockingly common blockage source and are also a serious fire hazard since nesting material is highly flammable.
- If you use dryer sheets, know that they leave a waxy residue on the lint screen over time that restricts airflow even when the screen looks clean. Wash the lint trap with warm soapy water and a soft brush every 3 to 6 months.
- Mark your calendar for an annual vent cleaning every fall before heating season when laundry loads tend to increase. Many home fires peak in January and February when dryers run more frequently.
- Keep the dryer vent run as short and straight as possible. Each 90-degree elbow is equivalent to adding 5 feet of duct length for airflow purposes. Minimize bends when you have any flexibility in your laundry room layout.
Variations for Your Situation
- Apartment or Condo with In-Unit Dryer: Focus on the accessible portion of the vent from the back of the dryer to the first wall penetration. A $25 to $35 lint brush kit from any hardware store is all you need. Clean the lint trap housing cavity with a vacuum crevice tool and ask your building manager in writing to schedule professional cleaning of the shared or exterior duct sections at least once a year. Document your request in case there is a future fire investigation.
- Tight Budget (under $30): Skip the drill-powered brush kit and use a standard 3-piece brush set with manual rod extensions ($15 to $25 at any hardware store). Combine it with your regular household vacuum using a crevice attachment for the interior. You will not get the deep scrub of a powered brush, but clearing the first 5 to 8 feet of the duct where most lint accumulates still delivers 70 to 80% of the benefit. Prioritize cleaning the exterior cap end by hand, which is free and often the worst blockage point.
- Older Home (pre-1980): Homes of this era frequently have plastic accordion flex duct or foil accordion duct in the dryer vent run, both of which are now considered fire hazards and are not code-compliant for new installations. Before you clean, inspect what type of duct you have. If it is white plastic or thin crinkled foil, budget $20 to $50 for replacement rigid 4-inch aluminum duct and replace it during the same session. This is a one-time upgrade that reduces your cleaning frequency and fire risk significantly going forward.