
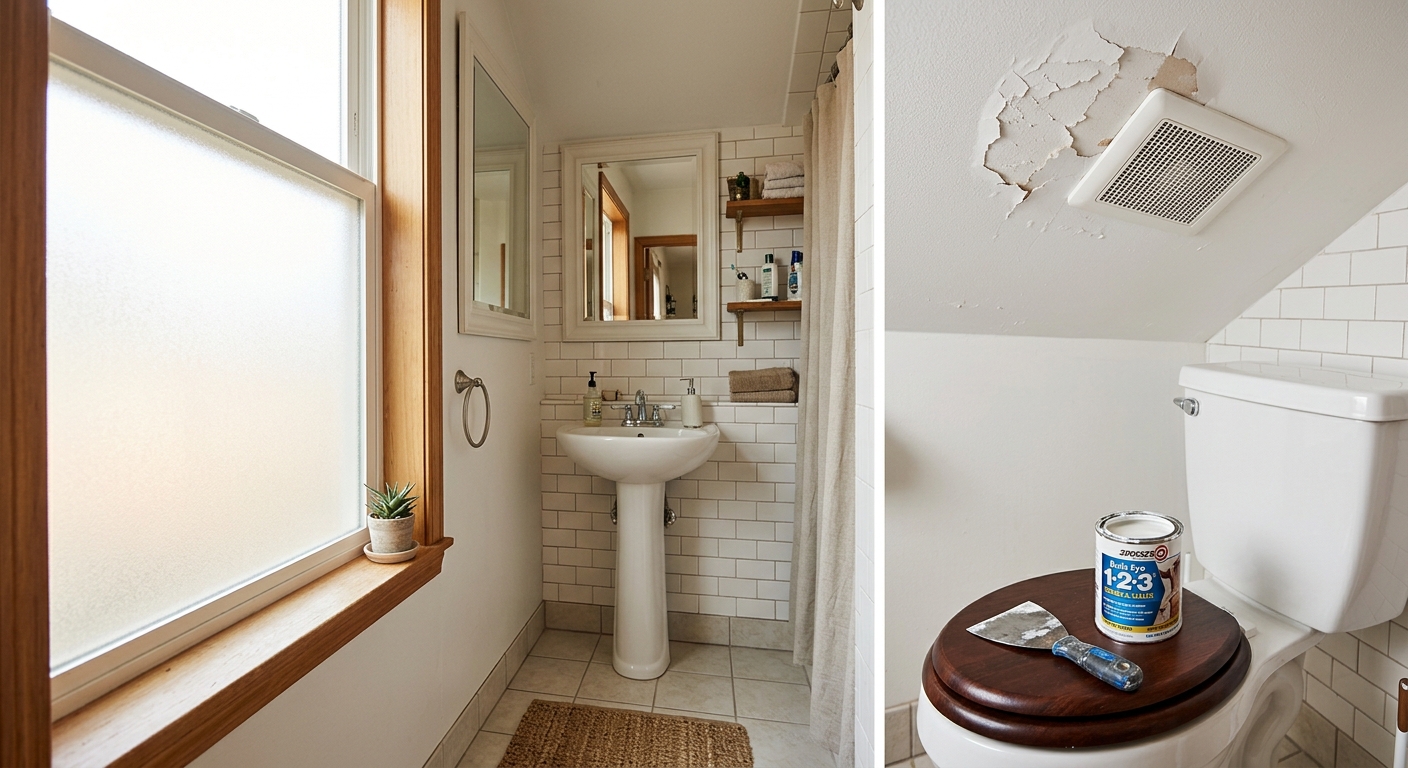
That bubbling, peeling paint on your bathroom ceiling is not just an eyesore. It is your home telling you that moisture is winning the battle against your walls. Bathrooms are the most humidity-intensive rooms in a typical house, regularly hitting 80 to 100% relative humidity during and after showers. When ventilation is poor and paint seals fail, that moisture soaks into drywall and creates the exact dark, damp conditions that mold spores thrive in.
The good news is that peeling paint caught early is a weekend fix, not a contractor emergency. Most cases involve a combination of inadequate ventilation, failed paint, and minor surface moisture damage — all of which a motivated homeowner can address for under $100. Left alone for six to twelve months, however, that same patch of peeling paint can turn into black mold on drywall, which can cost $500 to $3,000 or more to professionally remediate.
This guide walks you through diagnosing the moisture source, repairing the damaged surface properly, and repainting with the right materials so the problem stays solved. You will also learn how to improve your bathroom ventilation so peeling paint does not come back next winter.
What You’ll Need
Click on an item below to shop for the recommended items for this recipe on Amazon.
As an Amazon Associate, we earn from qualifying purchases.
How to Do It
- Run your exhaust fan or open a window and let the bathroom dry completely for 24 hours before starting. Painting over damp drywall guarantees the problem will return.
- Scrape all loose and peeling paint with a putty knife or paint scraper, feathering the edges so there is no sharp ridge between the old paint and bare surface.
- Inspect the exposed drywall for soft spots, dark staining, or fuzzy growth. Press firmly with your thumb. If the surface feels spongy or crumbles, stop and use the DIY approach instead.
- Apply a thin coat of stain-blocking, mold-resistant primer such as Zinsser BIN or Kilz Original to the bare patch. Let it dry fully per the label, typically 45 to 60 minutes.
- Apply one to two coats of bathroom-specific satin or semi-gloss paint with built-in mildewcide, allowing full dry time between coats.
- Going forward, run your exhaust fan for at least 20 minutes after every shower to prevent the moisture problem from restarting.
- Measure your bathroom square footage (length times width) and check your existing exhaust fan’s CFM rating on the housing label. If the fan is rated below 1 CFM per square foot of bathroom area or is older than 10 years, plan to replace or add a fan as part of this project.
- Wear an N95 respirator and gloves. Scrape all peeling paint back to solid edges using a putty knife. For areas larger than one square foot, use a paint scraper and sand the feathered edges smooth with 120-grit sandpaper.
- Mix one cup of bleach with one gallon of water. Wipe down the entire affected area with this solution using a sponge, which kills surface mold spores. Allow it to dry completely, at least 2 hours with ventilation running.
- If the drywall surface feels soft or the paper is delaminating, cut out the damaged section with a drywall saw and install a new patch using moisture-resistant green board or cement board. Tape and mud the seams and allow to cure for 24 hours.
- Apply a full coat of mold-resistant, stain-blocking primer over the entire repaired area. For ceilings, use a product specifically rated for high-humidity applications.
- If replacing the exhaust fan, install a model sized at 1.1 to 1.5 CFM per square foot for the bathroom, connect it to an exterior-vented duct (not the attic), and wire it to a timer switch set for 20 minutes. This single step is the most important long-term prevention measure.
- Apply two coats of bathroom semi-gloss paint with mildewcide, waiting the full recoat time between applications. Finish by caulking the tub-to-wall and wall-to-floor joints with 100% silicone caulk to seal additional moisture entry points.
- Document all visible damage with photos before calling. Note how long the peeling has been present and whether there are any musty odors, which helps the contractor assess scope quickly.
- Request a licensed mold inspector or remediation contractor rather than a general painter. They can use a moisture meter to measure drywall moisture content and determine whether mold has penetrated behind the wall surface.
- Ask for a written scope of work that separates the remediation phase (mold removal and drywall replacement) from the finish phase (priming and painting), so you can compare bids accurately.
- Once remediation is complete, hire an HVAC technician to verify that your bathroom exhaust fan vents fully to the exterior and is properly sized. This costs $75 to $150 and prevents recurrence.
- Request that the contractor use cement board or moisture-resistant drywall for any replaced panels in the shower or tub surround area, not standard drywall, which remains vulnerable even with good paint.
Why It Works: The Benefits
Professional mold removal in a bathroom costs $500 to $3,000 on average depending on the extent of growth. Fixing peeling paint early, typically for $50 to $100 in materials, eliminates the moisture pathway that makes mold possible.
Prolonged moisture exposure can cause drywall paper to delaminate and the gypsum core to crumble, requiring full panel replacement at $200 to $600 per wall including labor. Early paint repair costs a fraction of that.
Mold and mildew release mycotoxins and musty volatile organic compounds into indoor air. Eliminating the moisture source and repainting with mildew-resistant paint reduces these airborne irritants, benefiting anyone with asthma or allergies.
Fixing bathroom ventilation as part of this repair can reduce whole-home humidity levels by 5 to 15%, which lowers cooling loads in summer and reduces condensation on windows in winter.
Visible mold or water damage in a bathroom is one of the most common inspection flags that triggers price reductions in home sales, sometimes by $5,000 to $10,000 or more. Early intervention protects that equity.
💰 Savings Impact by Action
Fixing peeling paint for $50 to $100 avoids mold remediation costs that average $500 to $3,000, representing up to 95% cost avoidance on the same problem.
Upgrading to a properly sized exhaust fan reduces post-shower humidity recovery time by up to 70%, dramatically lowering the risk of recurring paint failure and mold growth.
Using satin or semi-gloss paint with mildewcide instead of flat paint reduces mold and mildew growth on painted surfaces by approximately 60% under equivalent humidity conditions.
Addressing peeling paint before drywall is structurally compromised avoids panel replacement costs of $200 to $600 per wall, preserving up to 85% of potential repair expense.
🏠 Key Concepts Explained
The Science Behind It
Bathroom paint fails because of a physics problem, not just a paint quality problem. When you shower, you raise the air temperature and saturate it with water vapor. That warm, humid air rises and contacts the cooler ceiling surface. Because cool air holds less moisture than warm air, the vapor condenses into liquid water droplets on the paint film, a process governed by the dew point. If your ceiling surface is more than a few degrees cooler than the humid air, condensation is inevitable regardless of paint type.
The deeper problem is vapor diffusion. Water molecules are small enough to pass through latex paint and into drywall paper, even without visible condensation. Over weeks and months, this repeated moisture cycling causes the paint film to swell and contract, breaking the adhesion bond between the paint and substrate. Once that bond fails at even a small point, water gets behind the film and the peeling accelerates rapidly. This is why a small bubble in October can become a six-inch peel by February.
Mold colonization follows a predictable pattern once moisture is established. Stachybotrys (black mold) and Cladosporium are the species most commonly found in bathrooms. Both require a cellulose food source, which drywall paper provides abundantly, sustained humidity above 70%, and temperatures between 40 and 100 degrees Fahrenheit. Your bathroom meets all three conditions regularly. The key intervention is controlling humidity through ventilation, because without sustained moisture, mold spores cannot activate even if they are present on the surface.
Frequently Asked Questions
▼ The paint keeps peeling back in the same spot even after I repainted it. What am I missing?
Recurring peeling in the same location almost always means there is a continuous moisture source behind the wall, not just shower humidity. Check for a slow pipe leak inside the wall, a failed grout line in the shower surround, or a roof penetration above that spot. Use a moisture meter on the drywall surface. Readings above 17% indicate active moisture intrusion that paint alone cannot fix.
▼ I found black staining under the peeling paint. Is that definitely mold?
Black or dark gray staining under peeling paint is often mold but can also be mildew or tannin bleed-through from the drywall. Apply a drop of household bleach to the stain and wait two minutes. If the stain lightens or disappears, it is biological growth (mold or mildew). If it stays the same color, it is likely a stain or tannin. Either way, treat the area with a mold-killing solution before priming and repainting.
▼ Can I just paint over the peeling area with a thick coat of paint to seal it down?
No, and this is one of the most common mistakes homeowners make. Painting over loose paint traps air and moisture underneath, which causes the new coat to peel even faster, often within weeks. You must scrape all loose material back to a firm edge before any primer or paint is applied. Skipping the scraping step wastes both time and money.
▼ My bathroom has no exhaust fan at all. What can I do?
If your bathroom has a window, open it fully during and for 20 minutes after every shower as an immediate measure. For a longer-term solution, a surface-mounted exhaust fan can be installed on an exterior wall without accessing the attic, venting directly through the wall with a short 4-inch duct. This is a medium-difficulty DIY project costing $60 to $150 in parts, or about $200 to $400 with an electrician if a new circuit is needed.
▼ How do I know if my drywall is damaged badly enough that I need to replace it rather than just repaint?
Press firmly on the surface with your thumb or knuckle. Healthy drywall feels hard and solid. Damaged drywall feels soft, spongy, or crumbly, and the paper surface may separate from the gypsum core when scraped. Any area that fails the thumb test needs to be cut out and replaced with moisture-resistant drywall or cement board before priming. Painting over structurally compromised drywall will not hold.
Quick Tips
- Always prime bare drywall with a stain-blocking mold-resistant primer before repainting. Skipping primer is the number one reason bathroom paint peels again within a year.
- Use 100% silicone caulk, not latex caulk, at the tub and shower joints. Silicone stays flexible and waterproof for 10 to 20 years while latex caulk cracks and allows water infiltration within 2 to 5 years.
- Check your exhaust fan by holding a single sheet of toilet paper near the grille while the fan runs. If the paper does not get pulled firmly toward the grille, the fan is too weak or clogged with dust and lint.
- Paint in satin or semi-gloss finish in all bathrooms, not flat or eggshell. Higher sheen finishes are denser and more moisture-resistant. Flat paint in a bathroom is a near-guaranteed future paint failure.
- After completing any bathroom paint repair, leave a small hygrometer (indoor humidity monitor, available for $10 to $15) on the vanity shelf for two weeks. If humidity consistently exceeds 70% between showers, your ventilation still needs improvement.
Variations for Your Situation
- Apartment/Rental: Renters cannot replace exhaust fans or repaint without landlord approval, but they can document the peeling with timestamped photos and formally notify their landlord in writing, since moisture damage and mold are habitability issues in most states. In the meantime, use a portable HEPA air purifier with a humidity display, keep the bathroom door open after showers, and run a small clip-on fan to increase air circulation. If the landlord does not respond within a reasonable timeframe, most states allow tenants to pursue repair-and-deduct remedies.
- Tight Budget (under $50): Focus first on the free step: run the existing exhaust fan for 20 minutes after every shower, starting today. Then spend $10 to $15 on a small bottle of Zinsser mold-killing primer and a quart of satin bathroom paint. Scrape the peeling area with a butter knife if you do not own a putty knife, prime the bare spot, and apply two careful coats with a $3 foam brush. This minimal intervention stops the moisture damage from advancing and costs under $25 total.
- Older Home (pre-1980): Homes built before 1980 often have plaster walls rather than drywall, which are more moisture-tolerant but can still harbor mold on the surface. More importantly, older homes frequently have exhaust fans vented into wall cavities or attic spaces rather than to the exterior, or no fan at all. Before repainting, trace the exhaust duct path if one exists and confirm it exits the building envelope. Also check for lead paint using a $10 lead test swab before sanding, since pre-1978 paint may contain lead and sanding it creates hazardous dust requiring special containment and disposal.