Insulation is one of those things homeowners rarely think about until something goes wrong. But when you find wet, matted batts in your crawl space, or notice the sharp smell of rodent urine in your attic, the problem is already well underway. Mold and pest damage do not just reduce your insulation’s effectiveness, they can compromise indoor air quality, accelerate wood rot, and turn a straightforward energy upgrade into a costly remediation project if left unaddressed.
The good news is that most homeowners can handle moderate insulation damage themselves with the right protective gear, tools, and replacement materials. The key is knowing how to assess the extent of the damage accurately before you start pulling material out. A small patch of mold from a one-time roof leak is a very different situation than a crawl space with years of rodent activity and systemic moisture infiltration.
This post covers how to identify mold versus pest damage, when a DIY approach is safe and practical, when to call a licensed remediation professional, and how to replace your insulation in a way that prevents the same problem from coming back. We also include real cost estimates, payback periods, and the building science behind why damaged insulation costs so much more to ignore than to fix.
What You’ll Need
Click on an item below to shop for the recommended items for this recipe on Amazon.
As an Amazon Associate, we earn from qualifying purchases.
How to Do It
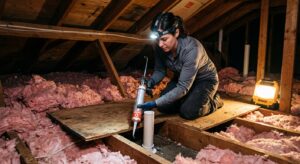
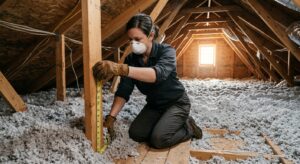
- Put on an N95 or P100 respirator, nitrile gloves, and safety glasses before entering the attic or crawl space. Do not enter without respiratory protection if you suspect rodent activity or heavy mold.
- Use a flashlight to inspect insulation for discoloration (black, green, or gray patches indicate mold), matting or tunneling (rodent damage), and saturated or crumbling material. Photograph everything.
- Check the moisture source: look for roof stain lines, dripping pipes, or condensation on HVAC ducts. Probe wood framing near damaged areas with a screwdriver tip. If it sinks in more than a quarter inch, you have rot and need a contractor.
- Use a cheap pin-type moisture meter on any insulation you can reach. Readings above 20% on adjacent wood indicate active moisture. Do not proceed with removal until the source is repaired.
- Seal off HVAC returns and air handler access in the affected area with plastic sheeting and tape to prevent cross-contamination while you plan your next steps.
- Based on your findings, determine scope: small isolated patch (under 10 square feet) is a DIY job. Widespread mold covering more than 10 square feet, or any blackened sheathing, requires a licensed remediation contractor per EPA guidelines.
- Rent a commercial insulation vacuum (typically $60 to $100 per day) from a tool rental store for attic blown-in removal. For crawl space batts, heavy-duty contractor bags and a utility knife work for manual removal.
- Wearing a full Tyvek suit, P100 respirator, goggles, and nitrile gloves, bag all contaminated insulation in 6-mil poly bags. Double-bag rodent-contaminated material. Seal bags before carrying through living space.
- Spray any mold-stained wood framing with a diluted borax solution (1 cup borax per gallon of water) or a commercial mold encapsulant. Allow to dry fully, at least 24 hours, before installing new insulation.
- Apply expanding foam or caulk to all penetrations, gaps around pipes, and any entry points you identified during rodent inspection. Install hardware cloth (half-inch galvanized mesh) over any openings larger than a quarter inch.
- Install replacement insulation to current code levels: R-38 to R-60 for attics depending on your climate zone, R-19 to R-30 for crawl space floors. Use faced batts with the vapor retarder facing the warm-in-winter side, or blown-in cellulose for full coverage in attics.
- Dispose of bagged insulation at your local solid waste facility. Check local regulations, as some municipalities require special handling for rodent-contaminated material.
- Get at least three quotes from licensed insulation or mold remediation contractors. Ask specifically whether the quote includes source repair, not just removal and replacement.
- Verify the contractor holds appropriate state licensing for mold remediation if applicable in your state, and ask for proof of liability insurance. Unqualified contractors can spread contamination rather than contain it.
- Request a post-remediation verification test (air quality sampling) after work is complete if mold was involved. This typically adds $200 to $400 but confirms the space is clear before your new insulation goes in.
- Ask the contractor to air seal all bypasses and penetrations during the re-insulation phase. Many will include this at little or no additional cost, and it significantly improves the energy performance of the final installation.
- For crawl spaces, ask about an encapsulation option: a continuous 20-mil poly vapor barrier sealed to the foundation walls. This adds $1,500 to $3,000 but dramatically reduces future moisture-related insulation damage and can lower crawl space humidity by 30 to 50%.
Why It Works: The Benefits
Replacing damaged insulation with properly rated material can reduce heating and cooling loads by 15 to 30%, directly lowering monthly utility bills by $30 to $100 depending on your climate, home size, and fuel costs.
Removing mold-contaminated and rodent-soiled insulation eliminates a primary source of airborne spores and particulates that can infiltrate living spaces through floor gaps, recessed lights, and plumbing penetrations.
Mold and persistent moisture rapidly degrade floor joists, rafters, and sheathing. Catching and removing damaged insulation early can prevent wood rot that costs $2,000 to $10,000 or more to repair structurally.
Full removal and replacement of rodent-damaged insulation also removes nesting material and scent trails that attract new infestations. Pairing this with hardware cloth exclusion reduces re-entry risk significantly.
Closing air bypasses created by pest tunneling and replacing missing R-value reduces cold floors, drafty rooms, and temperature swings between floors by addressing the actual heat loss pathways rather than turning up the thermostat.
💰 Savings Impact by Action
Replacing severely damaged insulation with code-level R-value can reduce heating and cooling energy use by up to 28% in homes with previously compromised assemblies.
Sealing pest-created bypasses and penetrations during re-insulation reduces uncontrolled air leakage, cutting infiltration energy losses by up to 20%.
A sealed crawl space vapor barrier reduces moisture-driven energy loss and HVAC humidity load, saving 15 to 18% on conditioning costs in humid climates.
Removing wet fiberglass batts that have lost 40 to 50% of their effective R-value and replacing them restores full thermal resistance and eliminates that hidden energy drain.
🏠 Key Concepts Explained
The Science Behind It
Insulation works by trapping still air within its matrix of fibers or foam cells. Still air is a poor conductor of heat, which is why a thick batt of fiberglass keeps your attic heat from reaching your living space. But this mechanism depends entirely on the insulation remaining dry and undisturbed. When moisture saturates fiberglass or cellulose, water replaces trapped air within the material. Water conducts heat roughly 25 times more efficiently than air, which is why wet insulation loses 40 to 50% of its effective R-value almost immediately. The insulation looks intact but is thermally nearly useless.
Rodent tunneling creates a different but equally serious problem. When rodents compress and burrow through insulation, they create direct air channels between the conditioned space and the unconditioned attic or crawl space below. These channels function as uncontrolled ventilation, a constant exchange of outdoor air bypassing all of your insulation. Building scientists call these thermal bypasses, and research from Lawrence Berkeley National Laboratory has shown that air leakage through bypasses can account for 25 to 40% of a home’s total heating and cooling load, dwarfing the conductive heat loss the insulation was designed to prevent.
Mold growth follows moisture by 24 to 48 hours under warm conditions and requires sustained relative humidity above 60 to 70% at the surface. In a crawl space or attic, a small roof leak or plumbing drip can maintain these conditions for months before anyone notices. Once mold colonizes organic insulation like cellulose or the paper facing on fiberglass batts, the material must be removed. Encapsulants can stabilize surface mold on wood framing, but they cannot restore compromised insulation. Replacing damaged material with the correct R-value and vapor control restores the thermal assembly to its designed performance and breaks the moisture cycle that started the damage in the first place.
Frequently Asked Questions
▼ How do I know if the mold in my insulation is the dangerous kind?
You cannot determine mold species by appearance alone, and this is a common misconception. Black-colored mold is not always Stachybotrys, and green or gray mold can still be harmful. The EPA recommends treating all mold in insulation as a health hazard requiring removal. If you are concerned about species identification for insurance or medical reasons, hire an industrial hygienist to do air sampling before disturbing the material.
▼ Can I just spray mold killer on the insulation and leave it in place?
No. Biocidal sprays can kill active mold on the surface but do not remove spores, mycotoxins, or the organic material mold feeds on inside the insulation. Contaminated insulation must be physically removed and disposed of. Sprays are appropriate for treating adjacent wood framing surfaces after the insulation is out, but they are not a substitute for removal.
▼ My crawl space insulation keeps falling down and getting damaged. What am I doing wrong?
Batts installed between floor joists in crawl spaces must be supported by insulation hangers (wire rods that span between joists) or by a continuous vapor barrier stapled up against the batt. Without support, batts sag, create air gaps, and contact the ground moisture that causes recurring mold. Install wire hangers every 18 to 24 inches to hold batts firmly against the subfloor, or consider switching to rigid foam board below the joists for a more durable installation.
▼ What if I find damaged insulation in a finished wall?
Wall cavity insulation damaged by a pipe leak or pest intrusion is significantly more complex to address because you must open the wall. Signs include persistent musty smell near an outlet or baseboard, soft drywall, or staining. In this case, call a licensed remediation contractor for assessment before cutting into walls yourself. The source must be confirmed repaired before any remediation begins, and depending on moisture levels, structural drying equipment may be required before re-insulating.
▼ Will my homeowner’s insurance cover insulation damage from pests or mold?
Most standard homeowner’s insurance policies exclude damage caused by pests, rodents, and mold that resulted from long-term neglect or maintenance failures. However, if mold or pest damage is secondary to a covered peril such as a sudden pipe burst or windstorm-caused roof leak, there may be partial coverage. Document everything with photos before disturbing anything, contact your insurer immediately, and ask specifically about remediation coverage under your policy.
Quick Tips
- Always fix the leak, condensation source, or pest entry point before replacing insulation. New material installed over an active problem will fail within one to three seasons.
- In crawl spaces, a 6-mil or thicker poly vapor barrier on the ground surface reduces moisture evaporation by up to 90% and is the single most cost-effective way to prevent recurrence.
- Take photos of all framing and existing conditions before covering with new insulation. This documentation is valuable for insurance claims and future reference.
- If you are replacing blown-in attic insulation, take the opportunity to air seal attic bypasses around recessed lights, top plates, and plumbing chases first. This step costs under $50 in materials and can save 15 to 20% on heating bills independently of the insulation itself.
Variations for Your Situation
- Apartment or Rental: Renters who discover mold or pest damage in accessible areas like a basement storage room or utility closet should document with photos and notify their landlord in writing immediately. Landlords are legally responsible for maintaining habitable conditions including mold remediation in most states. Do not attempt to remove insulation yourself in a rental, as this could expose you to liability. If the landlord is unresponsive, contact your local housing authority or health department, which can compel action and in some cases fund remediation.
- Tight Budget (under $200): Prioritize the moisture source fix above all else, as it costs little and prevents the damage from worsening or recurring. Use free or low-cost PPE from a local tool library or hardware store. For small isolated patches of pest-damaged batt insulation under 20 square feet in an accessible crawl space, manual removal with contractor bags, a borax spray on adjacent framing, and replacement batts from a big box store (typically $40 to $80 for a small area) can address the problem within budget. Skip the insulation vacuum and use heavy-duty bags with a helper to keep the job manageable.
- Older Home (pre-1980): Homes built before 1980 may contain vermiculite insulation in attics, which has been associated with asbestos contamination, or older fiberglass batts with degraded paper facing that crumbles easily. Do not disturb any granular gray or silver attic insulation without first having it tested for asbestos by a certified lab (test kits run $30 to $50 plus lab fee). If asbestos is confirmed, licensed abatement is required by law in most states and is not a DIY project under any circumstances. Older homes also tend to have far more air bypasses around knob-and-tube wiring areas, so seal thoroughly before re-insulating.