
If you own a home built before 1960, there is a good chance your walls are plaster over wood lath, and a near certainty those walls contain little to no insulation. That gap between your interior plaster and exterior sheathing is essentially a thermal highway, letting conditioned air escape in winter and heat pour in during summer. The result is higher energy bills, cold spots near exterior walls, and a heating system that runs almost constantly on cold days.
The traditional fix, stripping walls down to the studs, costs $10,000 to $30,000 or more and destroys the very character that makes older homes worth owning in the first place. The good news is that modern insulation techniques let you add meaningful thermal resistance to plaster walls with minimal disruption. Methods like blown-in insulation through small access holes, injection foam, and strategic exterior upgrades can cut heating and cooling costs by 20 to 40% in a typical pre-1960 home without sacrificing original plaster, moldings, or trim.
This guide walks you through the most effective options, from low-cost air sealing strategies you can do this weekend to professional blown-in insulation that pays for itself in under five years. You will learn which approach makes sense for your budget, your skill level, and the specific construction of your home.
What You’ll Need
Click on an item below to shop for the recommended items for this recipe on Amazon.
As an Amazon Associate, we earn from qualifying purchases.
How to Do It
- Turn off power to electrical circuits on exterior walls and remove outlet and switch cover plates. Use a flashlight to look inside the electrical box for daylight or feel for drafts, which indicate direct gaps to the wall cavity or outside. Apply fire-rated acoustic putty or a pre-made outlet gasket behind each cover plate before reinstalling.
- Inspect the interior perimeter where baseboards meet the floor along exterior walls. Use a stick of incense or a smoke pencil on a calm day to detect air movement. Where you find drafts, remove the baseboard, apply a continuous bead of paintable latex caulk where the plaster meets the subfloor, and reinstall the baseboard.
- Check where window and door casings meet the plaster. Run a bead of paintable latex caulk along the joint between the casing and the plaster surface on all exterior-wall windows and doors. This closes a common bypass that allows cold air from inside the wall cavity into the living space.
- In the attic, locate the tops of all exterior walls. These top plate areas are typically open in older balloon-frame and platform-frame homes, allowing free air movement between the wall cavity and the attic. Use expanding spray foam or rigid foam board cut to fit and sealed with foam to block these openings before adding or evaluating attic insulation.
- Inspect the basement or crawl space ceiling where exterior walls meet the rim joist area. Cut rigid foam board to fit each rim joist bay, press it in place, and seal the edges with spray foam. This is one of the highest-impact air sealing moves in any older home, often reducing heating bills by 5 to 10% on its own.
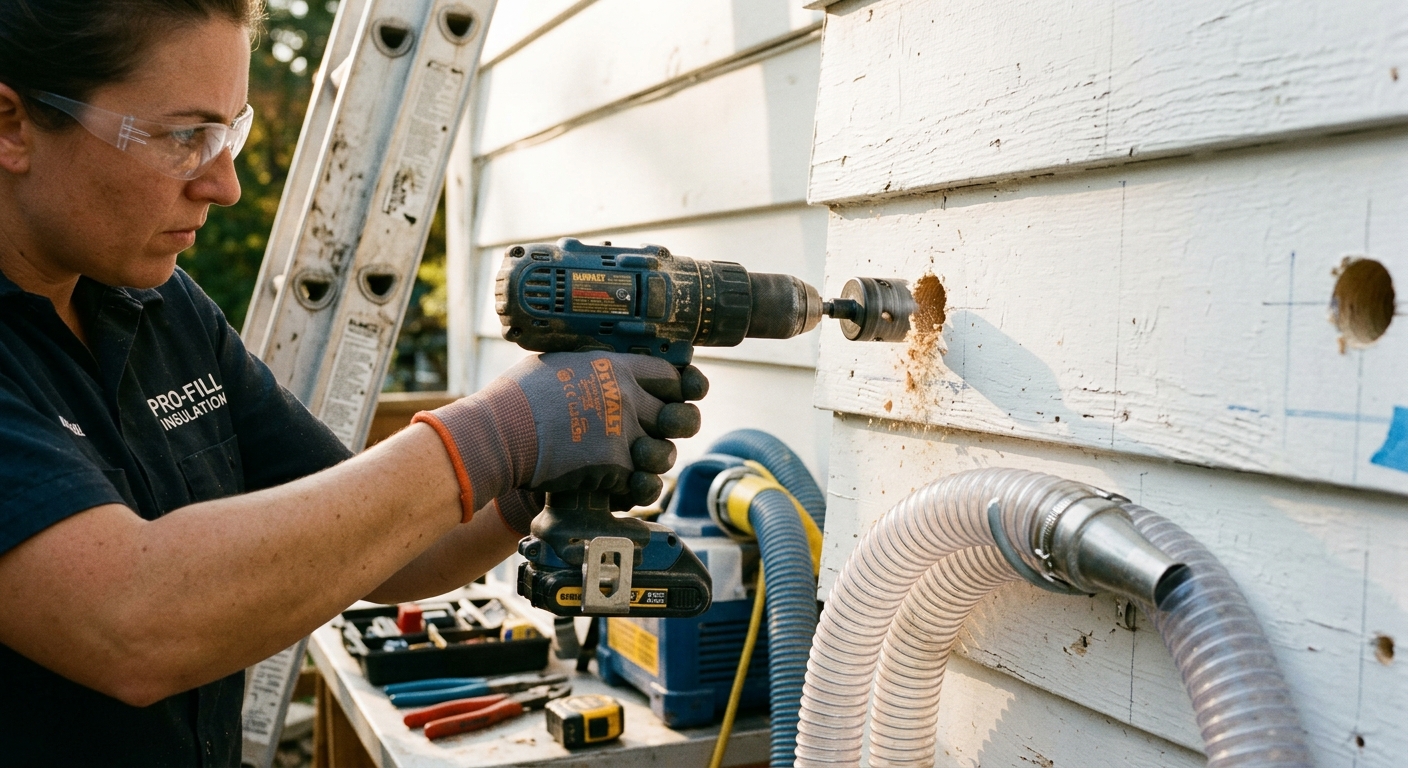
- Before drilling any holes, map your wall cavities. Older homes often have fire blocking, which is a horizontal piece of lumber midway up the wall that blocks the full-length cavity. Use a stud finder with AC detection or tap the wall and listen for hollow versus solid sounds to locate studs and any blocking. Mark each cavity clearly on the siding with tape.
- Drill a 2-inch access hole through the exterior siding and sheathing into the center of each stud cavity. If you find fire blocking, you will need to drill two holes per cavity, one above and one below the block. Use a sharp hole saw and work carefully to avoid drilling into wiring or plumbing. Start at the top of the cavity.
- Rent a blower machine and purchase dense-pack cellulose insulation. Dense-pack technique requires filling each cavity to a density of 3.5 pounds per cubic foot or higher, which prevents settling. Insert the fill tube all the way to the bottom of the cavity, turn on the blower, and slowly withdraw the tube as the cavity fills. You will feel resistance increase as the cavity densifies.
- When the cavity is fully packed, you will notice the blower load increase noticeably and the tube becomes harder to withdraw. At this density, cellulose will not settle over time and effectively stops convective air movement within the cavity, achieving roughly R-13 in a 3.5-inch cavity.
- Patch each hole with a matching siding plug, backer rod and caulk, or a wood plug painted to match. For wood siding, cut plugs from matching scrap and glue them in with exterior wood adhesive. For vinyl or fiber cement siding, use purpose-made patching patches or consult the siding manufacturer for approved repair methods.
- After completing the work, use a thermal camera or thermal leak detector on a cold day to verify even coverage. Cold stripes indicating unfilled cavities will be clearly visible through the exterior surface and require going back to add a supplemental fill hole.
- Get at least three quotes from insulation contractors who specifically list blown-in wall insulation for existing homes in their services. Ask each contractor whether they use dense-pack cellulose, fiberglass, or injection foam, and request references for comparable older homes. Injection foam is particularly well-suited to plaster walls because it expands slowly and does not generate the pressure that can crack aged plaster.
- Ask the contractor to perform or arrange a blower door test before work begins. This quantifies your current air leakage rate in air changes per hour and gives you a baseline to measure results. Many utility-sponsored programs require a pre-work and post-work blower door test to qualify for rebates.
- Discuss access strategy with your contractor before signing anything. Drilling from the exterior is standard and preserves interior finishes completely. Some contractors may propose drilling from the interior through plaster, which can be done cleanly but leaves more visible repairs. Get the access plan and patching method in writing.
- On installation day, confirm the contractor uses a calibrated blower machine with a gauge to verify density in each cavity. A professional dense-pack installation should reach 3.5 pounds per cubic foot minimum for cellulose and should be documented with before and after thermal images.
- After completion, request the post-installation blower door test results and thermal images for your records. These documents are valuable for utility rebate applications, resale disclosure, and future reference if you ever question coverage quality.
Why It Works: The Benefits
Filling empty stud cavities with blown-in cellulose or injection foam raises wall R-value from roughly R-2 to R-13 or higher, reducing wall heat loss by up to 85% and cutting total home energy bills by 20 to 40% depending on current insulation levels and local climate.
Cold spots along exterior walls and drafts near windows are almost always caused by uninsulated cavities and air infiltration. Filling those cavities eliminates the cold radiation effect from walls, making rooms feel 3 to 5 degrees warmer at the same thermostat setting.
Blown-in and injection methods require only small access holes, typically 2 inches in diameter, drilled from the exterior or through inconspicuous interior locations. Original plaster, crown moldings, window casings, and decorative trim remain completely intact.
Dense-pack cellulose in a standard 2×4 stud cavity reduces airborne sound transmission by 5 to 10 STC points, noticeably quieting street noise, neighbor noise, and room-to-room sound transfer without any additional acoustic treatment.
Homes with documented insulation upgrades sell for 2 to 6% more on average according to ENERGY STAR research, and the improved comfort is immediately noticeable to any potential buyer during a showing or home inspection.
💰 Savings Impact by Action
Filling empty stud cavities from R-3 to R-13 can reduce whole-house heating and cooling costs by up to 30% in pre-1960 homes with no existing wall insulation.
Sealing top plates, rim joists, and outlet bypasses in an older home reduces infiltration-driven heat loss by 15 to 25% according to DOE building science research.
Combining wall insulation with attic air sealing and insulation upgrades to R-49 can deliver total energy savings of 35 to 45% compared to the unimproved baseline.
Sealing and insulating basement rim joists alone reduces heat loss through the foundation perimeter by up to 10% of total home heating costs in cold climates.
Adding R-6 thermal curtains to single-pane windows on exterior walls reduces window heat loss by up to 40%, contributing roughly 5% to whole-house heating bill savings.
🏠 Key Concepts Explained
The Science Behind It
An uninsulated plaster wall in a pre-1960 home consists of interior plaster, wood lath strips, an empty air cavity between studs, and exterior wood sheathing covered by siding. The total R-value of this assembly is roughly R-3 to R-4, which means for every degree of temperature difference between inside and outside, heat flows through the wall rapidly. Modern energy codes require walls to achieve R-13 to R-21 depending on climate zone, so an uninsulated older wall is performing at 20 to 30% of what we now consider minimum standard.
When you fill that cavity with dense-pack cellulose, two things happen simultaneously. First, you add genuine thermal resistance. Cellulose insulation achieves approximately R-3.7 per inch, so a 3.5-inch cavity filled to proper density delivers about R-13. Second, and equally important, you eliminate the convective loop that was allowing air to circulate within the cavity. An empty cavity does not actually perform at its full static R-value because air moving within it transfers heat continuously. Dense-pack insulation physically prevents that air movement, which is why it outperforms loose-fill at the same nominal thickness.
The moisture science matters just as much as the thermal science in older homes. Plaster wall assemblies were designed to breathe, allowing any moisture that enters the wall to dry out toward either the interior or the exterior depending on season and vapor drive direction. Cellulose is hygroscopic, meaning it can absorb and release small amounts of moisture without degrading, and it remains vapor-open, preserving the wall’s drying capacity. This is why building scientists consistently recommend cellulose over closed-cell spray foam for retrofit insulation in older homes, particularly in mixed and cold climates. Closed-cell foam creates a vapor barrier mid-wall and can cause seasonal moisture accumulation in climates where the vapor drive reverses between summer and winter.
Frequently Asked Questions
▼ How do I know if my old plaster walls already have some insulation?
The easiest method is to remove an electrical outlet cover plate on an exterior wall and shine a flashlight into the gap around the electrical box. If you see loose gray or yellow material, the cavity may already be filled. For a definitive answer, hire an energy auditor with a thermal imaging camera to scan your walls on a cold day when there is at least a 15-degree temperature difference between inside and outside. Empty cavities will show up as distinctly cooler vertical stripes and filled cavities will show an even surface temperature.
▼ Will blown-in insulation crack my old plaster walls?
Dense-pack cellulose and properly applied injection foam are both safe for aged plaster when installed by an experienced contractor who controls density carefully. The risk of cracking comes primarily from over-pressurizing cavities, which can happen if a contractor uses too high a blowing pressure or attempts to fill a cavity too quickly. Injection foam specifically designed for retrofit applications expands at very low pressure and is the safest choice for fragile or cracked plaster. Ask any contractor you hire whether they have experience with plaster walls and request references from similar projects.
▼ My home has knob-and-tube wiring. Can I still insulate the walls?
Not without an electrician’s evaluation first. Knob-and-tube wiring relies on open air circulation to dissipate heat, and covering it with insulation can cause overheating and increase fire risk. A licensed electrician needs to assess whether the wiring is active, in good condition, and whether it can be safely covered or needs to be replaced. In many older homes, knob-and-tube has already been replaced in the walls during past renovations, but you cannot assume this without verification. The cost to replace knob-and-tube in a typical home ranges from $8,000 to $15,000 but is often required by insurers and lenders regardless of insulation plans.
▼ My walls are balloon-framed. Does that change anything about the insulation process?
Yes, significantly. Balloon-frame construction, common in homes built before 1920, has stud cavities that run continuously from the basement sill plate all the way to the attic without any horizontal fire blocking. This means a single cavity can be 20 feet tall or more and requires drilling at multiple heights to achieve complete fill. It also means air sealing the top and bottom of the cavity is critical before insulating, because without blocking, the cavity connects basement air to attic air in a direct thermal and pressure bypass. Inform any contractor of your framing type before they begin and confirm their plan addresses the full cavity height.
▼ How long will it take to see the savings on my energy bills?
Most homeowners notice a difference within the first full heating season after wall insulation is installed, typically a 20 to 35% reduction in heating and cooling costs for homes that started with completely uninsulated walls. The exact savings depend on your climate, your energy rates, and how much of your heat loss was coming from walls versus the attic, windows, and air infiltration. Request an energy audit after the work is complete and compare your utility bills to the same months in the previous year for the clearest picture.
Quick Tips
- Insulate the attic floor to R-49 before tackling walls if you have not already done so. Attic insulation offers a faster payback than walls in most climates and does not require dealing with plaster at all.
- When patching exterior holes after blown-in work on wood siding, use a two-part epoxy wood filler rather than standard wood putty. It bonds permanently, resists moisture, and takes paint exactly like wood, making repairs nearly invisible.
- On a cold night with the heat running, walk along exterior walls with your bare hand at arm’s length. Noticeably cooler areas compared to the rest of the wall surface indicate empty cavities and show you exactly where to prioritize insulation work.
- Check whether your state or utility offers a whole-home energy efficiency rebate program. Many programs funded through the Inflation Reduction Act offer rebates of 50% or more on insulation materials and labor for households that qualify, dramatically shortening the payback period.
Variations for Your Situation
- Apartment or Condo: Renters and condo owners typically cannot drill into walls or hire contractors for structural work. Focus entirely on the air sealing measures you can reverse: use outlet gaskets on exterior wall electrical boxes, apply removable rope caulk around drafty window frames, use heavy thermal curtains rated R-6 or higher on exterior windows, and place draft stoppers at exterior doors. These measures cost under $100 and can reduce your personal heating load by 10 to 15%. For condo owners, consider requesting that the HOA investigate wall insulation as a building-wide capital improvement, which may qualify for utility rebates.
- Tight Budget Under $500: Prioritize air sealing over insulation when money is limited, because it delivers the highest return per dollar in older homes. Spend the first $50 on outlet gaskets, caulk, and spray foam for the attic top plates and rim joists. Spend the next $100 on a thermal leak detector to find the worst areas. If budget allows, rent a blower machine and purchase two to four bags of cellulose to fill the single worst wall or two, typically the north-facing wall or the wall adjacent to an unheated garage. Even partial coverage makes a measurable difference.
- Older Home With Deteriorating Plaster: If your plaster is already cracked, soft, or showing signs of the lath separating from the wall, attempting blown-in insulation from the exterior is still viable but requires extra care. Avoid injection from the interior, which puts lateral pressure on the plaster face. Have a plaster contractor assess the wall condition before insulating, as severely deteriorated plaster may need stabilization with plaster washers and screws first. In rooms where the plaster is beyond saving, consider removing it, insulating the open cavity with batts or spray foam, and applying new drywall as a practical complete renovation that also solves the insulation problem permanently.