
Most homeowners focus their energy-saving efforts on windows, thermostats, and appliances, but the basement is quietly draining money every single month. Heat escapes through uninsulated concrete walls and rim joists in winter, cool air seeps out in summer, and leaky ductwork can waste 20 to 30 percent of your conditioned air before it ever reaches a living space. The average home loses $200 to $400 per year just from basement-related inefficiencies that a single afternoon of detective work could uncover.
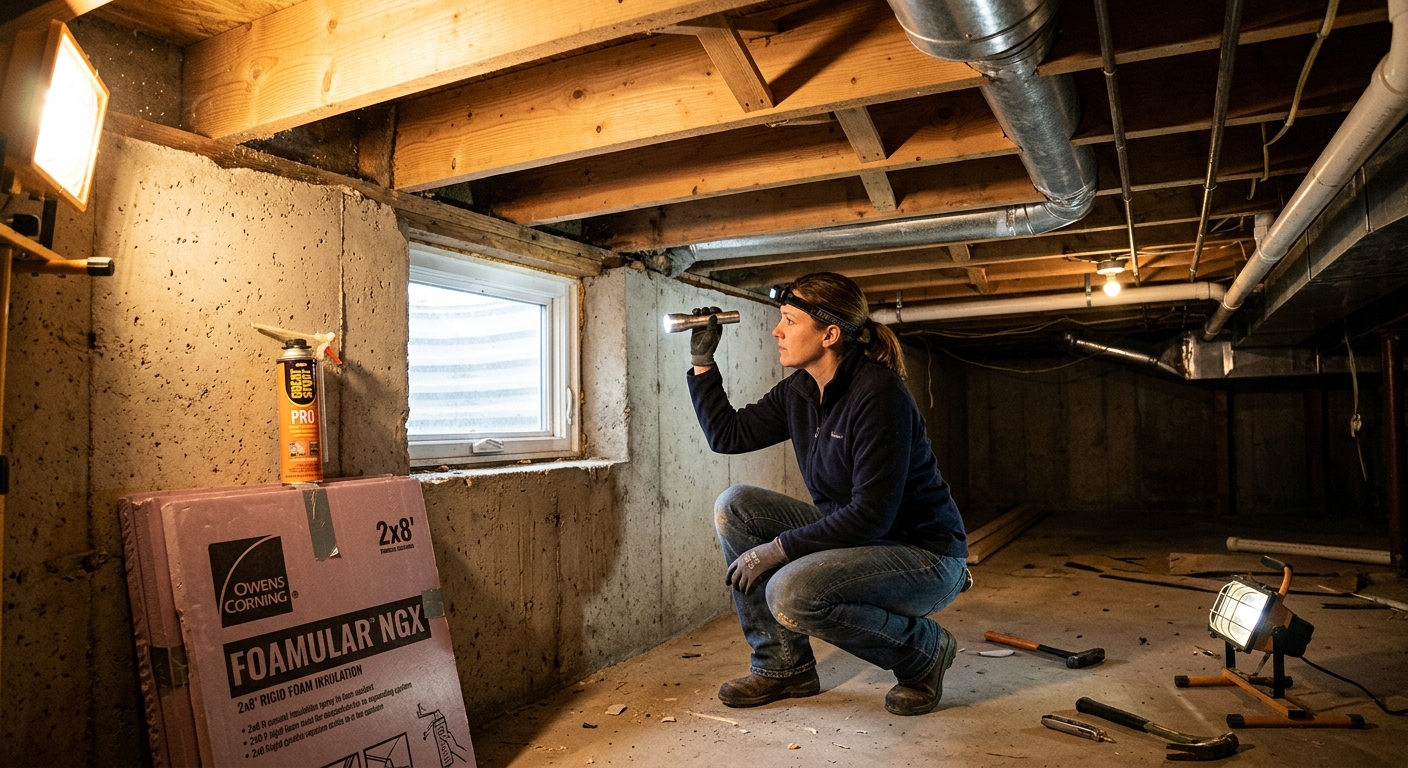
A basement energy audit is not about hiring an expensive professional or tearing out walls. It is a structured walkthrough that trains your eyes to spot the most common culprits: air gaps, missing insulation, moisture problems, and mechanical system leaks. Armed with a flashlight, a stick of incense, and a few hours, you can build a prioritized action list that pays for itself many times over.
This guide walks you through exactly what to look for, where to look, and what to do about it, starting with free fixes you can tackle today and working up to the higher-impact upgrades that deliver the best return. Whether your basement is finished or unfinished, conditioned or unconditioned, there is almost certainly money hiding down there.
What You’ll Need
Click on an item below to shop for the recommended items for this recipe on Amazon.
As an Amazon Associate, we earn from qualifying purchases.
How to Do It
- On a cold or windy day, walk the perimeter of your basement with a flashlight and hold your hand near the rim joist area (the framing just above the foundation wall). Feel for cold drafts or use a stick of incense to watch smoke movement near gaps, pipe penetrations, and where the sill plate meets the concrete.
- Look at every pipe, wire, and duct that passes through the basement ceiling or wall to the outdoors. Mark each gap with blue painter’s tape so you have a clear action list.
- Find your ductwork and visually inspect every joint and connection. Look for disconnected sections, gaps between duct sections, and old cloth tape that has dried out and shrunk away from the metal. Flex duct that sags or kinks is also losing airflow.
- Locate your water heater, furnace, and any other mechanical equipment. Note whether the water heater is electric or gas, how old it appears, and whether there is any insulation wrap on it. Check the first 6 feet of hot water pipe leaving the water heater for insulation.
- Plug any large, open penetrations you find today using rolled newspaper or rags as a temporary measure, and seal small gaps around pipes immediately using a can of low-expansion foam sealant, which costs about $6 at any hardware store.
- Photograph everything you found and make a prioritized list: air leaks first, duct problems second, insulation third, equipment upgrades last.
- Seal all penetrations through the rim joist area and basement ceiling using low-expansion spray foam for gaps under 1 inch and foam backer rod plus caulk for larger gaps. A single can of spray foam handles about 20 to 30 small penetrations.
- Cut rigid foam board insulation (minimum R-10, which is 2 inches of polyisocyanurate) to fit each rim joist bay between floor joists. Apply a bead of foam sealant around all four edges of each cut piece before pressing it firmly into the bay. This step alone typically reduces heating bills by 5 to 10 percent.
- Seal leaky duct joints using UL-181-rated mastic sealant, not cloth tape. Apply mastic with a paintbrush to every joint, seam, and connection you can reach. For gaps larger than a quarter inch, embed fiberglass mesh tape into the mastic before it dries. Do not use silver duct tape since it dries out and fails within a few years.
- Wrap all accessible ductwork in unconditioned basement space with duct wrap insulation rated at least R-6. Secure it with metal band strapping and seal seams with foil tape.
- Wrap the first 6 feet of hot and cold water pipes leaving the water heater with pipe insulation sleeves from the hardware store, which cost about $1 per foot. For electric water heaters, add an insulating blanket rated R-10 or higher if the unit is more than 7 years old.
- Unplug or remove any second refrigerator or chest freezer that is not regularly used. If you need the freezer, replace units older than 2001 with a current ENERGY STAR model, which uses 75 percent less energy than a 1990s-era unit.
- Hire a BPI-certified or RESNET-certified energy auditor for a whole-home assessment that includes a blower door test, duct blaster test, and infrared thermal imaging. Many utilities subsidize this service to $100 or less. The auditor will quantify exactly how leaky your building envelope and duct system are, giving you a prioritized list with projected savings for each fix.
- Use the audit report to get bids from insulation contractors for full basement rim joist air sealing and wall insulation. Spray foam applied by a professional contractor achieves a continuous air barrier and R-value in a single step, while rigid foam board installed by a crew is less expensive and still highly effective.
- Have an HVAC technician perform duct leakage testing and duct sealing on the full duct system, including any ducts in the basement ceiling. Aeroseal duct sealing, a process where pressurized sealant particles are blown through the duct system from inside, can reduce duct leakage by up to 90 percent and typically costs $1,500 to $2,500 for a whole home.
- If your water heater is more than 10 years old, ask for a quote on a heat pump water heater. These units use 60 to 70 percent less electricity than a standard electric resistance model and are eligible for a 30 percent federal tax credit through 2032, bringing a typical installed cost of $1,800 down to about $1,260 after the credit.
- Ask about utility rebates before any work begins. Most gas and electric utilities offer rebates of $50 to $500 on insulation, duct sealing, and water heater upgrades that stack on top of federal tax credits.
Why It Works: The Benefits
Sealing and insulating the rim joist alone typically reduces whole-home heating costs by 5 to 10 percent, while fixing duct leaks can recover another 20 to 30 percent of conditioned air that was previously wasted.
Air sealing and insulating rim joists directly eliminates the cold-floor problem that makes the first floor of most homes uncomfortable in winter, without touching your heating system.
Sealing basement air leaks reduces the amount of damp, potentially mold-spore-laden basement air drawn into living spaces through the stack effect, improving indoor air quality throughout the home.
When duct leaks are sealed, your furnace or air handler moves the same volume of air with less static pressure and fewer run cycles, reducing wear and extending the service life of motors and heat exchangers by several years.
Plugging large penetrations and wrapping accessible ducts with mastic costs under $50 in materials and can pay back in a single heating or cooling season, making basement improvements some of the highest-return projects in the home.
💰 Savings Impact by Action
Air sealing and insulating rim joists reduces whole-home heating energy use by 5 to 10 percent by eliminating the single largest air leakage pathway at the base of most homes.
Sealing leaky basement ductwork with mastic recovers 20 to 30 percent of conditioned air that was previously dumped into unconditioned space before reaching living areas.
Insulating hot water pipes reduces standby heat loss and can cut water heating energy use by 3 to 4 percent while delivering hot water to fixtures faster.
Insulating unfinished basement walls to R-10 or higher reduces basement heat loss by 15 to 20 percent compared to bare concrete or block walls.
Removing or replacing a pre-2000 second refrigerator or freezer eliminates 150 to 200 dollars per year in standby electricity costs representing 5 to 10 percent of a typical home electric bill.
🏠 Key Concepts Explained
The Science Behind It
Your basement sits at the bottom of a natural chimney. As warm air rises and exits through the top of your home via attic bypasses and upper-floor leaks, the resulting negative pressure at the bottom of the house pulls replacement air in through every crack, gap, and penetration in the basement. Physicists call this the stack effect, and it is why basement leaks matter far more than their size suggests. A 1-square-inch gap at the base of a two-story home can move as much air as a 4-square-inch gap at mid-height because the pressure differential is greatest at the extremes.
The rim joist is the single most air-leaky assembly in most basements because it is built from multiple pieces of framing lumber that shrink and gap over time, sits directly on a rough concrete surface that is never perfectly flat, and is punctured by dozens of wires, pipes, and vents. Even in a relatively tight home, the cumulative area of gaps along a typical rim joist perimeter can equal several square feet of open hole. Rigid foam insulation addresses this because it acts as both a thermal barrier and an air barrier simultaneously, something that fiberglass batt insulation alone cannot do since air passes freely through fibrous materials.
Duct leakage compounds the problem because most basement ductwork operates at a slight positive pressure on the supply side and a slight negative pressure on the return side. Any gap in a supply duct dumps conditioned air directly into the unconditioned basement, where it contributes nothing to comfort. Meanwhile, any gap in a return duct pulls unconditioned basement air, which may be cold, humid, or contaminated with radon or mold spores, directly into the air stream that circulates through your living spaces. The DOE estimates that correcting duct leakage in a typical home improves HVAC system efficiency by 20 percent or more, which is a larger gain than most full equipment replacements deliver.
Frequently Asked Questions
▼ I sealed the rim joist but my floors are still cold. What did I miss?
Cold floors after rim joist sealing usually mean there is still significant air leakage elsewhere, or the subfloor above the basement has no insulation between the joists. Check whether you fully sealed every joist bay with foam board and that no gaps remain around pipes passing through the subfloor. Adding R-19 to R-30 batt insulation between floor joists above an unconditioned basement is the next step and will make a noticeable comfort difference.
▼ How do I know if my ducts are leaking without hiring someone?
Turn on the air handler and run your hand along every duct joint and seam you can reach while the system is running. You will feel air blowing from any significant leak. Gaps at duct connections are the most common location. You can also look for dust streaks or dark staining around duct joints, which is a sign of long-term air movement. For a quantified answer, a duct blaster test performed by an energy auditor will give you an exact leakage number.
▼ My basement smells musty. Should I seal it before fixing the smell?
No. A musty smell indicates active moisture or mold, and sealing the space before resolving that will trap the problem and make it worse. First, identify whether water is entering through the walls or floor, condensing on surfaces, or coming from a plumbing issue. Run a dehumidifier and keep basement relative humidity below 60 percent. Once the moisture source is controlled and any visible mold is remediated, then proceed with air sealing and insulation.
▼ Can I insulate my basement walls with rigid foam if I have a gas furnace down there?
Yes, but you need to verify how your furnace draws combustion air before you seal the space tightly. Modern sealed-combustion and direct-vent furnaces pull combustion air from outside through a dedicated pipe and are not affected by basement air sealing. Older atmospheric-draft furnaces rely on basement air for combustion and venting, so aggressive sealing around those units requires either upgrading to a sealed-combustion model or installing a fresh-air inlet. Have an HVAC technician confirm your setup before proceeding.
▼ How long will it take to see lower energy bills after doing these fixes?
If you complete the fixes during the heating season, you should see a measurable difference on your very next bill, since heating is the highest-cost period for most homes and basement air sealing directly reduces heating load. Compare the same calendar month year over year rather than month to month for the clearest read, since weather varies. Most homeowners report a 10 to 20 percent reduction in heating bills after completing rim joist sealing and duct work.
Quick Tips
- Do your basement audit on a cold, windy day in winter because the stack effect and temperature difference are at their peak, making air leaks far easier to feel and detect with smoke or incense.
- Take photos of every problem you find and track your energy bills month over month after each fix so you can see real dollar savings rather than estimated ones.
- Check your utility company’s website before buying materials. Many utilities offer free or subsidized weatherization kits, rebates on insulation, or free energy audits that can cut your project cost significantly.
- If your basement has a sump pit, make sure it has a sealed cover. An open sump pit is a direct pathway for cold, damp ground air to enter the home and a known radon entry point in many regions.
Variations for Your Situation
- Apartment or Condo with Shared Basement: Renters and condo owners with access to a shared basement can still look for and report leaks around their unit’s penetrations to building management, which is often required by code to address. Focus on what you can control: insulate under your unit’s floor with area rugs plus rug pads, seal gaps around pipes coming up through your floor with rope caulk (removable and renter-safe), and use door draft stoppers on any basement-facing doors. These steps cost under $50 and require no landlord approval.
- Tight Budget Under $50: Start with a $6 can of spray foam and spend 45 minutes sealing every visible gap along the rim joist and around every pipe penetration you can reach. This single task routinely delivers 3 to 8 percent heating bill reduction. Next, buy foam pipe insulation sleeves for the hot water pipes near your water heater at about $1 per foot. These two steps together cost under $30 and pay back within one heating season in most climates.
- Older Home Pre-1980: Homes built before 1980 often have no insulation whatsoever in the basement, rim joists stuffed with deteriorating fiberglass at best, and duct connections sealed only with cloth tape that has long since failed. Expect to find more problems and larger gaps than in newer homes, but also expect larger savings. Prioritize combustion safety first since older furnaces and water heaters are more likely to be atmospheric draft equipment. Also test for radon before sealing the basement tightly, since older homes in radon-prone regions need a radon mitigation system installed concurrently with air sealing work.