You know the feeling: you climb into bed, and a thin stream of cold air finds your shoulder or your ankles. Or in summer, your bedroom stays stubbornly warm no matter how long the AC runs. A drafty window is one of the most common comfort complaints in homes, and it is usually caused by something small, like worn weatherstripping, a gap around the sash, or a dried-out bead of caulk.
It also costs you money. The U.S. Department of Energy estimates that air leakage accounts for roughly 25 to 40 percent of the energy used for heating and cooling in a typical home, and windows and doors are among the biggest culprits. Replacing windows can run $600 to $1,500 or more per window, with payback periods that often stretch past 20 years. Sealing the leaks you already have costs a tiny fraction of that.
In this post, we cover a true five-minute fix you can do tonight with items you may already own, plus a more durable DIY upgrade for a weekend afternoon. We also explain why windows leak, how to find the exact spot, and what to do if the simple fixes are not enough.
What You’ll Need
Click on an item below to shop for the recommended items for this recipe on Amazon.
As an Amazon Associate, we earn from qualifying purchases.
How to Do It
- Find the leak first: on a windy day, hold a lit incense stick or a strip of tissue paper near the edges of the sash, the lock rail, and where the frame meets the wall. Wherever the smoke or tissue flutters, air is moving.
- Close and lock the window firmly. Many drafts come from a sash that is not pulled tight against the frame, and the lock helps compress the weatherstripping.
- Press removable rope caulk (also called caulk cord) into any gaps you found along the sash, meeting rail, or trim. Roll it between your fingers, press it in firmly, and smooth it with a fingertip.
- Apply self-adhesive foam tape along the bottom rail or any spot where the sash meets the frame. Clean the surface with a damp cloth first so the adhesive sticks.
- Hang a heavy lined curtain or close a cellular shade for the night. This creates an insulating air layer and blocks the convective cold air flow across your room.
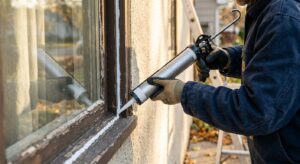
- Remove old, cracked caulk around the interior trim with a utility knife or caulk removal tool, then vacuum the gap and wipe it with rubbing alcohol so new caulk adheres.
- Apply a thin, continuous bead of paintable acrylic latex or siliconized caulk where the trim meets the wall and where the trim meets the window frame. Smooth the bead with a wet finger or caulk tool.
- Replace worn sash weatherstripping: measure the channel, then install new V-seal (tension seal) along the sides of double-hung sashes and a bulb or foam gasket along the bottom and top rails.
- For casement or awning windows, replace the compression gasket that sits around the sash perimeter. Peel the old gasket out, clean the groove, and press in the new one.
- Install a clear interior window insulation film kit on the inside of the frame. Apply the double-sided tape, attach the film, and shrink it tight with a hair dryer for a crystal-clear extra air layer.
- Test again with the incense or tissue method to confirm the leaks are gone, and touch up any gaps you missed.
- Measure the window width and height inside the frame (for an inside mount) or outside the frame (for an outside mount) so your treatment overlaps the opening.
- Choose cellular (honeycomb) shades or thermal-lined curtains. Cellular shades can reduce heat loss through a window by 20 to 40 percent according to DOE data.
- Mount the treatment so it sits tight against the frame or wall. Side tracks or a returning valance at the top and sides stop air from circulating around the edges.
- Open the shade on sunny winter days to capture free solar heat, and close it at night. In summer, do the reverse during the day to block heat gain.
Why It Works: The Benefits
Eliminating a cold draft near the bed can make a room feel 3 to 5 degrees warmer without touching the thermostat, which helps you sleep more soundly.
Sealing a leaky window can cut that room’s energy loss by 5 to 15 percent, and whole-home air sealing efforts commonly save 10 to 20 percent on total energy costs according to ENERGY STAR.
Stopping humid indoor air from leaking into cold window gaps reduces moisture buildup, frost, and the mold risk that comes with it.
Sealing air gaps also blocks sound. Many homeowners notice noticeably less street noise after sealing a bedroom window.
A $10 to $25 materials investment can pay for itself in one to three months of utility savings in a cold or hot climate.
💰 Savings Impact by Action
Sealing gaps around a leaky window can cut that room’s air-leakage heat loss by 10 to 20 percent.
Interior shrink film adds an insulating air layer that can reduce heat loss through the glass by up to 25 percent.
Insulating cellular shades can reduce winter heat loss through a window by 20 to 40 percent when closed.
Heavy lined curtains hung tight to the wall can trim window heat loss by around 10 percent.
🏠 Key Concepts Explained
The Science Behind It
Drafts happen because of pressure differences. Wind pushes on one side of your house and creates suction on the other, while the stack effect pulls cold air in low and pushes warm air out high. Any gap in the building envelope becomes a pathway, and a window perimeter is one of the longest continuous gaps in the average bedroom. Sealing it stops air from moving, which stops the heat it carries.
The second factor is surface temperature. On a 20 degree winter night, the inside surface of a single-pane window can drop to the low 30s Fahrenheit, while a well-insulated wall stays near room temperature. Your body loses heat by radiating toward that cold glass, and the air touching the glass chills, gets denser, and sinks to the floor. That is why you can feel a draft even when no outside air is actually getting in.
Insulating treatments work by trapping still air. Still air has a very low thermal conductivity, which is why cellular shades, window film, and thick curtains help. Each added layer of trapped air increases the effective R-value of the window assembly, slowing heat transfer. Combined with good air sealing, even a basic window can feel dramatically more comfortable without being replaced.
Frequently Asked Questions
▼ Why is my bedroom still cold after I sealed the window?
The remaining chill is often radiant heat loss or a convective loop off the cold glass rather than air leaking in. Add a thermal curtain, cellular shade, or interior window film to warm the glass surface. Also check nearby outlets, baseboards, and attic hatches for additional leaks.
▼ Can renters do this without landlord permission?
Yes. Removable rope caulk, peel-and-stick foam tape, shrink-film window kits, and thermal curtains all leave little or no mark. Avoid permanent caulk on trim or painted surfaces without permission, and keep the window operable for emergency exit.
▼ How long before I actually notice savings on my bill?
You will feel the comfort improvement the first night. On your bill, a single window may only save a few dollars per month, so the real savings show up when you seal several windows and doors. Expect to see a visible change in a month or two of cold or hot weather.
▼ What if my windows are very old or the frames are warped?
Warped or rotted frames will not seal well with weatherstripping alone. Try heavy-duty rope caulk and interior window film as a temporary fix, then consider repairing the sash or hiring a window pro for a quote. Replacement makes sense when frames are rotted, glass seals have failed, or the window cannot close tightly.
▼ Is window film safe for double-pane windows?
Interior shrink-film kits attach to the frame trim, not the glass, so they are safe for double-pane windows. Do not use tinted adhesive films meant for the glass itself on older double-pane units without checking the manufacturer’s warranty, since heat buildup can stress the seal.
Quick Tips
- Test for leaks on the windiest day you can, since higher pressure makes small gaps easier to detect.
- Seal the window at the trim line and the sash line. Many people only fix one, which leaves the other leaking.
- Check every window in the room, not just the obvious one. Other leaks like outlets on exterior walls often add to the draft feeling.
- Leave a small gap of ventilation in the home overall. Sealing is great, but make sure bath fans and kitchen exhaust fans still work to control moisture.
Variations for Your Situation
- Apartment/Rental: Stick to removable options like rope caulk, peel-and-stick foam tape, and shrink-film window kits (about $10 to $20 per window). Add tension-rod thermal curtains for another $20 to $40. Everything comes off cleanly at move-out, and you keep the savings and comfort.
- Tight Budget (under $50): Use a rolled towel or draft snake along the sill ($0 to $5), a roll of rope caulk ($6 to $10), and a window film kit ($10 to $20). Hang an old blanket or heavy curtain at night. Together, these steps can cut that window’s leakage dramatically for under the price of a pizza dinner.
- Older Home (pre-1980): Expect more gaps, single-pane glass, and aging wood sashes. Prioritize full perimeter caulking, replacement V-seal weatherstripping on double-hung sashes, and storm windows or interior storm inserts ($50 to $150 each) that can cut heat loss through the glass by 25 to 50 percent. Test for lead paint before scraping or sanding.