Picture this: your furnace runs almost constantly on a cold January night, your energy bill climbs toward $300, and yet your home still feels drafty near the windows and floors. The culprit is almost never your furnace. It is the dozens of small gaps, cracks, and penetrations quietly letting your expensive heated air escape into the attic, crawl space, and outdoors. The U.S. Department of Energy estimates that air leakage accounts for 25 to 40% of the energy used for heating and cooling in a typical home, making it the single largest source of waste you can actually fix yourself.
The tricky part is that the worst leaks are rarely where you think they are. While a drafty window gets all the attention, the real villains tend to be hidden spots like the gap where your top-plate meets the attic floor, the chase around your fireplace, recessed light cans in the ceiling, and the sill plate where your home’s framing meets the foundation. These areas are invisible during normal daily life but act like open windows during a polar vortex. Finding them before winter is not just a comfort upgrade, it is one of the best returns on time you will get as a homeowner, with payback periods often under one heating season.
This post covers exactly how to find those hidden leaks using methods ranging from a free do-it-yourself inspection with a candle and flashlight to a professional blower door test that maps every leak in your entire building envelope. You will also learn which leaks to prioritize, what materials to use for sealing them, and realistic savings numbers so you know what your effort is actually worth.
What You’ll Need
Click on an item below to shop for the recommended items for this recipe on Amazon.
As an Amazon Associate, we earn from qualifying purchases.
How to Do It
- Close all windows, exterior doors, and fireplace dampers. Turn off exhaust fans and your HVAC system to reduce competing airflows that could mask drafts.
- Light a stick of incense or hold a thin piece of toilet paper near every suspected leak zone. Watch for the smoke or paper to deflect, which indicates airflow. Work systematically: start at the basement rim joist, move to window and door frames, then check electrical outlets on exterior walls.
- Check the top of interior walls where they meet the ceiling, especially in closets, as these often have open stud cavities connecting to the attic. Hold your hand near the attic hatch or pull-down stairs and feel for cold air cascading down.
- Inspect recessed light fixtures in the ceiling by standing on a step stool and feeling around the trim ring for cold air. Many older can lights are open to the attic above and are major leak points.
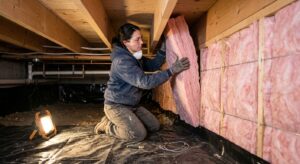
- Go to your basement or crawl space and look at the sill plate, the wood beam sitting on top of your foundation wall. Daylight visible from inside is an obvious sign. Shine a flashlight along the rim joist in every bay and note any gaps or deteriorated sill sealer.
- Mark every leak location with blue painter’s tape so you can return to seal them. Take phone photos so you remember the specific gap geometry when you are shopping for materials.
- Gather your materials before starting: one or two cans of low-expansion spray foam for gaps larger than half an inch, two to three tubes of paintable acrylic latex caulk for narrow cracks, one tube of acoustical sealant (non-hardening) for attic top plates, and rubber foam backer rod for gaps wider than three-quarters of an inch.
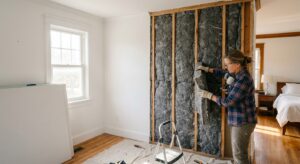
- Seal the attic floor first. Push back or temporarily remove insulation batts to expose the top plate. Use acoustical sealant or spray foam to close every wire, pipe, and duct penetration. Pay special attention to the gap that runs the full perimeter of the top plate where the drywall meets the framing, as this is often a continuous open slot connecting to the wall cavity below.
- Cover recessed lights in the attic with rigid foam or purpose-made airtight covers. Use caulk to seal the cover perimeter to the attic floor drywall. This step alone can reduce ceiling air leakage by 10 to 15% in homes built before 2000.
- Move to the basement rim joist. Cut rigid foam insulation boards (R-10 polyiso or XPS) to fit snugly between each floor joist bay. Use spray foam around all four edges of every piece to create an airtight and insulated seal. This is one of the highest-impact sealing jobs in any home.
- Return to the living space and caulk all window and door frames where the trim meets the wall surface, not just the sash. Also caulk around every electrical outlet and switch plate on exterior walls. For outlets, foam gaskets that fit behind the cover plate cost under $5 for a pack and take two minutes per outlet.
- Replace weatherstripping on any exterior door where the old stripping is compressed, torn, or missing. A properly weatherstripped door should require light resistance to close and should show no light gap around the frame when closed. Door sweeps on the bottom are equally important and are often the biggest single opening in an otherwise well-sealed door.
- Contact your local utility company or a certified BPI (Building Performance Institute) contractor to schedule a blower door test. This test depressurizes your home to a standardized 50 pascals and measures exactly how leaky your building envelope is in CFM50, a precise cubic-feet-per-minute reading.
- During the test, ask the technician to use an infrared thermal camera to scan walls and ceilings while the blower door runs. The pressure differential makes leak locations glow visibly on the thermal image, revealing hidden bypasses that a candle inspection would never find.
- Review the written report which will rank your leakage zones by magnitude and estimated energy loss. A typical report will show that the top three to five zones account for 60 to 70% of total leakage, letting you prioritize intelligently.
- Have the contractor provide a quote for dense-pack cellulose in wall cavities if your walls are uninsulated and leaky, spray foam for complex attic bypasses around chimneys and framing intersections, and any combustion safety work needed if your home has atmospherically vented appliances (sealing a home too tight without addressing combustion air can create a carbon monoxide hazard).
- After sealing work is complete, request a post-remediation blower door test to verify results. A well-executed professional air sealing job typically achieves a 30 to 50% reduction in total air leakage, confirmed by comparing the before and after CFM50 numbers.
Why It Works: The Benefits
Sealing air leaks in the attic floor, sill plate, and around penetrations can reduce annual heating costs by 15 to 30%, which translates to $150 to $400 per year for a home spending $1,200 annually on heating.
Eliminating the stack effect and sill-plate drafts removes the cold floors, chilly corners, and uneven room temperatures that no thermostat adjustment can fully fix. Rooms that were always cold will often feel several degrees warmer at the same thermostat setting.
A leaky home forces your furnace to run more frequent and longer cycles to maintain setpoint. Sealing leaks reduces run time, which can extend furnace life and lower maintenance costs over a 15 to 20 year equipment lifespan.
Stopping warm interior air from migrating into cold wall cavities and attic spaces reduces condensation, protecting your framing, insulation, and drywall from moisture damage that can cost thousands of dollars to remediate.
A full tube of acoustical sealant costs about $6 and can seal dozens of attic penetrations. A $20 investment in caulk and foam can realistically prevent $100 to $200 in first-winter heating losses, making the payback period well under one season.
💰 Savings Impact by Action
Sealing open top plates, recessed lights, and attic penetrations addresses the zone responsible for roughly 31% of total home air leakage according to Lawrence Berkeley National Laboratory research.
Sealing and insulating the basement rim joist with rigid foam and spray foam eliminates a zone that accounts for 15 to 18% of total infiltration in most single-family homes.
Installing foam gaskets behind all exterior-wall outlet and switch covers reduces infiltration through electrical penetrations by roughly 5% of total home leakage at a cost of under $15.
Replacing compressed or missing door weatherstripping and adding door sweeps can reduce door-related infiltration by up to 11% of whole-home air leakage, with payback typically under one heating season.
A comprehensive air sealing project addressing all major zones typically achieves a 20 to 40% reduction in total heating and cooling energy use, with DOE citing 15 to 30% as the conservative average for existing homes.
🏠 Key Concepts Explained
The Science Behind It
Air moves through your home’s envelope because of pressure differences, not simply because gaps exist. In winter, the stack effect creates a measurable positive pressure at the top of your home (where warm air wants to escape) and a corresponding negative pressure at the bottom (where cold air is pulled in to replace it). The pressure differential across a typical two-story home in winter can reach 5 to 10 pascals, which is enough to drive significant airflow through even a crack that is only a fraction of an inch wide. This is why sealing the attic floor and the basement rim joist simultaneously gives you the best results: you are blocking both the exhaust and the intake of this continuous convective loop.
The energy penalty from air leakage compounds in two ways that most homeowners do not realize. First, there is the direct sensible heat loss: every cubic foot of cold air entering the house must be heated from, say, 20 degrees Fahrenheit outside to 68 degrees inside, which requires real energy. Second, there is the latent heat issue: interior winter air holds moisture from cooking, breathing, and bathing. When that warm, humid air leaks into a cold attic or wall cavity, the moisture condenses and releases its latent heat energy to the structure rather than staying in your living space. Over time, this moisture load degrades insulation performance, promotes mold growth, and can rot framing members, adding a structural cost on top of the pure energy loss.
Building scientists measure total air leakage in ACH50, or air changes per hour at 50 pascals of depressurization. The EPA’s ENERGY STAR new construction standard requires no more than 3 ACH50 in most climate zones. A typical existing home built before 1980 often tests at 12 to 20 ACH50. Reducing a leaky home from 15 ACH50 down to 7 ACH50 through targeted air sealing, without any changes to insulation levels, can cut infiltration-related heating loads by 40 to 50%, which is why energy auditors consistently rank air sealing as the highest priority before any other retrofit.
Frequently Asked Questions
▼ I sealed what I could find but my house still feels drafty. What am I missing?
The leaks you can feel from inside are rarely the biggest ones. The most significant bypasses are in the attic floor and basement rim joist, both of which require crawling into uncomfortable spaces to find and seal. If you have not yet sealed these two zones, start there. If you have, a blower door test by a BPI-certified auditor will map every remaining leak with precision and is often worth the $300 to $500 cost.
▼ Can renters do air sealing without landlord permission?
Renters can safely use removable rope caulk on window frames, install foam gaskets behind outlet covers, and add door sweeps using tension-mount versions that require no screws. These steps are reversible and cost under $30 total. For anything that involves spray foam, attic access, or permanent changes to the unit, you will need written landlord approval, but many landlords will agree once they understand the maintenance benefits.
▼ How long before I see lower bills after sealing?
You will typically see the savings on your first full heating bill after completing the work, provided the outdoor temperature during that billing period is representative of normal winter conditions. Most homeowners who seal the attic floor and rim joist see a 15 to 25% drop in heating consumption compared to the same period the prior year. Tracking your gas or electric usage in therms or kWh rather than dollar cost gives a cleaner comparison since energy prices fluctuate.
▼ What if my home is older than 30 years? Is air sealing still worth it?
Older homes are actually where air sealing delivers the most dramatic results precisely because they were built with no attention to envelope tightness. A pre-1980 home will commonly have completely open wall cavities connecting to the attic, unsealed masonry penetrations, and original single-pane windows in leaky frames. Sealing the attic bypasses and rim joist in a home like this can reduce heating costs by 25 to 35% in the first season. The materials cost is the same as for a newer home but the savings are proportionally larger.
▼ Is it possible to seal a home too tight?
Yes, though it is difficult to achieve with DIY methods alone. Modern building science guidance recommends that homes below 3 ACH50 have mechanical ventilation such as an HRV or ERV to ensure fresh air exchange and manage indoor air quality. If you pursue professional air sealing and your post-remediation test shows you are at or below 3 ACH50, discuss ventilation options with your contractor before finishing the project. For most DIY seal-ups on older homes, you will not get close to this threshold.
Quick Tips
- Do your inspection on the coldest, windiest day you can tolerate working indoors. The larger the temperature gap between inside and outside, the more detectable drafts will be with low-tech tools like incense or a damp hand.
- Attic bypasses around plumbing vents, electrical panels, and chimney chases are almost always unsealed in homes built before 1990. These large irregular gaps are worth foaming even if you cannot access every smaller crack in the house.
- Foam backer rod, a foam rope sold at hardware stores for about $5 per roll, lets you pre-fill wide gaps before caulking so your caulk does not sink in and fail. Use it anywhere the gap is wider than half an inch.
- Electrical outlets on exterior walls are small but numerous. Foam gaskets that fit behind the cover plate take two minutes to install and cost about 50 cents each. A house with 20 exterior-wall outlets could have the equivalent of a half-inch hole in the wall from outlet leakage alone.
Variations for Your Situation
- Apartment or Rental: Renters cannot access shared wall cavities, attics, or the building envelope, but they can still capture meaningful savings. Use removable rope caulk around window frames (peels off cleanly in spring), install foam outlet gaskets behind every exterior-wall cover plate, and add a tension-mount door sweep to the entry door. These three steps combined cost under $30 and can reduce your unit’s heating load by 5 to 10%, with zero damage to the unit.
- Tight Budget (under $50): Prioritize the rim joist and attic hatch because these are the two highest-impact zones you can address with minimal materials. A single can of low-expansion spray foam ($7), two tubes of acoustical sealant ($12), and rigid foam scraps from a hardware store’s cutoff bin ($10 to $15) can seal the rim joist in a typical basement for about $30. Add a pre-made foam attic hatch cover kit for $20 and you have addressed two zones responsible for roughly 30 to 35% of typical home leakage for under $50 total.
- Older Home (pre-1980): Homes built before 1980 almost universally have open top plates where interior wall framing meets the attic floor, creating a direct air path from every interior wall cavity into the attic. These bypasses are invisible from below and are rarely addressed by standard insulation contractors. Before adding any attic insulation, push back existing insulation to expose the top plates and run acoustical sealant along every seam and penetration you find. In older homes this step alone commonly reduces total air leakage by 20 to 30% and makes subsequent insulation upgrades dramatically more effective.