Every shower you take pumps roughly a pint of water vapor into your bathroom air. Without proper ventilation, that moisture has nowhere to go. It settles into grout lines, soaks into drywall, and hides behind baseboards, quietly feeding mold colonies that can cost thousands of dollars to remediate. The frustrating part is that most bathroom mold problems are entirely preventable with the right exhaust setup and a few habit changes.
Bathroom ventilation is one of the most overlooked home systems, partly because fans are out of sight and rarely maintained, and partly because the consequences of neglect build slowly. But the stakes are real: the EPA estimates that mold remediation projects commonly run from $500 to $6,000 depending on the area affected. A properly sized and correctly used exhaust fan is far cheaper insurance than that.
This guide covers exactly how to assess your current ventilation, fix it with DIY upgrades or professional help, and build the daily habits that keep moisture under control for good. Whether your fan is undersized, your duct is kinked, or you simply do not have one at all, there is a solution here that fits your situation.
What You’ll Need
Click on an item below to shop for the recommended items for this recipe on Amazon.
As an Amazon Associate, we earn from qualifying purchases.
How to Do It
- Turn the fan on before you start the shower, not after. Pre-running the fan for 2 minutes lowers baseline humidity so the peak moisture load is lower.
- Run the fan for at least 20 minutes after you finish showering. Set a phone timer or use the bathroom light timer if your fan is wired to one. This is the single highest-impact habit change you can make.
- Check the door gap: slide a sheet of paper under the closed bathroom door. If it meets heavy resistance, trim or undercut the door by at least 3/4 inch to allow make-up air to flow in and support the fan.
- Remove the exhaust fan cover and wash it in warm soapy water. A dust-clogged grille reduces airflow by up to 25%. Dry it completely before reinstalling.
- Hold a single sheet of toilet paper near the fan grille while it runs. If it does not hold against the grille, your fan is underperforming and you likely need the DIY or professional upgrade.
- Calculate the CFM you need: measure your bathroom length times width in feet to get square footage, then add 10% if ceilings are above 8 feet. That number is your minimum CFM target. Choose a fan rated at least 10 to 20% above that minimum.
- Select a fan with a sone rating of 1.0 or lower. Quiet fans actually get used more consistently, which is more important than any technical spec. Look for ENERGY STAR certified models, which use 60% less energy than standard fans.
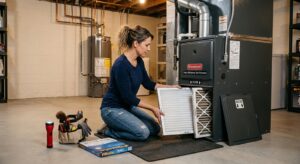
- Turn off the bathroom circuit breaker and confirm power is off with a non-contact voltage tester. Remove the old fan housing and note how the existing wiring is connected before disconnecting anything.
- Install the new fan housing in the same ceiling opening or enlarge it per the manufacturer template. Connect wiring to match the existing configuration, typically black to black, white to white, and ground to ground.
- In the attic, inspect the existing duct run. Replace any flexible duct that is kinked, compressed, or longer than 6 feet with rigid metal duct. Each 90-degree elbow you can eliminate improves airflow meaningfully.
- Confirm the duct exits through the roof or an exterior wall cap, never into the attic cavity itself. A duct terminating in the attic will deposit moisture directly into your insulation and framing, causing the exact problem you are trying to prevent.
- Request quotes from licensed electricians or HVAC contractors who specify the CFM rating, sone level, and duct path in writing before work begins.
- Ask specifically about humidity-sensing fans such as models from Broan, Panasonic, or Delta that detect when humidity rises above a set threshold and shut off automatically after it drops below 50 to 60%. This removes the run-time habit issue entirely.
- Confirm the contractor will run rigid duct to an exterior termination point with a dampered cap. The damper prevents cold outside air and pests from entering when the fan is off.
- For bathrooms without any existing exhaust, confirm whether a new circuit is needed or if the fan can be safely added to an existing bathroom circuit. A licensed electrician must make this determination.
- After installation, ask the contractor to test actual airflow with an anemometer or balometer reading. Confirm the installed CFM meets or exceeds your calculated requirement before they leave.
Why It Works: The Benefits
Keeping post-shower humidity below 60% consistently prevents the conditions mold needs to grow, avoiding remediation costs that average $2,000 for a typical bathroom mold outbreak.
Chronic moisture exposure degrades drywall, subfloor, and framing. Proper ventilation can extend the life of bathroom finishes by 10 to 15 years by keeping materials consistently dry.
Exhaust fans also remove volatile organic compounds from cleaning products and odors, reducing your household’s exposure to airborne irritants during and after bathroom use.
Bathrooms are a primary moisture source for the entire house. Controlling bathroom exhaust can reduce whole-home relative humidity by 5 to 10 percentage points, lightening the load on your air conditioner in summer.
Reducing indoor humidity means your AC removes less latent heat, which can trim cooling energy use by 5 to 10% during humid summer months when bathrooms are used frequently.
💰 Savings Impact by Action
Maintaining post-shower humidity below 60% through proper fan use eliminates the primary condition required for mold growth, preventing the vast majority of bathroom mold outbreaks.
ENERGY STAR certified exhaust fans use up to 60% less electricity than standard models while delivering equal or better airflow, reducing annual operating costs from roughly $15 to $6 per fan.
Properly exhausting bathroom moisture reduces whole-home latent heat load, trimming summer cooling energy use by approximately 5 to 10% in humid climates.
Removing dust buildup from the fan grille and housing restores up to 25% of lost airflow, often eliminating the need for a replacement fan entirely.
🏠 Key Concepts Explained
The Science Behind It
Bathroom moisture problems come down to a basic thermodynamic principle: warm air holds more water vapor than cool air. A hot shower heats the bathroom air and saturates it with vapor. When that air contacts cooler surfaces such as exterior walls, mirrors, or tile grout below the dew point temperature, the vapor condenses into liquid water. Mold spores, which are always present in the air at low concentrations, land on those wet surfaces and begin colonizing within 24 to 48 hours of sustained moisture exposure.
An exhaust fan solves this by creating a pressure differential that pulls moist indoor air out and draws drier replacement air in from under the door or through small gaps. The key variable is the air change rate: a properly sized fan in an 80 square foot bathroom should complete roughly 8 full air changes per hour. That turnover rate drops humidity from a post-shower peak of 85 to 90% down to below 60% in approximately 15 to 20 minutes, which is why run time after showering matters so much.
The ductwork connecting the fan to the exterior is equally important. Flexible plastic duct is often used because it is cheap and easy to install, but it has a rougher interior surface than rigid metal, creating friction that reduces airflow. A kinked or compressed flexible duct can cut effective CFM in half. Rigid galvanized steel duct with smooth interior walls and minimal bends delivers the fan’s rated airflow with far less loss, which is why professional and code-compliant installations increasingly specify it over flexible options.
Frequently Asked Questions
▼ My fan runs but I still get mold. What am I doing wrong?
The most likely culprits are undersizing, short run times, or a duct problem. First, do the toilet paper test: hold a sheet to the grille while the fan runs. If it falls, your fan is not moving enough air. Next, inspect the duct in the attic for kinks, disconnected joints, or a blocked exterior cap. Finally, confirm you are running the fan for a full 20 minutes after the shower ends, not just during it.
▼ Can I vent my bathroom fan into the attic instead of outside?
No. Venting into the attic is a building code violation in all U.S. jurisdictions and will cause serious moisture damage to your roof deck, insulation, and framing within one to three years. The duct must exit through the roof with a proper cap or through an exterior wall. If your existing duct terminates in the attic, correcting this should be your first priority before any other fix.
▼ How do I know if my fan is actually big enough for my bathroom?
Measure your bathroom in square feet (length times width) and compare that number to your fan’s CFM rating, which is printed on the fan housing or listed in the model specs. You need at least 1 CFM per square foot, with a minimum of 50 CFM for any bathroom. For bathrooms larger than 100 square feet, add 50 CFM for each toilet, shower, or tub beyond the first fixture. If your fan falls short, upgrading is worth the cost.
▼ My bathroom has no exhaust fan at all. What are my options short of a full renovation?
If cutting into the ceiling is not an option, a window exhaust fan is a code-acceptable alternative for bathrooms with an operable window. These plug into a standard outlet and can move 50 to 70 CFM for under $40. They work best paired with a portable dehumidifier set to 50% in the room. That said, a proper ceiling-mounted fan vented to the exterior is the long-term right answer and worth the investment.
▼ How long before I notice less mold and condensation after fixing ventilation?
Surface condensation on mirrors and walls should decrease within the first week of improved habits or a new fan. Existing grout staining and surface mold can be cleaned with a 1 to 16 dilution of bleach and water once humidity is consistently controlled. For deeper mold in walls or behind tile, you will need professional assessment, but preventing regrowth starts immediately once humidity stays below 60% consistently.
Quick Tips
- Run the fan during baths and showers, not just after. Starting early reduces the peak humidity load the fan has to overcome.
- Leave the bathroom door slightly open after showering to help drier house air mix in and speed up the drying process, even while the fan runs.
- Clean your exhaust fan grille every 3 months with a vacuum brush attachment. Dust buildup is the most common reason a working fan underperforms.
- If you have two bathrooms sharing a wall, check whether they were accidentally connected to the same exhaust duct. This is a code violation that can cause moisture to transfer between rooms.
Variations for Your Situation
- Apartment/Rental: Renters usually cannot replace the exhaust fan or modify ductwork, but you can clean the existing grille, run the fan correctly, and add a $25 to $50 portable dehumidifier set to 50% relative humidity. A window fan in exhaust mode costs under $40 and dramatically improves moisture removal if you have an operable bathroom window. Document any existing mold in writing and photos and report it to your landlord, who is typically responsible for structural moisture problems.
- Tight Budget (under $50): Start with the toilet paper airflow test to confirm whether your fan is working at all. Clean the grille and the fan blade inside the housing. Then commit to the 20-minute post-shower run time rule and leave a 3/4-inch gap under the bathroom door. A $15 digital hygrometer lets you track your actual humidity so you know whether habits alone are sufficient. These zero-cost fixes address the most common causes of bathroom mold without spending anything on hardware.
- Older Home (pre-1980): Homes built before modern ventilation codes often have no bathroom exhaust fan, undersized fans, or ductwork terminating inside the attic or soffit. Before doing any ceiling work, test the ceiling material for asbestos using a $30 mail-in test kit. Older wiring may also be aluminum or lack a ground wire, which affects what fan models you can safely install. In these cases, hiring a licensed electrician for the installation is strongly recommended, and the cost of $250 to $450 is well justified against the structural damage risk.