If your floors feel cold in winter, your energy bills seem high for no obvious reason, or your HVAC runs constantly without ever quite catching up, your crawl space insulation might be the culprit. Most homeowners never think about what is happening under their home, but the crawl space is one of the biggest sources of heat loss in houses built before the 1990s, and even many newer homes are under-insulated there.
The amount of insulation your crawl space needs depends on three things: your climate zone, whether your crawl space is vented or unvented (encapsulated), and what method you use to insulate it. Get the method wrong and you can actually create moisture problems, mold, and structural damage even with the right R-value. Get the R-value wrong and you leave real money on the table every month.
This post covers exactly how much insulation is required by current building codes and recommended by the Department of Energy for every U.S. climate zone, the difference between insulating the floor above versus the crawl space walls, and two practical approaches you can take, from a straightforward DIY install to a professional spray foam job that seals and insulates in one step.
What You’ll Need
Click on an item below to shop for the recommended items for this recipe on Amazon.
As an Amazon Associate, we earn from qualifying purchases.
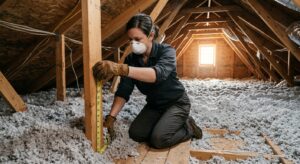
How to Do It
- Check your climate zone at energystar.gov or the DOE Zone Map and confirm your R-value target. Zone 3 requires R-19 minimum, Zones 4 to 5 require R-30, and Zones 6 to 8 require R-38 to R-60.
- Install a 6 mil polyethylene vapor barrier across the entire crawl space floor, overlapping seams by 12 inches and running it 6 inches up the foundation walls. Secure edges with pressure-treated lumber or concrete fasteners.
- Seal all rim joists (the boards sitting on top of the foundation wall) with canned spray foam or cut-and-cobble rigid foam plus caulk before installing batts. This step alone can cut air leakage by 20 to 30%.
- Cut and fit unfaced fiberglass or mineral wool batts snugly between floor joists. Use R-19 batts (roughly 6.25 inches thick) for Zone 3, R-30 batts for Zones 4 to 5, or stack R-19 plus R-11 to reach higher R-values where joist depth allows.
- Install insulation supports, either wire rods called tiger claws or 14-gauge wire cut slightly longer than the joist bay, every 18 to 24 inches to hold batts firmly against the subfloor. Do not compress the batts or you reduce their R-value.
- Inspect all HVAC ducts in the crawl space and seal any joints with mastic sealant or metal-backed tape rated for ductwork before closing up. Leaky ducts in a crawl space waste 20 to 30% of conditioned air.
- Have a contractor assess whether your crawl space vents can be sealed and whether local code allows an unvented crawl space in your climate zone. Most U.S. codes now permit this under IRC Section R408.3.
- Address any existing water intrusion, standing water, or active mold before encapsulation begins. Encapsulating a wet crawl space traps moisture and accelerates rot.
- Contractor installs a heavy-duty 12 to 20 mil reinforced vapor barrier across the floor and up all foundation walls, sealed at seams and wall terminations with tape rated for the application.
- Contractor applies closed-cell spray polyurethane foam (SPF) to the interior of the foundation walls and rim joists. Closed-cell foam achieves R-6.5 per inch, so 2 to 3 inches delivers R-13 to R-19 at the wall. Target thickness depends on your climate zone.
- Confirm with the contractor that a small conditioned air supply or exhaust duct from the HVAC system is added to the crawl space to maintain positive pressure and humidity control, as required by most building codes for unvented crawl spaces.
- After project completion, verify the work with a blower door test or at minimum check utility bills over the next two billing cycles and compare to the same period in prior years to confirm measurable improvement.
Why It Works: The Benefits
Properly insulated crawl spaces reduce whole-home energy use by 10 to 20% annually according to DOE data. In a home spending $2,000 per year on energy, that is $200 to $400 in savings every year.
Adding R-19 or higher under the floor can raise finished floor surface temperatures by 5 to 10 degrees Fahrenheit in cold climates, eliminating the cold-floor complaint that is common in homes with uninsulated crawl spaces.
Combining insulation with a ground vapor barrier reduces crawl space relative humidity by 20 to 40 percentage points in humid climates, dramatically lowering the risk of wood rot, mold, and pest intrusion.
When the crawl space is properly conditioned, ducts running through it stop sweating and leaking conditioned air into unconditioned space. This reduces HVAC run time, lowering wear and potentially extending system life by several years.
Up to 40% of the air you breathe in a typical crawl space home comes from the crawl space itself via the stack effect. Sealing and insulating the crawl space reduces infiltration of soil gases, mold spores, and radon into living areas.
💰 Savings Impact by Action
Adding insulation to meet current DOE zone recommendations reduces heating and cooling loads through the floor by up to 15% annually.
Sealing rim joists with spray foam eliminates one of the largest air leakage sites in the building envelope, reducing infiltration-related energy loss by up to 10%.
A ground vapor barrier reduces moisture infiltration that degrades insulation performance, preserving the full rated R-value and preventing up to 8% efficiency loss from wet batts.
Sealing leaky ducts in the crawl space with mastic recovers 20 to 30% of conditioned air that would otherwise be dumped into unconditioned space.
Professional encapsulation combining wall insulation, vapor barrier, and sealing reduces whole-home energy use by 15 to 18% in cold and mixed climates according to DOE field studies.
🏠 Key Concepts Explained
The Science Behind It
Heat moves through your floor assembly in three ways: conduction through the framing and subfloor materials, convection as air circulates through gaps and around loosely fitted batts, and radiation from the warm subfloor down to the cooler ground below. Insulation primarily slows conduction and convection. Each R-value point represents resistance to heat flow, so R-30 insulation transfers heat at half the rate of R-15 under the same temperature difference. In a climate where the crawl space stays at 40 degrees Fahrenheit and your living space is at 68 degrees, that 28-degree difference is the driving force pushing heat out through your floor all winter.
The vented vs. unvented distinction matters because it changes where you put the thermal boundary, the line between conditioned and unconditioned space. In a vented crawl space, outside air freely enters and the crawl space is essentially outdoors. The floor above is your thermal boundary, and that is where the insulation goes. In an encapsulated crawl space, the foundation walls and ground are sealed and the space is brought inside the conditioned envelope. The thermal boundary moves to the foundation walls, and insulating the floor above becomes unnecessary and can actually trap moisture. Choosing the wrong approach for your configuration is one of the most common and costly crawl space mistakes.
Moisture physics explains why vapor barriers are non-negotiable. Soil under a crawl space contains significant moisture that evaporates continuously. Without a vapor barrier, a 1,000 square foot crawl space can release 10 to 15 gallons of water vapor per day into the space above the ground. That moisture raises relative humidity, condenses on cold surfaces, and is absorbed by fiberglass batts, reducing their R-value by up to 40% when saturated. A properly installed vapor barrier stops this moisture drive at the source, making your insulation perform at its rated value year after year.
Frequently Asked Questions
▼ My floors are still cold after adding insulation. What did I do wrong?
The most common cause is air bypasses, not insulation thickness. Cold air is likely entering through unsealed rim joists, gaps around plumbing pipes, or HVAC duct penetrations and circulating under the floor even though batts are in place. Go back and seal every penetration you can find with spray foam or caulk, and make sure the vapor barrier on the ground has no large gaps. If floors are still cold after thorough air sealing, your R-value may be insufficient for your climate zone and you may need to add a layer of rigid foam below the existing batts.
▼ How do I know if my crawl space is vented or encapsulated?
Look around the base of your foundation from outside the house. Vented crawl spaces have small screened openings, typically one every 150 square feet of floor area, spaced around the perimeter. Encapsulated crawl spaces have those vents permanently closed or blocked, and when you open the access hatch you should see a heavy plastic barrier covering the ground and walls with no daylight coming in through vents. If you are unsure, a home energy auditor can assess your configuration in about 30 minutes.
▼ My crawl space has standing water or it smells musty. Should I still insulate?
No. Insulating over a moisture problem locks the problem in and accelerates wood rot and mold growth. First identify the source of the water, whether it is surface drainage, a high water table, plumbing leaks, or condensation, and address it fully. Allow the crawl space to dry out completely, remediate any visible mold, and then install insulation. In persistently wet crawl spaces, you may also need a sump pump or interior drainage channel before encapsulation is viable.
▼ Can I just add more insulation on top of what is already there?
It depends on the condition of the existing insulation. If the current batts are dry, mold-free, and still holding their shape against the subfloor, you can add more in some configurations. If they are sagging, wet, compressed, or show signs of mold or pest activity, remove and replace them entirely. Adding new insulation over damaged batts wastes money and traps the underlying problem. Pull down a section and inspect before deciding.
▼ Are there rebates available for crawl space insulation?
Yes, several. The federal Inflation Reduction Act provides a 30% tax credit (up to $1,200 per year) for insulation improvements including crawl space insulation, through the Energy Efficient Home Improvement Credit (Form 5695). Many state programs and utility companies also offer rebates ranging from $0.10 to $0.30 per square foot of insulation installed. Check the DSIRE database at dsireusa.org and your utility company website for current offers in your area before starting the project.
Quick Tips
- Measure your joist depth before buying batts. Standard 2×8 joists give you 7.25 inches of space, which fits R-21 high-density batts, not R-30. Buying the wrong thickness means either compression (lower R-value) or batts falling out.
- In Zones 4 and higher, consider adding rigid foam insulation to the exterior of the rim joist before finishing it with spray foam inside. Two inches of XPS foam (R-10) plus canned foam inside can get you to R-20 or higher at the rim with minimal effort.
- Do not insulate the crawl space floor under a vented crawl space with rigid foam boards between the joists unless you also add a proper vapor retarder. Rigid foam without vapor control can trap moisture in the subfloor and cause rot.
- Take photos of everything before and after you install insulation, especially duct sealing locations, vapor barrier laps, and rim joist sealing. This documentation is valuable for future buyers, home inspectors, and rebate applications.
Variations for Your Situation
- Apartment/Rental: Renters in ground-floor units or those above a crawl space typically cannot access or modify crawl space insulation. Focus on what you can control: add thick area rugs over cold floors (they add meaningful thermal resistance), use draft stoppers at exterior doors, and ask your landlord in writing to address crawl space insulation citing its impact on habitability and energy costs. Some states have implied warranty of habitability standards that include adequate insulation.
- Tight Budget (under $50): Start with rim joist sealing using canned spray foam, which costs $20 to $35 and takes two to three hours. This single step addresses the worst air leakage point in most crawl spaces and delivers the highest return per dollar of any crawl space improvement. If you already have a vapor barrier gap or torn sections, patch those with inexpensive poly sheeting and tape. These two zero-to-low-cost steps can noticeably improve floor comfort before you spend anything on batts.
- Older Home (pre-1980): Homes built before 1980 often have no vapor barrier at all, deteriorated or missing insulation, uninsulated and unsealed rim joists, and ducts that were never properly sealed. Before assuming you just need more insulation, have a home energy auditor do a blower door test with duct leakage testing. It is common to find that older crawl spaces lose 30 to 40% of conditioned air through duct leaks alone. Prioritize duct sealing first, then vapor barrier, then insulation. Also check for asbestos on any pipe insulation before disturbing anything, as it was commonly used before 1980.