Your gas bill does not spike in winter purely because of cold weather. A large portion of that increase comes from heat escaping through gaps, cracks, and poorly tuned systems that work twice as hard to compensate. The U.S. Department of Energy estimates that air leaks alone can account for 25 to 40% of a home’s heating energy loss, meaning a significant chunk of what you pay for simply disappears through walls, attics, and baseboards before it ever warms you.
The good news is that most of the highest-impact fixes cost very little and take an afternoon. Air sealing, thermostat scheduling, and a furnace tune-up are not glamorous projects, but they consistently deliver 20 to 30% reductions in heating costs for homeowners who follow through before temperatures drop. Waiting until January to address these issues means paying full price for an inefficient system all season long.
This guide walks you through everything from zero-cost behavioral changes to a weekend DIY upgrade plan, with real payback numbers at every step. Whether you rent an apartment or own a drafty 1970s colonial, there are actionable moves here that will show up on your next gas bill.
What You’ll Need
Click on an item below to shop for the recommended items for this recipe on Amazon.
As an Amazon Associate, we earn from qualifying purchases.
How to Do It
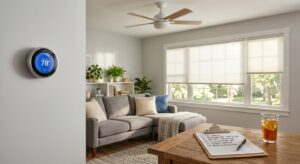
- Set your thermostat to 68°F when home and 60°F when sleeping or away. This single change saves roughly 8% on heating costs per the DOE and costs nothing to implement.
- Replace your furnace filter if it has not been changed in the last 90 days. A clogged filter forces the blower to work harder, reducing efficiency and airflow. A new MERV 8 filter costs $8 to $15 and takes three minutes to swap.
- Close the fireplace damper completely when not in use. An open damper creates a direct chimney to the outside and can lose as much heat as a window left permanently open.
- Roll up a draft snake or place a door sweep against the bottom of exterior doors where you can feel cold air entering. A basic foam draft stopper costs $5 to $10 and eliminates one of the most common heat loss points immediately.
- Open blinds and curtains on south-facing windows during daylight hours to capture free solar heat gain, then close all curtains at dusk to add an insulating layer against cold glass overnight.
- Check that all heating vents in occupied rooms are open and unobstructed by furniture or rugs. Blocked vents force pressure imbalances in the duct system and reduce delivered heat by 10 to 15% in affected rooms.
- Perform a draft audit before buying anything. On a cold or windy day, hold a lit incense stick or thin piece of tissue paper near window frames, door frames, electrical outlets on exterior walls, pipe penetrations, and attic hatches. Mark every location where the smoke or paper moves.
- Seal gaps around window and door frames using paintable latex caulk on the interior side. Apply a continuous bead, smooth it with a wet finger, and allow it to cure for 24 hours. One $5 tube of caulk covers roughly 30 linear feet of gaps.
- Install adhesive-backed foam weatherstripping on door stops where doors meet the frame. Choose a thickness that compresses slightly when the door closes. A $10 roll covers 2 to 3 standard doors and reduces drafts by 60 to 80% at those gaps.
- Seal electrical outlets and switch plates on exterior walls using foam outlet gaskets, available in packs of 12 for around $5. These small gaps collectively lose a surprising amount of warm air through the stack effect.
- In the attic, seal any visible gaps around ceiling light fixtures, plumbing stacks, and the tops of interior walls using fire-rated caulk or low-expansion spray foam before adding insulation. These attic bypasses are responsible for a disproportionate share of heat loss in many homes.
- Wrap the first 6 feet of hot water pipes in the basement or utility room with pre-slit pipe insulation foam ($10 to $20). This reduces standby heat loss from your water heater and keeps delivered water temperature higher, slightly reducing gas draw from the water heater.
- Schedule an annual furnace tune-up with a licensed HVAC technician before November. The technician will clean burners, inspect the heat exchanger for cracks, test combustion efficiency, and verify gas pressure. A cracked heat exchanger is a carbon monoxide risk and must be addressed professionally.
- Ask the technician to measure actual furnace efficiency using a combustion analyzer. If efficiency reads below 80% on a mid-efficiency furnace or below 90% on a condensing unit, the performance gap relative to rated efficiency is worth documenting for future upgrade decisions.
- Request a duct leakage assessment or duct pressurization test if your home uses forced-air heat. If duct leakage exceeds 15% of airflow, professional mastic sealant application to accessible ducts typically costs $200 to $500 and pays back in one to two heating seasons.
- Consider a whole-home blower door test through a certified energy auditor (often available free or subsidized through your gas utility). The test quantifies exactly how leaky your home is in ACH50, a standard metric, and produces a prioritized list of sealing locations with estimated savings for each.
- Ask your utility company about rebates before the appointment ends. Many gas utilities offer $50 to $150 rebates for furnace tune-ups and air sealing work completed by approved contractors, reducing your net cost significantly.
Why It Works: The Benefits
Combining air sealing, thermostat scheduling, and furnace maintenance can reduce heating costs by 20 to 30%, which translates to $150 to $400 in savings over a single heating season for the average U.S. home spending $900 to $1,300 annually on natural gas.
Sealing air leaks eliminates the cold drafts near windows and exterior walls that make rooms feel uncomfortable even when the thermostat reads 70°F, reducing the need to overheat common areas to compensate for cold spots.
A tighter, better-insulated home requires fewer and shorter furnace run cycles. Shorter cycles reduce wear on the heat exchanger, blower motor, and igniter, potentially extending furnace lifespan by several years and delaying a $3,000 to $6,000 replacement.
Sealing uncontrolled air leaks, particularly those originating in crawlspaces and garages, reduces the infiltration of moisture, radon, mold spores, and vehicle exhaust that piggyback on cold air drawn in by the stack effect.
Air sealing materials cost $20 to $80 for a full DIY treatment and typically pay back within the first heating season, delivering a better return on investment than most home efficiency products including new windows, which can take 10 to 20 years to pay back.
💰 Savings Impact by Action
Sealing gaps and cracks throughout the thermal envelope reduces uncontrolled heat loss and can lower heating energy use by up to 20% according to DOE data.
Reducing the thermostat by 8°F for 8 hours per day saves approximately 10% annually on heating costs, with no equipment cost if using a manual thermostat.
Restoring a neglected furnace to its rated efficiency through cleaning and calibration recovers 5 to 10% of heating output that was previously lost to dirty combustion and restricted airflow.
Sealing leaky ducts in unconditioned spaces recovers 20 to 30% of heated air that would otherwise escape before reaching living areas, per EPA ENERGY STAR estimates.
Upgrading attic insulation to R-38 or higher reduces heat loss through the ceiling by 15 to 25%, with the exact savings depending on existing insulation depth and climate zone.
🏠 Key Concepts Explained
The Science Behind It
Heat always moves from warm areas to cold ones through three mechanisms: conduction (direct contact through materials), convection (air movement carrying heat), and radiation (infrared energy traveling through space). In winter, all three work against you simultaneously. Your walls conduct heat outward, infiltrating cold air forces convective loops near windows and floors, and cold glass surfaces absorb radiant heat from your body and furniture. Reducing any one of these pathways measurably reduces how hard your furnace works.
The stack effect is the dominant driver of infiltration heat loss in cold climates. As warm air inside your home rises, it creates positive pressure near the top of the house and negative pressure near the bottom. This pressure differential, which can reach 5 to 10 Pascals on a cold still day and much higher on a windy day, continuously pulls cold outdoor air in through any gap below the neutral pressure plane and pushes warm indoor air out through gaps above it. Two-story homes, homes with basements, and homes with open floor plans experience stronger stack effects than compact single-story structures.
Combustion efficiency matters because natural gas furnaces do not convert 100% of fuel into usable heat. Older 80% AFUE furnaces exhaust 20% of combustion energy up the flue. Modern 95 to 98% AFUE condensing furnaces recover most of that heat by cooling flue gases enough to condense water vapor, capturing the latent heat of vaporization. Even within the same furnace, dirty burners and restricted airflow cause incomplete combustion and reduce real-world efficiency below the rated value, meaning the same fuel produces less heat and higher bills every time a service is skipped.
Frequently Asked Questions
▼ I sealed the drafts and adjusted my thermostat but my gas bill is still high. What am I missing?
The most likely culprit is duct leakage or insufficient attic insulation, both of which are invisible during a basic walkthrough. Check your attic insulation depth: if you can see the tops of the ceiling joists, you are well below the recommended R-38 to R-60 for most climates and losing significant heat. For duct leakage, hold your hand near duct joints in the basement or attic while the furnace runs and feel for air escaping at connections.
▼ Can renters do any of this without landlord permission?
Yes, renters can do quite a bit. Programmable thermostat use, draft snakes, removable rope caulk on windows (it peels off cleanly in spring), outlet gaskets, and pipe insulation on exposed pipes are all reversible or non-destructive. For anything involving permanent caulk or weatherstripping, send your landlord a brief email explaining the change and the savings benefit as documentation. Most landlords approve since it protects the property.
▼ How long before I see the savings reflected on my actual gas bill?
You will typically see the impact within one to two billing cycles after completing the work, assuming outdoor temperatures are similar to the previous year. Gas bills lag slightly because billing periods span 28 to 32 days. For the most accurate comparison, check your utility’s therms used per day rather than the dollar amount, since gas prices fluctuate and can obscure efficiency improvements.
▼ What if my home is older than 30 years? Will these steps still work?
They will work, but older homes typically have more leaks, less insulation, and older furnaces, meaning the baseline inefficiency is higher and the savings potential from each fix is also higher. Pre-1980 homes often have no weatherstripping at all and minimal wall insulation, so even basic sealing can produce dramatic results. Focus first on attic insulation and air sealing since those deliver the highest ROI in leaky older construction.
▼ My furnace is over 20 years old. Is it worth doing all this work or should I just replace it?
Do the air sealing and thermostat work regardless, because those improvements benefit any heating system and pay back immediately. For the furnace itself, a $150 to $200 tune-up is worth doing even on an old unit if it is otherwise functioning safely. However, if the unit is approaching 25 years old or the heat exchanger shows any signs of cracking, replacing it with a 95% AFUE condensing furnace will save 15 to 20% on gas annually and may qualify for federal tax credits of up to 30% of installed cost under current law.
Quick Tips
- Check your gas utility’s website before buying any materials. Many utilities offer free weatherization kits including caulk, weatherstripping, and outlet gaskets to residential customers.
- Install a smart thermostat with geofencing so it automatically sets back when everyone leaves and pre-warms before you return. Models like the Ecobee or Google Nest typically save $100 to $145 per year according to manufacturer studies verified by third-party auditors.
- Do your draft audit on the coldest available day before the main heating season. Temperature differentials above 20°F make leaks dramatically easier to detect by feel and by smoke.
- Insulating your water heater with an insulation blanket ($20 to $30) reduces standby losses by 25 to 45% on older units and pays back in under 3 months for households that heat water with gas.
Variations for Your Situation
- Apartment or Rental: Renters cannot modify central HVAC or add insulation, but the biggest wins are still accessible. Use removable rope caulk ($8 a roll) on drafty window frames, add thermal curtains ($25 to $60 per window) to reduce radiant heat loss at night, install a smart plug-based space heater in the room you occupy most rather than heating the whole unit, and use door draft stoppers on any exterior-facing doors. These changes can cut personal heating costs by 10 to 20% with zero permanent modifications.
- Tight Budget Under $50: Prioritize in this order: furnace filter replacement ($10), outlet gaskets for exterior walls ($5), one tube of caulk for the worst window or door ($5), and a basic 7-day programmable thermostat ($20 to $30). These four purchases address the most common sources of heating waste and together can save 15 to 20% on a typical gas bill, paying back completely within the first month of the heating season.
- Older Home Pre-1980: Start with a free energy audit from your gas utility before spending anything, since pre-1980 homes often have multiple issues that interact with each other. The two highest-impact upgrades for older construction are attic air sealing combined with blown-in insulation to R-38 ($1,000 to $2,500 for a professional job, often 60 to 80% rebate-eligible) and rim joist insulation in the basement using spray foam ($100 to $200 DIY). Together these two projects can reduce heating loads by 20 to 35% and pay back in two to four heating seasons.