Your HVAC filter has one job: keep airborne dust and debris out of your system’s blower motor, coils, and ductwork. But when that filter gets clogged, it stops doing its job and starts doing the opposite. A dirty filter restricts airflow so severely that your system has to work harder, run longer, and consume more energy just to move conditioned air through your home. The U.S. Department of Energy estimates that a clogged filter can increase HVAC energy consumption by 5 to 15 percent, and in severe cases even more.
The problem is sneaky. Filters don’t fail loudly. They just quietly choke your system over days and weeks until you notice higher electric bills, uneven temperatures, or worse, a service call for a frozen evaporator coil or a burned-out blower motor. Replacing a blower motor runs $300 to $600 installed. Replacing a filter costs $5 to $30. The math is obvious, but most homeowners still change filters far less often than they should.
This post walks you through the 7 clearest warning signs that your filter is the culprit, explains the building science behind why it matters, and gives you a practical plan to fix it today, whether you want a quick five-minute fix or a smarter long-term maintenance system.
What You’ll Need
Click on an item below to shop for the recommended items for this recipe on Amazon.
As an Amazon Associate, we earn from qualifying purchases.
How to Do It
- Locate your filter slot, usually at the return air grille on a wall or ceiling, or at the air handler cabinet itself. Turn off the thermostat fan before pulling the filter.
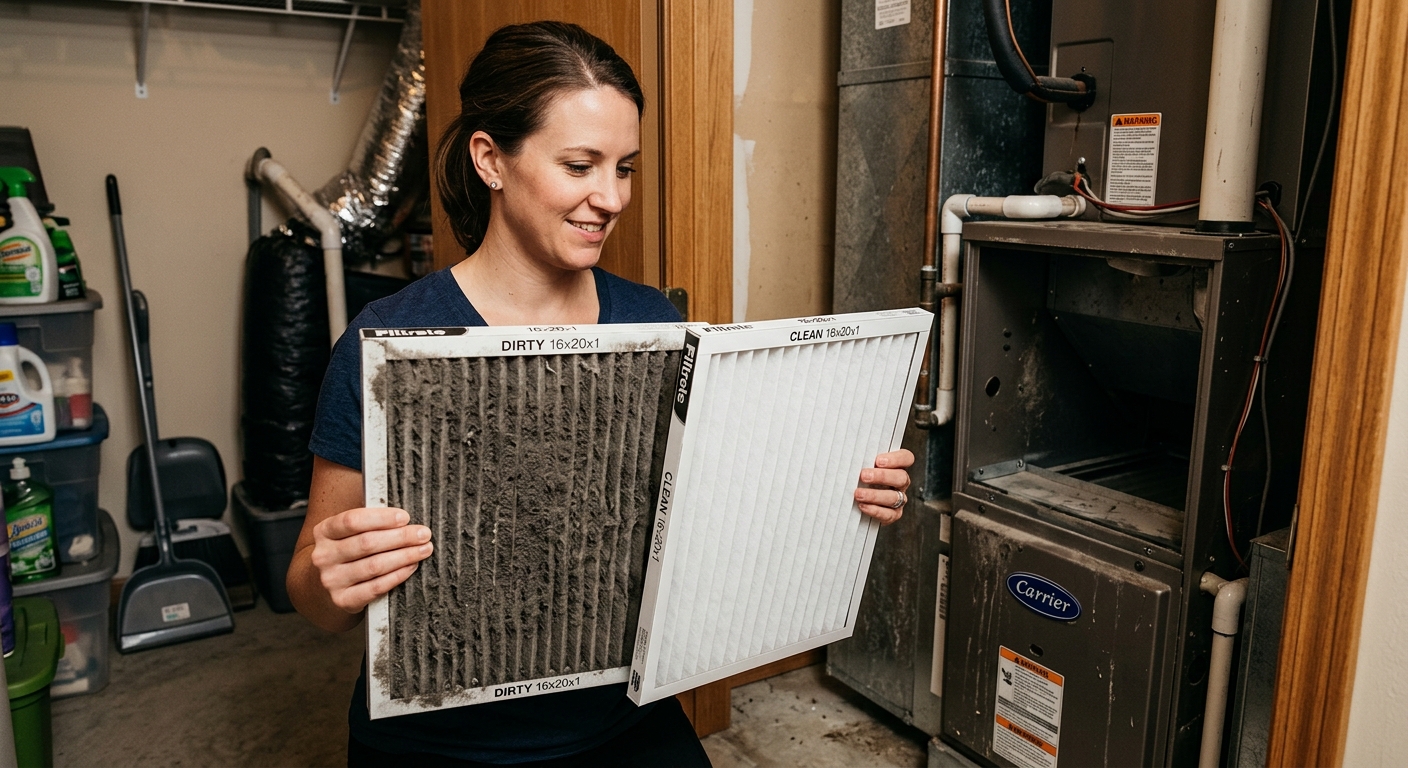
- Hold the old filter up to a light source. If you cannot see light clearly through the media, it is overdue for replacement. A light gray filter is working. A dark gray or brown filter is strangling your system.
- Note the size printed on the filter frame (example: 16x25x1) and the MERV or FPR rating. Buy a replacement of the same size and a MERV rating between 8 and 11 for most homes.
- Slide the new filter in with the airflow arrow pointing toward the air handler, not toward the return duct. An arrow pointing the wrong direction is one of the most common installation mistakes.
- Write the installation date on the filter frame with a marker, and set a phone reminder for the next change: every 30 days for fiberglass filters, every 60 to 90 days for pleated filters.
- Turn the system back on and stand at the nearest supply register. You should feel noticeably stronger airflow within one full cycle if the old filter was severely clogged.
- Measure your filter slot carefully with a tape measure. Filter sizes printed on the frame are nominal, not exact. Confirm the actual opening dimensions before ordering in bulk.
- Purchase a 6-pack or 12-pack of MERV 8 to 11 pleated filters in your correct size from a home center or online retailer. Buying in bulk typically saves 20 to 35 percent per filter compared to single purchases.
- Store the filter stack directly on top of or next to the air handler so they are visible and accessible. Filters you have to hunt for are filters that do not get changed.
- Use a smart home app, a recurring calendar event, or a free service like FilterEasy to set a recurring reminder every 60 days. Adjust to 30 days if you have pets, heavy cooking activity, or anyone in the home with allergies.
- On each change date, also inspect the filter slot gasket and housing for gaps where air can bypass the filter. Press foam weatherstripping tape along any gaps between the filter frame and the slot to ensure a complete seal.
- Once per year, use a flashlight to inspect the visible surface of your evaporator coil through the access panel. If you see gray or brown dust buildup, the filter has been bypassing and a coil cleaning ($100 to $200 by a technician) is worthwhile.
- Confirm your air handler has a standard return plenum connection that can accept a filter cabinet addition. Most forced-air systems manufactured after 1990 can be retrofitted. Have an HVAC technician confirm compatibility if you are unsure.
- Choose a 4-inch deep media cabinet in your system’s filter size (Honeywell, Aprilaire, and Lennox all make reliable models ranging from $60 to $150 for the cabinet hardware).
- Shut off power to the air handler at the breaker before any ductwork modification. Never work on ductwork connections with the system powered on.
- Remove the existing 1-inch filter slot frame and install the media cabinet in its place, sealing all cabinet-to-duct joints with foil HVAC tape rated for the application. Do not use standard duct tape, which fails over time.
- Insert the thick media filter (included with most cabinet kits), note the installation date on the frame, and restore power. Set an annual reminder for filter replacement each spring before cooling season.
- Verify the system is operating normally by checking that supply registers have strong airflow and that the system reaches setpoint within a normal timeframe. A static pressure test by an HVAC tech ($50 to $75) can confirm the system is operating at design airflow.
Why It Works: The Benefits
Replacing a clogged filter restores design airflow immediately, reducing HVAC runtime and energy use by 5 to 15 percent. On a $200 monthly utility bill with half attributed to HVAC, that is $10 to $15 back per month.
Blower motors, compressors, and heat exchangers operating under reduced airflow stress fail years earlier than properly maintained systems. Regular filter changes can extend system life by 3 to 5 years, deferring a $5,000 to $12,000 replacement.
Restored airflow means your system can deliver the designed volume of conditioned air to every register, eliminating hot or cold spots caused by insufficient duct pressure.
A fresh filter actually captures allergens, dust, and particulates effectively. A clogged or bypassed filter allows those particles to recirculate through your home and settle on furniture, coils, and ductwork surfaces.
Frozen coils and overheated motors are the two most common no-cool service calls in summer, and both are frequently caused by dirty filters. Avoiding just one service call saves $100 to $400 in diagnostic and labor fees.
💰 Savings Impact by Action
Replacing a clogged filter restores design airflow and reduces HVAC energy consumption by up to 15 percent according to DOE data.
Keeping coils free of dust buildup by maintaining clean filters preserves heat transfer efficiency, with dirty coils reducing capacity by up to 21 percent per ASHRAE research.
Sealing filter slot gaps to prevent air bypass improves both filtration effectiveness and system airflow, recovering an estimated 5 to 10 percent of lost efficiency.
Homeowners on a regular filter change schedule average 10 to 12 percent lower HVAC energy use annually compared to those who change filters reactively only after problems appear.
🏠 Key Concepts Explained
The Science Behind It
Your HVAC blower is designed to move a specific volume of air, measured in cubic feet per minute, against a specific resistance. Engineers call this the system’s design static pressure. A clean filter in good condition adds a known, acceptable amount of resistance. As the filter loads up with dust and debris, that resistance climbs. The blower motor must consume more electrical power to maintain the same airflow, and beyond a certain point, airflow drops even though the motor is working harder. This is why a clogged filter increases both energy consumption and system wear simultaneously.
The consequences are compounded at the evaporator coil. In cooling mode, the coil works by absorbing heat from warm household air passing over it. Refrigerant inside the coil boils at a low temperature, pulling that heat out of the air. If airflow is restricted by a dirty filter, less warm air reaches the coil. The refrigerant absorbs less heat, its temperature drops below freezing, and moisture in the passing air freezes on the coil surface. That ice layer then restricts airflow even further, accelerating the freeze in a destructive feedback loop that ends in a completely blocked coil and no cooling at all.
On the filtration side, a clogged filter actually becomes less effective over time rather than more effective, contrary to what many homeowners assume. As the media loads with particles, the pressure drop across it increases to the point where air finds the path of least resistance, around the filter edges rather than through it. This bypass effect means that a severely clogged filter may be capturing almost no new particles while simultaneously blocking airflow, giving you the worst of both outcomes: poor air quality and high energy use at the same time.
Frequently Asked Questions
▼ I just changed the filter and my AC is still not cooling well. What else could be wrong?
If the coil was already frozen when you changed the filter, the system needs time to fully thaw before cooling effectively, typically 2 to 4 hours with the system in Fan Only mode. If the coil is not frozen and airflow seems normal but temperatures are not dropping, the refrigerant charge may be low or the compressor may need service. At that point, call a licensed HVAC technician for a system diagnosis, which typically runs $75 to $150 for a service call.
▼ How often should I really be changing my filter? The packaging says 90 days but that seems too long.
The 90-day claim on most filter packaging assumes an average home with no pets, moderate dust levels, and the system running typical hours. In reality, homes with pets, smokers, high occupancy, or dusty climates should change filters every 30 to 45 days. A simple rule: check monthly and replace when the filter looks more gray than white. When in doubt, change it sooner since filters cost far less than repair bills.
▼ Can I wash and reuse a disposable pleated filter to save money?
No. Washing a disposable pleated filter collapses the fibers and destroys the electrostatic charge that allows it to capture fine particles. A washed filter looks cleaner but performs worse than a fresh one. The only filters designed for washing and reuse are permanent electrostatic filters sold specifically as washable, typically made with aluminum or polypropylene frames and mesh media.
▼ My system has two return vents. Do both have filters or just one?
It depends on the system design. Some homes have a single central filter at the air handler and return grilles with no filters installed. Others have filters at every return grille. Check both locations: look inside each return grille for a filter and also check the air handler cabinet for a separate filter slot. Running either location without a filter allows unfiltered air into the system.
▼ Will switching to a higher MERV filter actually improve my air quality enough to matter for allergies?
Yes, but with an important caveat. Upgrading from MERV 8 to MERV 11 captures significantly more allergens and fine dust, and most systems handle MERV 11 without airflow problems. Going to MERV 13 or higher requires confirmation from your HVAC manufacturer or technician because many residential systems cannot maintain adequate airflow through that level of restriction. A well-fitted MERV 11 filter changed every 45 days outperforms a MERV 13 filter left in place for 6 months.
Quick Tips
- Set a recurring phone alarm titled ‘Change HVAC Filter’ every 60 days. This single habit eliminates the most common cause of residential HVAC service calls.
- If anyone in your home has allergies or asthma, upgrade to MERV 11 pleated filters and change them every 30 to 45 days during high-pollen seasons.
- Homes with pets should treat 30 days as the maximum filter change interval, not 90 days. Pet dander clogs filter media far faster than household dust alone.
- Check your filter one week after any major home renovation or dusty project like drywall work or sanding floors. Construction dust can clog a filter in days rather than months.
Variations for Your Situation
- Apartment/Rental: Most apartments use 1-inch standard filters in either the air handler closet or a ceiling return grille, and tenants are typically responsible for changing them even if the lease is silent on the topic. Buy a 3-pack of MERV 8 pleated filters ($12 to $18) in the correct size and change them every 60 days. If you cannot find the filter slot, ask your property manager since an unfound filter is often a sign there is no filter installed at all, which you should report in writing.
- Tight Budget (under $50): A 6-pack of MERV 8 pleated filters in your size costs $18 to $30 at any home center or online and is the highest-return home maintenance purchase you can make. Skip fiberglass filters entirely since they cost almost as little but capture almost nothing and still restrict airflow as they load. If you have already changed the filter and want the next highest-impact free step, check every return grille in your home to confirm all of them have filters properly installed and seated.
- Older Home (pre-1980): Homes built before 1980 often have non-standard duct sizes, and return air systems that were added or modified over decades. Measure your filter slot carefully before buying since a 1-inch size mismatch leaves gaps that bypass all filtration. These homes also tend to have more air leakage into the return system from attics or crawl spaces, meaning the filter loads faster with construction-era dust and debris. Plan on 30 to 45 day change intervals and inspect the filter slot framing for gaps that may benefit from weatherstripping tape.