Your water heater works every single day, yet most homeowners never give it a second thought until cold showers arrive. Beneath the surface of that tank, minerals like calcium and magnesium are slowly settling out of your water supply and forming a hardened layer of sediment at the bottom. This layer forces the heating element or burner to work harder, drives up your energy bill, and accelerates corrosion that shortens the unit’s lifespan from a potential 15 years down to 8 or 10.
The good news is that flushing your water heater is one of the highest-return maintenance tasks in any home. It costs nothing but an hour of your time, requires only basic tools you already own, and can realistically add 3 to 5 years to the life of an appliance that costs $600 to $1,500 to replace. In hard-water areas, the difference in efficiency between a flushed and an unflushed heater can be as high as 25% on your water heating energy costs.
This guide walks you through two practical approaches: a quick annual flush any homeowner can do in about 30 minutes, and a more thorough DIY deep-clean for heaters that have gone several years without maintenance. You will also find troubleshooting answers, tips for different home situations, and the building science behind why this simple habit matters so much.
What You’ll Need
Click on an item below to shop for the recommended items for this recipe on Amazon.
As an Amazon Associate, we earn from qualifying purchases.
How to Do It
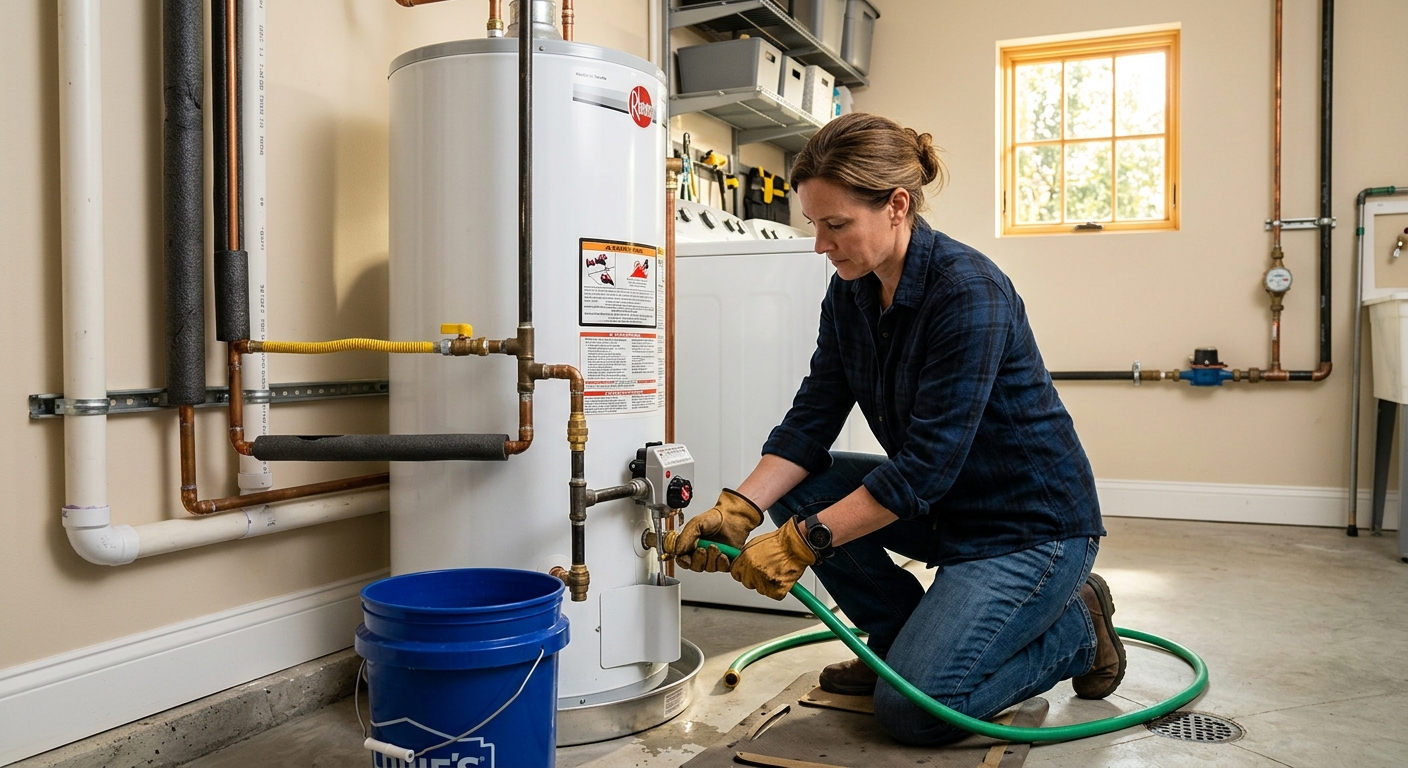
- Turn the water heater’s thermostat to the lowest setting or to the ‘Vacation’ mode. For gas units, switch the knob to ‘Pilot’. This prevents the burner from firing while the tank level drops.
- Connect a standard garden hose to the drain valve at the bottom of the tank. Run the other end to a floor drain, utility sink, or outside where hot water can safely discharge. The water will be hot, so keep people and pets clear.
- Open a hot water faucet somewhere in the house, such as a bathroom sink, to allow air into the system and let water flow freely without creating a vacuum.
- Open the drain valve by turning it counterclockwise. Allow 3 to 5 gallons to drain into a bucket first and inspect the water. If it runs clear within a minute or two, the sediment load is low. If it is cloudy, rust-colored, or full of white or tan flakes, continue draining until it clears.
- Once the water runs clear, close the drain valve, remove the hose, and restore the cold water supply. Let the tank refill completely before restoring power or relighting the pilot. A full tank typically takes 20 to 30 minutes to refill.
- Restore the thermostat to your normal setting, which should be 120 degrees Fahrenheit for most households. Check the drain valve for drips and hand-tighten or replace it if it weeps.
- Shut off power to an electric heater at the breaker panel, or set a gas heater to ‘Pilot’. Turn off the cold water supply valve at the top of the tank. Allow the water to cool for at least 1 to 2 hours if the heater has been running recently, since a full drain will expose the lower heating element on electric units and running it dry will burn it out.
- Connect a garden hose to the drain valve and route it to a suitable drain point. Open a hot water tap in the house to break the vacuum. Open the drain valve fully and drain the entire tank. This can take 20 to 45 minutes for a 40 to 50 gallon unit.
- Once empty, briefly turn the cold water supply back on for 2 to 3 minutes to flush the tank with fresh water and stir up any remaining sediment. Let this rinse water drain fully. Repeat this rinse step two or three times until the water exiting the hose is completely clear.
- While the tank is empty or draining, locate the anode rod, typically accessed from a hex bolt on top of the tank or under a sheet metal cover. Use a 1 and 1/16 inch socket and a breaker bar to remove it. If it is less than half an inch in diameter or heavily corroded down to the core wire, replace it with a new magnesium or aluminum anode rod ($20 to $40 at any hardware store). Apply thread seal tape to the threads before reinstalling.
- Close the drain valve firmly, remove the garden hose, and restore the cold water supply. Open two or three hot water faucets in the home to purge air from the lines. When water flows steadily without sputtering from those faucets, the tank is full.
- Restore power at the breaker or relight the pilot following the label instructions on the unit. Set the thermostat to 120 degrees Fahrenheit. Check all connections, including the drain valve and anode rod port, for any drips before leaving the area.
Why It Works: The Benefits
Removing sediment restores direct contact between the heat source and water, reducing energy consumption by 10 to 25% depending on buildup severity. For a typical household spending $400 to $600 per year on water heating, that is $40 to $150 back in your pocket annually.
Regular flushing reduces internal corrosion and hot-spot damage, realistically adding 3 to 5 years to a tank’s functional life. Avoiding one premature replacement saves $600 to $1,500 in equipment and installation costs.
A clean tank heats water more efficiently and recovers to set temperature 15 to 20% faster after high-demand use, meaning fewer cold surprises during back-to-back showers.
Popping, rumbling, and banging sounds from a water heater are almost always caused by water trapped under sediment and boiling. Flushing eliminates this noise almost immediately after the first complete flush.
The annual flush routine puts eyes on your unit once a year, giving you a chance to catch rust-colored water, a failing anode rod, or a corroded T&P valve before they become expensive emergencies.
💰 Savings Impact by Action
Flushing a heavily scaled tank can restore up to 25% of lost heating efficiency by re-establishing direct thermal contact between the heat source and water.
Replacing a depleted anode rod can extend tank life by 40% or more by restoring the sacrificial corrosion protection that shields the steel tank.
Lowering the thermostat from 140 to 120 degrees Fahrenheit reduces water heating energy use by roughly 6 to 10% and slows mineral precipitation.
Consistent annual flushing maintains average efficiency within 10 to 15% of the unit’s rated efficiency over its full service life versus an unmaintained tank.
🏠 Key Concepts Explained
The Science Behind It
Water heaters work on a simple principle of convection and conduction: a heat source at the bottom of the tank warms water, which rises as it heats and is replaced by cooler water sinking from above. This natural circulation keeps the entire tank at a relatively uniform temperature. Sediment disrupts this cycle by forming a physical barrier between the burner or element and the water itself. Instead of heating water directly, the burner must first heat the sediment layer, which is a poor thermal conductor, and the heat then slowly transfers upward into the water. The result is longer burn times, higher gas or electricity consumption, and elevated metal temperatures at the tank base.
The chemistry behind sediment formation is straightforward. Calcium bicarbonate and magnesium bicarbonate are soluble in cold water but become insoluble when heated, a process called thermal precipitation. Every time the heater cycles on, dissolved minerals drop out of solution and settle to the bottom. Over months and years, this accumulates into a concrete-like crust. In areas with water hardness above 10 grains per gallon, a neglected heater can accumulate a full inch of sediment within 3 to 5 years, which the Department of Energy links to efficiency losses of up to 25% for gas units and higher for electric models where the element is submerged directly in the sediment.
The anode rod is a piece of building science that most homeowners have never heard of. Made from magnesium or aluminum, it is intentionally designed to corrode in place of the steel tank through a process called galvanic sacrificial protection. As long as the rod is intact, it attracts corrosive oxygen and minerals away from the tank walls. Once it is depleted, corrosion shifts to the tank itself, and failure follows quickly. Inspecting and replacing the anode rod every 3 to 5 years, ideally during your annual flush, is the single most cost-effective way to maximize tank longevity.
Frequently Asked Questions
▼ Water is barely trickling out of the drain valve. How do I get it to drain faster?
A slow drain almost always means sediment is partially blocking the drain valve opening. Try inserting a thin, stiff wire or a straightened coat hanger to break up the clog at the valve. You can also briefly open the T&P relief valve on the side of the tank to improve airflow, but use caution since that water is very hot. If the valve remains blocked, a plumber can remove it and use a wet-dry vacuum to extract the sediment directly.
▼ My water heater is making loud popping or rumbling sounds. Will flushing fix it?
Yes, this is the classic symptom of water trapped beneath a thick sediment layer boiling and escaping as steam bubbles. A full deep flush following the DIY approach above will resolve the noise in most cases. If the sounds return within a few months, you have severe hard water and should consider a scale-inhibiting filter or water softener to prevent rapid re-accumulation.
▼ How do I know if my anode rod needs to be replaced?
Remove the anode rod during your flush and inspect it. If it has worn down to less than half an inch in diameter, is heavily pitted, or you can see the steel core wire running through the center, replace it immediately. A new rod costs $20 to $40 and takes 10 minutes to install. Skipping replacement once the rod is depleted can cut years off your tank’s remaining life.
▼ Can I flush a tankless water heater the same way?
No. Tankless heaters do not accumulate bottom sediment the same way, but they do develop scale on the heat exchanger coils that must be removed by circulating a white vinegar or descaling solution through the unit using a submersible pump and hoses. This is a different process entirely. Consult your tankless unit’s manual for the manufacturer-recommended descaling procedure and interval.
▼ My water heater is 12 years old and has never been flushed. Is it too late?
It is worth attempting a flush, but proceed cautiously. On older tanks with heavy sediment, the drain valve itself may crack when opened for the first time, or the sediment may be so compacted that it does not flush out easily. Have a replacement brass ball valve ready, take the process slowly, and inspect the water carefully for rust, which would indicate significant internal corrosion. If the tank is already showing rust-colored water, external corrosion, or is past its warranty period, budget for a replacement rather than invest heavily in a struggling unit.
Quick Tips
- Mark your calendar or set an annual reminder to flush the heater every September before winter heating demand increases.
- If your home has hard water above 7 grains per gallon, flush every 6 months and consider installing a whole-house water softener or a scale-inhibiting inline filter to dramatically slow sediment accumulation.
- Keep your water heater thermostat set to exactly 120 degrees Fahrenheit. Higher temperatures accelerate mineral precipitation and sediment buildup, and they also increase scalding risk.
- When draining, collect the first bucket of water and hold it up to a light. Visible white or tan flakes indicate calcium scale, rust-colored water points to tank corrosion, and clear water means the unit is in good shape.
- If the plastic drain valve leaks after you close it, do not over-tighten it. Replace it with a brass ball valve for a permanent fix that will never give you trouble again.
Variations for Your Situation
- Apartment/Rental: Most apartment residents share a large commercial water heater maintained by building management, so individual flushing is not applicable. Focus instead on reporting slow recovery times or discolored water to your landlord in writing, which creates a maintenance record. If you have your own in-unit tank, ask your landlord for written permission before draining it, since any accidental overflow or valve failure becomes a liability issue. Document the tank’s age and condition with photos before starting.
- Tight Budget (under $50): The annual quick flush approach costs nothing and delivers real efficiency gains. The only potential cost is a replacement drain valve ($8 to $15) if the existing one fails to reseat after opening. Skip the anode rod inspection for now but add it to next year’s plan when you can budget $20 to $40 for a replacement rod. The zero-cost quick flush alone can recover 10 to 15% efficiency in a moderately scaled unit.
- Older Home (pre-1980): Homes built before 1980 often have original or early-replacement water heaters running well past their design life, and some may have outdated galvanized steel supply pipes that contribute additional rust and debris. Before flushing, shut off the water supply and run a hot tap to check water color. Rust-red or brown water from a pre-1980 heater is a strong sign the tank interior is compromised and replacement is a better investment than maintenance. If the water runs clear, proceed with the quick flush only and plan for a full replacement within 1 to 3 years as a budget item.