Your air conditioner might be running perfectly, but if your ductwork is leaking, you could be cooling your attic instead of your living room. The U.S. Department of Energy estimates that the average home loses 20 to 30 percent of conditioned air through duct leaks, gaps at joints, and poorly insulated duct runs. On a $2,000 annual cooling bill, that is $400 to $600 vanishing before the air even reaches your vents.
The frustrating part is that most homeowners never suspect the ducts. When the house feels stuffy or the AC runs nonstop, the first instinct is to blame the thermostat, the unit itself, or old windows. But in homes with forced-air systems, ductwork is almost always a major contributor to comfort problems and high bills, especially in houses built before 2000 when duct sealing standards were far less rigorous.
This post walks you through how to find duct leaks, what you can realistically fix yourself, and when to bring in a professional for a full diagnostic. We will cover the building science behind why leaks hurt so much, give you real payback numbers, and show you step-by-step approaches from a free weekend fix to a professional duct sealing service that can cut your cooling costs by 20 percent or more.
What You’ll Need
Click on an item below to shop for the recommended items for this recipe on Amazon.
As an Amazon Associate, we earn from qualifying purchases.
How to Do It
- Turn off your HVAC system and let it sit for 15 minutes. Access your attic, basement, or crawl space during the coolest part of the day and bring a bright flashlight, a box fan for ventilation, and knee pads.
- Inspect every visible duct joint, seam, and connection point. Look for gaps, separated joints, disconnected flex duct sections, and old deteriorating duct tape (standard silver duct tape fails within 2 to 5 years and is not a long-term seal).
- Mark all problem areas with painter’s tape so you can find them easily while working. Pay special attention to the supply and return plenum connections at the air handler, which are often the largest single source of leakage.
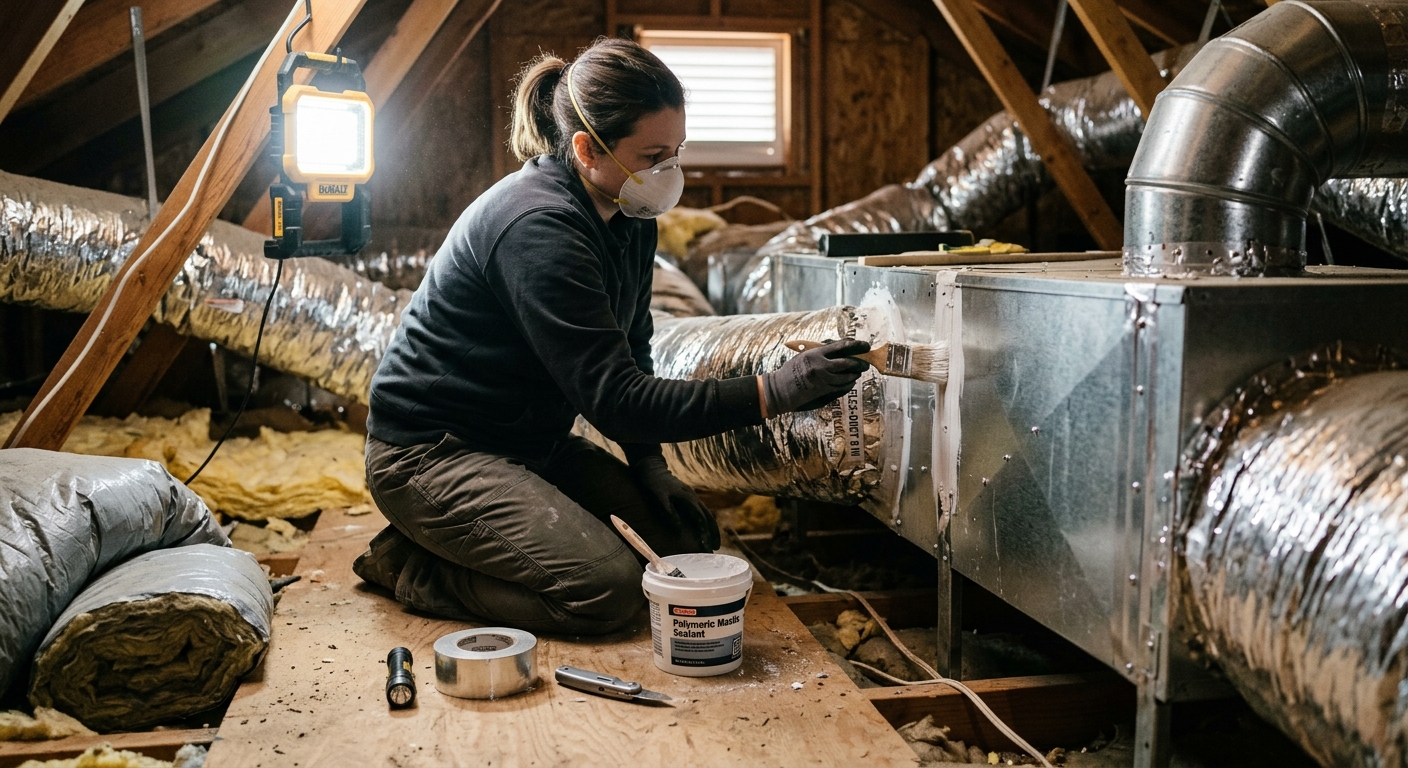
- Apply UL 181-rated mastic sealant (a thick water-based paste) to all joints, gaps, and seams using a paintbrush or gloved hand. Mastic is the professional standard: it stays flexible, never cracks, and lasts the life of the system. For gaps larger than 1/4 inch, embed fiberglass mesh tape into the wet mastic before applying a second coat.
- Seal all duct boot connections where ducts meet the floor, wall, or ceiling registers. These are notorious leak points. Remove each register grille and apply mastic or foam sealant around the perimeter of the boot where it meets the drywall or subfloor.
- Allow mastic to cure for 4 hours before turning the system back on. After the system runs for 30 minutes, hold your hand near each previously leaky joint and check for airflow. You should feel none.
- Check your existing duct insulation rating. Flex duct in attics should be at minimum R-6, with R-8 being the current code standard in most climate zones. Older homes often have R-4 or bare metal ducts with no insulation at all.
- For flex duct runs, purchase pre-insulated flex duct at R-8 and replace any runs shorter than 10 feet yourself. Cut the old duct at the collar, slip on the new section, secure with an approved drawband, and seal the collar connection with mastic.
- For rigid sheet metal duct in attics, wrap exposed sections with R-8 duct wrap insulation (sold in rolls at home centers). Wrap tightly with no gaps, butt seam joints together, and secure with foil tape every 12 inches. Do not leave bare metal exposed between sections.
- After insulating, bury accessible flex duct runs under attic insulation where possible. Insulation buried under 12 inches of blown-in insulation effectively reaches R-38 or higher, dramatically reducing heat gain.
- Inspect and insulate the return air plenum if it is located in the attic. The return plenum is often a large sheet metal box with little or no insulation. Glue rigid foam board (R-10 minimum) to all exposed exterior surfaces using construction adhesive rated for foam.
- Document your work with photos before covering anything. Note the R-values you added so you can verify improvement at your next energy audit or when selling the home.
- Request a duct leakage test (Duct Blaster test) from a certified HVAC contractor or home energy auditor. This baseline test measures your total duct leakage in CFM25 (cubic feet per minute at 25 pascals) and tells you exactly how bad your leakage is before spending anything.
- Review the written report showing leakage before and after any work. A well-performing system leaks less than 4 CFM25 per 100 square feet of conditioned floor area. Most older homes test at 15 to 30 CFM25, meaning they fail by a large margin.
- Get at least two quotes for Aeroseal or traditional mastic sealing by a certified contractor. Ask specifically for pre and post Duct Blaster test results to verify the improvement, and confirm the contractor holds a NATE or BPI certification.
- If the contractor recommends duct replacement rather than sealing, ask for a clear explanation of why sealing is not sufficient. Duct replacement costs $2,000 to $5,000 and is only warranted if ducts are physically collapsed, severely deteriorated, or incorrectly sized for the system.
- After the service, ask the contractor to re-balance your registers by adjusting dampers to match the improved airflow. Rooms that were previously starved of air may now receive too much after leaks are sealed, and balancing ensures even comfort throughout.
- Apply for available utility rebates immediately after the work. Many utilities offer $100 to $500 rebates for professional duct sealing. ENERGY STAR’s Rebate Finder and your utility’s website are the best starting points.
Why It Works: The Benefits
Sealing and insulating ducts typically reduces cooling energy use by 20 to 30%, translating to $300 to $600 per year in a home with average cooling costs. The DOE rates duct sealing as one of the top five most cost-effective home improvements available.
Leaky ducts cause rooms to heat unevenly, often leaving far-away bedrooms 5 to 8 degrees warmer than the thermostat setting. Sealing restores proper airflow balance so every room reaches its set temperature without over-cooling common areas.
Leaky return ducts pull air from attics, crawl spaces, and wall cavities, introducing dust, insulation fibers, mold spores, and pest debris into your living air. Sealing those return leaks directly reduces particulate counts and allergen loads in your home.
When your system is not losing 20 to 30% of its output to leaks, it reaches setpoint faster and cycles off sooner. Less runtime means less wear on the compressor and blower motor, potentially adding 2 to 4 years to your system’s lifespan.
Stopping return duct infiltration of humid attic air allows your AC to dehumidify your living space more effectively. Homeowners with sealed ducts often report indoor humidity dropping from uncomfortable levels above 60% RH to the ideal range of 45 to 55% RH without any other changes.
💰 Savings Impact by Action
Sealing accessible leaks with mastic reduces total duct leakage by 40 to 60%, cutting cooling energy waste by up to 25% in homes with high baseline leakage.
Upgrading attic duct insulation from R-4 to R-8 reduces heat gain in supply runs by 15%, delivering cooler air to rooms without increasing AC runtime.
Professional Aeroseal reduces total duct leakage by 85 to 90%, capturing inaccessible wall and ceiling leaks for combined savings of up to 30% on cooling bills.
Sealing the perimeter of register boots where ducts meet drywall eliminates a common infiltration point that can account for 10% of total return leakage.
Replacing collapsed or deteriorated flex duct sections restores designed airflow volumes, improving system efficiency by up to 20% in rooms previously receiving inadequate supply air.
🏠 Key Concepts Explained
The Science Behind It
Your forced-air system is designed as a closed loop: the blower pulls return air in at one end, conditions it, and pushes supply air out at the other. Every cubic foot of conditioned air that leaks out of a supply duct before reaching a register is a cubic foot of wasted capacity. But the problem compounds because that lost supply air has to be replaced by something. Your home goes slightly negative in pressure, and outdoor air infiltrates through every gap in your building envelope to fill the void. In summer, that replacement air is hot and humid, dramatically increasing your cooling load before the AC has processed even one degree of useful cooling.
The thermal penalty of uninsulated ducts is a separate but equally important issue. The laws of thermodynamics require heat to flow from hot to cold, and a 55-degree duct in a 130-degree attic is an extreme heat sink. The rate of heat transfer is proportional to the temperature difference, so attic ducts experience some of the fastest heat gain of any component in your home. An uninsulated metal duct in an attic can absorb enough heat over a 15-foot run to raise supply air temperature by 10 to 20 degrees Fahrenheit, effectively making a 3-ton AC system perform like a 2.5-ton system.
Mastic sealant works so well because it bridges gaps and remains permanently flexible. Unlike tape, which relies on adhesive that degrades over time, mastic cures into a rubbery membrane that bonds to sheet metal, flex duct, and fiberboard. It fills voids up to 1/4 inch on its own and can seal gaps up to 3/4 inch when combined with mesh tape. Aeroseal works on a similar principle but from the inside: the pressurized polymer particles are too large to pass through sealed duct walls but deposit and bond at leak edges, building up a complete seal over 60 to 90 minutes of treatment. Both methods are validated by DOE research showing 85 to 90% reductions in total duct leakage.
Frequently Asked Questions
▼ How do I know if my ducts are actually leaking before I spend money fixing them?
The most reliable free test is the incense or smoke pencil test: run your system on fan-only mode and hold a lit incense stick near every duct joint, seam, and register boot you can access. Smoke that wavers, gets sucked toward the duct, or blows away confirms a leak at that spot. If you want a precise measurement, hire a BPI-certified auditor for a Duct Blaster test, which costs $150 to $300 and gives you exact leakage numbers before and after repairs.
▼ I sealed my ducts but my house still feels stuffy and the AC runs all day. What am I missing?
Duct sealing addresses distribution losses but not your overall cooling load. If your home is poorly insulated, has significant air leaks in the building envelope, or has windows with high solar heat gain, the AC will still struggle even with perfect ducts. Start by checking your attic insulation level (it should be R-38 to R-60 in most climates) and run your hand along window frames and baseboards while the system is running to check for envelope air leaks. An HVAC technician can also verify your system is properly sized and charged with refrigerant.
▼ Can I seal ducts that run inside walls or ceilings I cannot access?
DIY methods only work on accessible ductwork. For leaks inside finished walls and ceilings, professional Aeroseal is the practical solution. It injects a sealant through your existing registers and seals inaccessible leaks from the inside without cutting into walls. Aeroseal contractors typically guarantee a specific post-treatment leakage rate in writing, and the before-and-after Duct Blaster results verify the improvement.
▼ My house was built in 1975. Is duct sealing still worth it in an older home?
Older homes almost always have the worst duct leakage and stand to gain the most from sealing. Homes built before 1990 were typically assembled with whatever tape was on hand, and that tape has long since failed. Budget for a more thorough job since older sheet metal systems often have dozens of individual joints, and consider pairing duct sealing with attic air sealing and insulation for a combined payback period of 2 to 4 years with 30 to 40% total cooling savings.
▼ Will duct sealing affect my gas furnace or cause any safety issues?
Sealing supply and return ducts can change the static pressure in your system, which is generally beneficial but should be followed by a combustion safety check for gas appliances. Ask any contractor performing duct work to do a spillage test on your furnace and water heater after the job. If you smell gas or notice your furnace behaving differently after duct sealing, call your gas utility immediately and do not run the system until it has been inspected.
Quick Tips
- Seal return duct leaks first: return leaks pull in dirty, humid, unconditioned air directly into your breathing space and your air handler, making them higher priority than supply leaks from a health and equipment standpoint.
- Never use ordinary cloth-backed duct tape on ducts. It fails within 2 to 5 years. Only UL 181-rated foil tape or mastic sealant is appropriate for permanent duct sealing.
- After sealing, check your air filter within 2 to 4 weeks. A sealed system moves more airflow through the filter than a leaky one, so filters may need more frequent replacement during the first season.
- If one room in your home has always been 5 to 10 degrees warmer than the rest, check whether its supply duct is fully connected at the boot and the main trunk. A partially disconnected duct is one of the most common causes of hot rooms and is often invisible from below the ceiling.
- Utility rebates for duct sealing are frequently unclaimed. Call your gas and electric utility before starting work and ask specifically about duct sealing rebates, which can offset $100 to $500 of professional service costs.
Variations for Your Situation
- Apartment/Rental: Most apartment residents share ductwork with the building and cannot access or modify it directly. Focus on sealing the register boots where ducts meet your walls and floors using removable foam weatherstripping or temporary mastic that can be removed at move-out. Ask your property manager to have the building’s duct system professionally tested, citing the DOE estimate that leaky ducts cost residents $300 to $600 per year in wasted energy. Window AC units and mini-splits bypass duct losses entirely and may be worth requesting as a substitute in a unit with chronic comfort problems.
- Tight Budget (Under $50): Start with a $15 can of mastic sealant and a cheap paintbrush and focus exclusively on the three highest-leak points: the return air plenum connection at the air handler, the supply plenum collar, and the register boots at your two or three most uncomfortable rooms. These four to six locations typically account for 30 to 50% of total duct leakage in older homes and can be reached in one afternoon. This partial seal alone can deliver $100 to $200 in annual savings with no special tools required.
- Older Home (Pre-1980): Homes from this era were often built with duct systems inside unconditioned attics using fiberglass duct board that has deteriorated over decades. Before sealing, do a full visual inspection for collapsed sections, crumbling duct board, and completely disconnected runs. Replacing deteriorated sections with new R-8 flex duct before sealing is more cost-effective than mastic over failed materials. Budget $300 to $600 for a combination of targeted replacement and mastic sealing, and plan for a professional Duct Blaster test before and after to verify results.