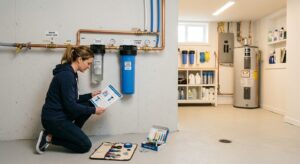
Your water heater is one of the hardest-working appliances in your home, and one of the most overlooked. It sits in a corner of your basement or utility closet, quietly burning gas or electricity around the clock to keep 40 to 80 gallons of water hot and ready. The problem is that heat doesn’t stay put. It bleeds through the tank walls, through the pipes, and out into whatever unheated space surrounds it. This constant loss is called standby heat loss, and it can account for 15 to 20% of your entire home’s water heating energy.
The good news is that this is one of the most cost-effective fixes in all of home efficiency. A water heater insulating blanket costs about $15 to $30 at any hardware store, takes 30 minutes to install, and can reduce standby heat loss by 25 to 45% according to the U.S. Department of Energy. For a typical household spending $400 to $600 per year on water heating, that translates to real money back in your pocket every single month.
In this post, you’ll learn how to check whether your water heater actually needs insulation, how to safely install a blanket yourself, how to dial in the right temperature setting, and what other low-cost tweaks can squeeze even more savings out of your existing system. Whether you have a gas or electric tank, most of these steps take less than an hour and cost next to nothing.
What You’ll Need
Click on an item below to shop for the recommended items for this recipe on Amazon.
As an Amazon Associate, we earn from qualifying purchases.
How to Do It
- Locate the thermostat dial on your water heater. On gas units it is typically on the front of the gas valve. On electric units you may need to remove an access panel with a screwdriver to reach one or two thermostats.
- If the dial reads above 120 degrees Fahrenheit, turn it down to 120. This is the DOE-recommended setting for most households and reduces standby loss and scalding risk simultaneously.
- Run a hot tap for 2 minutes after adjusting and check the temperature with a cooking thermometer or inexpensive laser thermometer to confirm the actual output temperature.
- Purchase foam pipe insulation sleeves sized to match your pipe diameter (typically 3/4 inch). Cut them to length and snap them over the first 3 to 5 feet of both the hot outlet and cold inlet pipes at the top of the tank.
- Seal any open ends of the pipe insulation with foil tape to prevent the sleeves from sliding off over time.
- Check whether your tank actually needs a blanket. Press your hand firmly against the side of the tank. If it feels warm or hot to the touch, it is losing significant standby heat and will benefit from added insulation. If it feels cool, the built-in insulation is adequate.
- Purchase a pre-cut water heater insulating blanket rated at R-8 or higher from a hardware store. Most kits include the blanket, reflective tape, and instructions. Budget $15 to $30.
- Turn off the water heater before starting. For electric units, switch off the breaker. For gas units, turn the dial to the Pilot setting.
- Wrap the blanket around the tank body, keeping it snug and smooth. Mark and cut out openings for the pressure relief valve, thermostat access panel, drain valve, and on gas units, the burner access door and flue at the top. Leave the top completely open on gas units to avoid interfering with combustion and venting.
- Secure the blanket with the included tape, pressing firmly along all seams so there are no gaps where heat can escape.
- Restore power or return the gas valve to its normal operating setting. Check that the burner or element fires normally and that no warning lights appear.
- Shut off the cold water supply valve at the top of the tank and switch the unit off at the breaker or set the gas valve to Pilot.
- Connect a garden hose to the drain valve near the base of the tank and run it to a floor drain or outside. Open a nearby hot water faucet to let air in as the tank drains.
- Open the drain valve and let the tank empty fully. The water may look rusty or cloudy, especially if the tank has not been flushed in more than two years. This is normal.
- Close the drain valve, disconnect the hose, reopen the cold supply, and let the tank refill completely before restoring power or relighting the burner. Firing the element in an empty tank will destroy it.
- While the tank is partially drained, consider inspecting or replacing the anode rod, a sacrificial magnesium or aluminum rod that prevents tank corrosion. A depleted anode rod is the single biggest cause of premature tank failure. Replacement rods cost $20 to $40 and require a 1-1/16 inch socket.
- Combine this flush with the blanket installation and pipe insulation from the other approaches for maximum efficiency gain.
Why It Works: The Benefits
The DOE estimates that insulating an older tank can save 7 to 16% on total water heating costs annually. For a household paying $500 per year to heat water, that is $35 to $80 back in your pocket every year from a one-time $15 to $30 investment.
A better-insulated tank holds its set temperature longer, so the heater cycles less and your stored hot water stays ready. Households with high morning demand often notice the tank recovers faster between back-to-back showers after insulation is added.
Every heating cycle puts wear on the burner, element, and thermostat. Reducing standby losses means fewer cycles per day, which can meaningfully extend the life of a unit that already costs $800 to $1,500 to replace.
Water heating accounts for roughly 18% of a typical home’s energy use. Cutting standby losses by 25 to 45% on that slice reduces your household carbon output by an estimated 100 to 300 pounds of CO2 per year depending on your fuel source.
💰 Savings Impact by Action
Adding an R-8 insulating blanket to an older tank reduces standby heat loss by 25 to 45%, translating to 7 to 16% savings on total water heating energy according to DOE data.
Lowering the water heater thermostat from 140 to 120 degrees Fahrenheit reduces standby heat loss and saves 6 to 10% on water heating costs with zero equipment cost.
Foam insulation on the first 3 to 6 feet of hot outlet pipe reduces conduction loss and can save an additional 3 to 5% while also delivering faster hot water to fixtures.
Removing sediment buildup from the tank floor restores direct contact between the heating element and water, recovering up to 10 to 12% of lost heating efficiency in neglected tanks.
🏠 Key Concepts Explained
The Science Behind It
Heat transfer is governed by a simple rule: energy moves from hot to cold until equilibrium is reached. Your water heater maintains water at 120 to 140 degrees Fahrenheit inside a tank surrounded by air that may be 50 to 70 degrees cooler. That 70 to 90 degree differential creates a constant driving force pushing heat outward through the tank walls. The thinner and less resistant those walls are, the faster energy escapes, and the more often the heating element or burner must cycle on to compensate. This cycle repeats dozens of times per day whether you use any hot water or not.
Adding an insulating blanket works by increasing the total thermal resistance (R-value) between the hot water and the ambient air. R-value measures how strongly a material resists heat flow. Doubling the effective R-value of your tank walls roughly halves the rate of heat loss, which means the burner or element cycles on half as often during standby periods. For an older tank with R-7 built-in insulation, adding an R-8 blanket nearly doubles total resistance and produces dramatic real-world savings. Newer tanks with R-16 to R-25 foam insulation see smaller but still meaningful gains.
Pipe conduction loss adds another layer to the problem. Metal and water are both efficient conductors of heat. The hot water pipe leaving your tank pulls heat directly out of the stored water column through conduction, even when no faucet is open. Foam elastomeric pipe insulation, which costs about $1 per foot, creates an air-gap barrier that slows this conduction loss significantly. The combination of a tank blanket, insulated pipes, and a 120-degree thermostat setpoint addresses all three major sources of standby energy waste simultaneously, which is why the total savings potential can reach 25 to 45% of your standby heating load.
Frequently Asked Questions
▼ My water heater tank already feels cool to the touch. Do I still need a blanket?
If the tank exterior feels cool, its built-in insulation is doing a reasonable job and a blanket will deliver smaller savings. Focus instead on pipe insulation and thermostat adjustment, which cost almost nothing. Blankets typically provide the biggest payback on tanks 10-plus years old with thin factory insulation.
▼ Can I put an insulating blanket on a gas water heater?
Yes, but with important restrictions. You must leave the top completely uncovered to protect the flue and draft hood, and you must cut out clean openings for the burner access door, thermostat, and pressure relief valve. Follow the blanket manufacturer’s template exactly. If you are unsure about any of these clearances, call a plumber rather than guess.
▼ I lowered my thermostat to 120 degrees but now my water does not feel hot enough. What should I do?
First confirm the actual output temperature with a thermometer at the tap, since dial markings can be inaccurate. If the measured temperature is truly below 110 degrees, try raising the thermostat slightly to 125 degrees. Households with dishwashers that do not have their own internal booster heater may need 130 degrees for effective sanitizing.
▼ How long before I actually notice savings on my bill?
Most homeowners see the impact within one full billing cycle after making all three changes together. Water heating costs are bundled into your overall utility bill, so track it month over month against the same period last year to isolate the savings. A smart energy monitor or your utility’s usage dashboard can help you see daily changes more clearly.
▼ What if my water heater is in a heated closet inside the house instead of a garage or basement?
Standby losses in a conditioned space are less wasteful because the heat that escapes the tank warms your living area rather than being lost entirely. The blanket still reduces energy consumption at the water heater, but the net savings are somewhat lower than for a unit in an unheated garage or basement. Pipe insulation and thermostat adjustment still offer full value regardless of location.
Quick Tips
- Set a calendar reminder to flush sediment from your tank once every 12 months. Sediment buildup can reduce heating efficiency by 10 to 15% and shorten tank life significantly.
- If your water heater is more than 10 years old, check the label for its Energy Factor or Uniform Energy Factor rating. Units below 0.60 EF are poor performers, and replacement with a heat pump water heater (EF 3.0 to 4.0) may pay back within 3 to 5 years.
- Install a simple timer on an electric water heater to stop it from heating water during overnight hours when no one is using it. An appliance timer costs about $25 and can shave another 5 to 12% off electric water heating costs.
- Keep at least 12 inches of clearance around your water heater after installing a blanket to allow adequate airflow, especially for gas units that need combustion air from the surrounding space.
Variations for Your Situation
- Apartment/Rental: Most renters cannot access or modify a shared building water heater. Focus on what you can control: install an aerating low-flow showerhead ($10 to $25) to cut hot water consumption by 25 to 40%, and insulate the visible portion of the hot water pipe under your sink if accessible. Ask your landlord about adjusting the thermostat, as many are set unnecessarily high.
- Tight Budget (under $50): Start with the free step: turn the thermostat down to 120 degrees right now. Next, spend $3 to $8 on foam pipe insulation for the hot outlet pipe. If the tank feels warm to the touch and you can spare $15 more, add the blanket. These three steps in order give you 80% of the total savings potential at minimum cost.
- Older Home (pre-1980): Water heaters in older homes often sit in unheated basements with minimal pipe insulation and tanks well past their efficient years. If your unit is more than 12 years old, a blanket is worth installing but get a professional assessment too. An aging tank with a depleted anode rod, corroded fittings, or signs of rust is a candidate for replacement with a heat pump water heater, which can cut water heating costs by 60 to 70% compared to a standard electric resistance tank.