Your air conditioner could be in perfect working order and you could still be paying far more than you should every summer. The reason is almost always the same: hot outdoor air is sneaking into your home through dozens of tiny gaps, and your AC is burning energy around the clock trying to fight it. The Department of Energy estimates that air leakage accounts for 25 to 40% of a typical home’s heating and cooling energy loss, making it the single biggest source of wasted energy in most houses.
The frustrating part is that most of these leaks are invisible. They hide behind switch plates, under door frames, along the rim joist in your basement, and where pipes and wires punch through walls. You cannot feel them on a calm day, and your energy bill does not tell you where they are. But once you know where to look and how to test for them, finding and sealing air leaks is genuinely one of the most beginner-friendly home improvement projects you can take on.
This guide walks you through a systematic process for locating leaks, explains which materials seal which gaps, and gives you two clear action paths: a fast no-cost inspection you can do this afternoon, and a full DIY sealing project you can complete over a weekend for under $100. We will also cover the building science behind why leaks matter so much in summer, and give you realistic numbers so you know exactly what to expect on your next utility bill.
What You’ll Need
Click on an item below to shop for the recommended items for this recipe on Amazon.
As an Amazon Associate, we earn from qualifying purchases.
How to Do It
- Close all windows and exterior doors. Turn off your AC and any exhaust fans so air movement in the house is minimal and any draft you feel is coming from outside.
- Light a stick of incense or hold a thin piece of toilet paper near the top 10 leak-prone locations: the base of exterior walls, around every electrical outlet and switch on exterior walls, around window and door frames, where pipes or wires enter the house, the attic hatch, fireplace damper, and any recessed lights on the top floor ceiling.
- Watch the smoke or paper for deflection. Even a slow drift toward or away from the surface indicates air movement. Mark every suspect location with blue painter’s tape so you do not lose track.
- Check your attic hatch specifically by pressing your hand flat against it and holding it there for 10 seconds. Even a 1-degree temperature difference you can feel through your palm indicates a significant leak at one of the highest-impact locations in the house.
- Make a prioritized list of what you found. Rank by size: large gaps around pipe penetrations and recessed lights first, medium gaps at window frames second, and small cracks at outlets last. This list becomes your sealing plan.
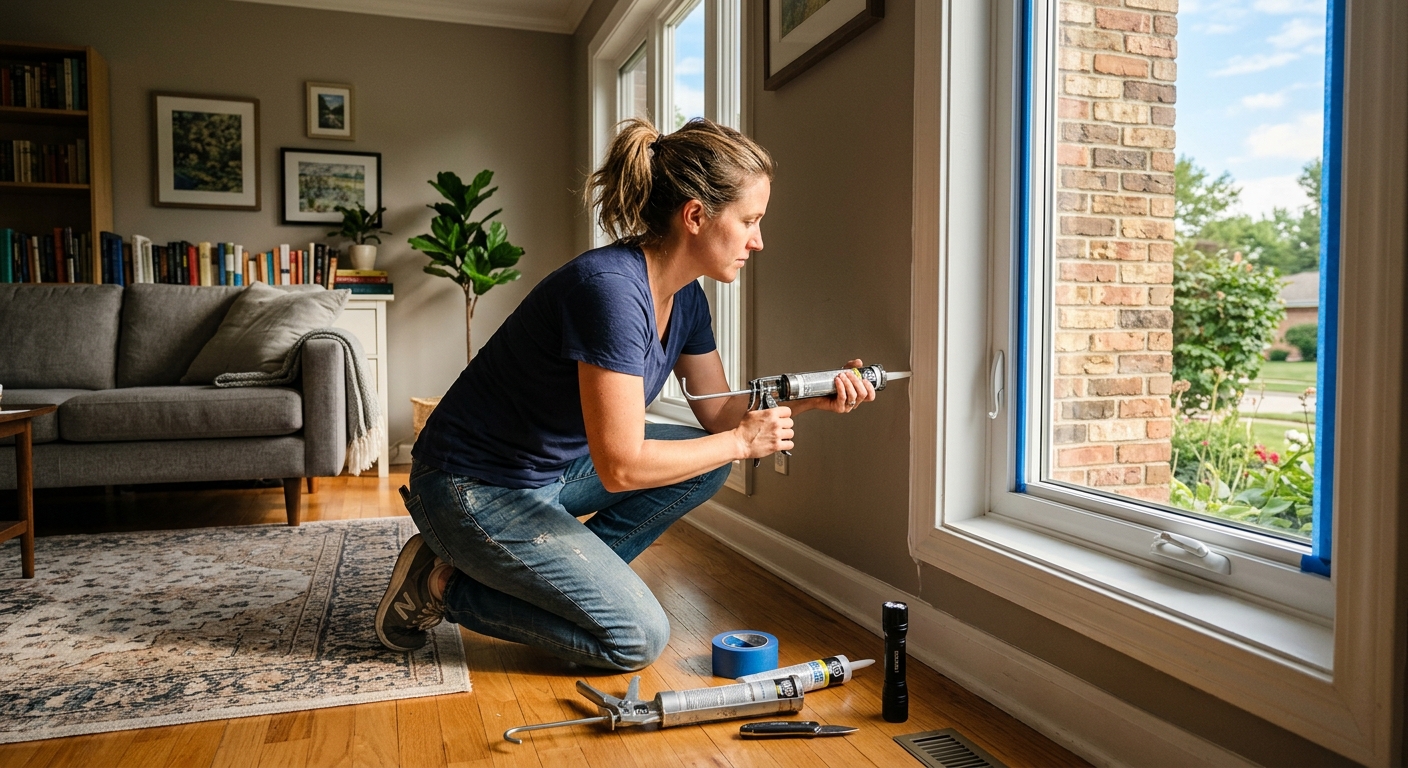
- Purchase your materials before you start: one or two tubes of paintable latex caulk for interior gaps under half an inch, foam backer rod for gaps between a quarter and three-quarter inch before caulking, a can of low-expansion spray foam for gaps larger than three-quarter inch around pipes and wires, self-adhesive foam weatherstripping for door frames, and a roll of foam gaskets sized for electrical outlets.
- Start in the attic. Wearing a dust mask and gloves, use spray foam to seal every location where a wire, pipe, or duct penetrates the top plate of your walls. These gaps are often the size of a quarter or larger and connect directly to your living space below. One can of foam can seal a typical attic floor in under an hour.
- Install foam gaskets behind every outlet cover and switch plate on exterior walls. Remove the cover plate, press the pre-cut foam gasket into place, and reinstall. This takes about 90 seconds per outlet and costs roughly $0.30 each. A typical home has 20 to 40 outlets on exterior walls.
- Caulk around every window and door frame on the interior side where the trim meets the wall. Run a continuous bead, smooth it with a damp finger, and let it cure. Use paintable caulk so you can touch it up later. Pay special attention to corners where trim pieces meet.
- Replace or add weatherstripping to exterior doors. Peel the old compressed foam strip and press new self-adhesive foam or V-strip weatherstripping into the door stop. The door should compress the stripping slightly when closed. A proper seal eliminates visible daylight around the door frame.
- In the basement or crawlspace, run a bead of caulk or spray foam along the rim joist, which is the board that sits on top of your foundation wall. This band of wood is one of the leakiest areas in the house and is often completely uninsulated. After sealing, add cut-to-fit rigid foam insulation panels for maximum benefit.
Why It Works: The Benefits
Sealing air leaks reduces the infiltration load on your AC, typically cutting cooling energy use by 15 to 25%. On a $200 summer electric bill, that translates to $30 to $50 in savings every month from June through September.
Hot air infiltrating from outside creates warm spots near windows, doors, and walls that your thermostat in the hallway never detects. Sealing those pathways eliminates the micro-climates and lets your AC deliver consistent temperatures throughout the house.
Outside air in summer carries significantly more moisture than your conditioned indoor air. Sealing leaks reduces the latent load on your AC, which can drop indoor relative humidity by 5 to 10 percentage points and eliminate that sticky, muggy feeling.
An AC running 20 to 30% fewer hours due to reduced infiltration accumulates far less wear on the compressor and blower. Reducing runtime meaningfully can add years to equipment life and delay costly system replacements.
Uncontrolled air leaks bring in pollen, outdoor pollutants, and moisture-laden air that can encourage mold growth. Sealing gaps gives you control over where and how fresh air enters, reducing allergens and improving overall air quality.
💰 Savings Impact by Action
Sealing penetrations at the attic floor eliminates the primary stack-effect leakage pathway and can reduce total home infiltration by up to 20%.
Properly sealing exterior doors with fresh weatherstripping eliminates one of the most common and largest single-gap leaks in a typical home, saving up to 11% on conditioning costs.
Sealing and insulating the rim joist above the foundation addresses a band of gaps that DOE data links to up to 15% of a home’s total air leakage.
Foam gaskets behind exterior-wall outlets block a network of small gaps that collectively account for roughly 5% of total infiltration in most older homes.
A comprehensive air sealing project combining all major zones can reduce overall cooling energy use by 15 to 25% according to DOE and ENERGY STAR field data.
🏠 Key Concepts Explained
The Science Behind It
Air leakage is driven by pressure differences between inside and outside your home. In summer, several forces work together to push hot outdoor air inward. The stack effect causes warm interior air to rise and escape through gaps at the top of the house, which creates a slight negative pressure at lower levels that actively pulls outdoor air in through cracks near the foundation and lower walls. On a 95-degree day with a cooled interior at 74 degrees, the 21-degree temperature differential generates a surprisingly strong and continuous airflow through every available gap.
When that hot outdoor air enters, your AC must do two jobs simultaneously. First, it must remove sensible heat, lowering the air temperature. Second, and more energy-intensive, it must remove latent heat by condensing the moisture out of humid summer air. In humid climates, latent heat removal can account for 30 to 50% of the total cooling energy your system uses. This is why a leaky home in a humid region feels uncomfortable and sticky even when the thermostat reads the correct temperature. The AC may be maintaining 74 degrees but still cannot keep up with the constant flow of new moisture entering through gaps.
Building scientists measure airtightness using a blower door test, which depressurizes the house and measures how much air flows in to equalize the pressure. Results are reported in air changes per hour at 50 Pascals of pressure, known as ACH50. A typical house built before 1980 tests at 10 to 20 ACH50. A code-compliant new home targets around 5 ACH50. An energy-efficient home can achieve 1 to 3 ACH50. Each point of improvement translates directly to less infiltration, less cooling load, and lower bills. You do not need a blower door test to benefit from air sealing, but it is the most precise way to measure before and after results and identify hidden gaps you cannot find manually.
Frequently Asked Questions
▼ I sealed everything I could find but my AC is still running constantly. What am I missing?
The most impactful leaks are often hidden inside walls, above drop ceilings, and at the attic floor where insulation covers the gaps. If you have done a thorough visual inspection and still have problems, the next step is a professional blower door test. An energy auditor can pinpoint exactly where your remaining leakage is concentrated, which lets you target high-impact areas instead of guessing.
▼ Can renters do any of this without landlord permission?
Yes. Outlet foam gaskets, door draft stoppers, and temporary rope caulk on windows are all fully reversible and typically require no landlord approval. These steps cost under $30 total and can noticeably reduce drafts and discomfort. Avoid permanent foam or caulk on surfaces you do not own, and consider sharing your findings with your landlord since they benefit from lower maintenance costs and longer equipment life.
▼ How long before I see the savings show up on my electric bill?
If you complete the sealing project in spring before peak cooling season, you should see a measurable difference on your very first summer bill compared to the same period last year. Savings compound over the entire cooling season, typically June through September, and the full payback on materials usually occurs within one cooling season.
▼ My house is a 1965 ranch. Are there specific places I should focus on first?
Homes from that era almost always have high infiltration at the rim joist above the foundation, around original windows that have settled and pulled away from their frames, and at the ceiling of any additions or converted spaces. Start with the rim joist if you have a basement, then move to window frames before investing in replacement windows. Those two areas alone can eliminate a large share of your leakage.
▼ Is there such a thing as sealing a house too tightly?
In practice, very few DIY projects achieve this level of tightness. However, if you plan an aggressive sealing campaign combined with added insulation, it is worth considering a mechanical ventilation strategy such as a bath fan running on a timer or an energy recovery ventilator. Homes below about 3 ACH50 should have controlled fresh air introduction to maintain good indoor air quality.
Quick Tips
- Seal attic penetrations before adding or disturbing attic insulation. Insulation reduces conductive heat transfer but does almost nothing to stop air movement.
- Check recessed can lights on your top floor ceiling. Older non-airtight cans are large open holes directly into your attic and can account for 10 to 15% of total home air leakage.
- A folded piece of paper slid under your front door when it is closed is a quick test for weatherstripping quality. If it slides freely with no resistance, the door is leaking.
- On a hot sunny afternoon, hold your hand six inches from an exterior wall outlet. A faint warm draft is a clear sign the outlet is uninsulated and leaking, and a $0.30 foam gasket will fix it.
Variations for Your Situation
- Apartment or Rental: Renters cannot modify HVAC or caulk permanently, but can install outlet foam gaskets, use removable rope caulk on drafty windows, and add door sweep draft stoppers that require no tools. Look for products labeled as temporary or renter-friendly. Total cost under $40 and fully reversible when you move out.
- Tight Budget Under $50: Focus on the three highest-ROI steps that cost almost nothing. Install foam gaskets on all exterior-wall outlets ($8 for a pack of 20), add self-adhesive weatherstripping to your front and back doors ($12 per door), and use a can of spray foam on the three or four largest pipe or wire penetrations you can find ($7 per can). These three steps address the majority of leakage in most homes for under $45 total.
- Older Home Pre-1980: Expect significantly higher baseline leakage, original single-pane windows, and no foam or sealant around any penetrations. Prioritize the rim joist first since it is often completely open in older construction and one can of spray foam plus rigid foam panels can cut that zone’s leakage by 80 to 90%. Then work on recessed lights and attic penetrations before touching windows, since window replacement is expensive and delivers lower ROI than envelope sealing.