You replaced the lightbulbs, you keep the thermostat at a reasonable setting, and you even upgraded to a newer fridge. So why does your energy bill still feel higher than it should? The frustrating reality is that the most expensive energy problems in most homes are completely invisible to the naked eye. Cold air seeping through a gap behind an electrical outlet, insulation that has settled or was never installed correctly, a furnace flue with a small crack leaking combustion gases into your living space: none of these show up during a casual walk-through.
A home energy audit changes that entirely. Using professional-grade tools like blower door depressurization equipment, infrared thermal cameras, and combustion safety analyzers, an auditor can map exactly where your home is losing conditioned air, where heat is sneaking in or out through walls and ceilings, and whether your heating and cooling equipment is operating safely and efficiently. The Department of Energy estimates that the average home loses 25 to 40% of its heating and cooling energy through air leaks alone, most of which are in locations homeowners never think to check.
This post walks you through what a professional energy audit actually involves, what kinds of problems it typically uncovers, how a motivated DIYer can do a meaningful self-audit before spending money, and how to prioritize the fixes you find so you get the fastest payback on your investment. Whether you start with a flashlight and your own two hands or hire a certified auditor, the goal is the same: stop paying for energy that is doing nothing for your comfort.
What You’ll Need
Click on an item below to shop for the recommended items for this recipe on Amazon.
As an Amazon Associate, we earn from qualifying purchases.
How to Do It
- On a cold or windy day, walk each room with a stick of incense or a smoke pencil held near electrical outlets, window frames, baseboards, and where pipes enter walls. Watch for smoke deflection that signals air movement.
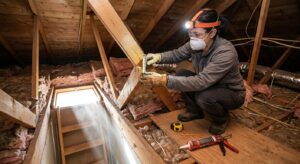
- Go into your attic during daylight hours and look for visible gaps where interior partition walls meet the attic floor, around recessed lights, and where plumbing or wiring penetrates the top plates. These bypasses are the most common source of major air loss.
- Check your attic insulation depth with a ruler. Current DOE recommendations for most of the US call for R-38 to R-60, which translates to 10 to 16 inches of blown cellulose or fiberglass. Anything under 7 inches is significantly underperforming.
- In your basement or crawlspace, inspect the rim joist (the wood framing at the very top of the foundation wall) for gaps, missing insulation, and daylight visible from the outside. This area is responsible for a disproportionate share of cold-air infiltration in many homes.
- Review 12 months of utility bills and note your average cost per square foot per month. Compare this to the EPA’s national average of about $0.10 to $0.12 per square foot monthly. Homes significantly above this range almost always have fixable efficiency problems.
- Write down every problem location you find and photograph it. This list becomes your action plan and gives a professional auditor a head start if you decide to hire one.
- Request quotes from at least two BPI or RESNET-certified auditors in your area. Your utility company may offer a subsidized audit for $99 or less, or even free in some states. Check their website or call their energy efficiency line.
- Before the auditor arrives, make a list of your comfort complaints (rooms that are always too hot or cold, drafts, humidity problems) and gather 12 months of utility bills. This context helps the auditor focus on your specific issues.
- During the blower door test, the auditor depressurizes your home to about 50 Pascals and measures total air leakage in cubic feet per minute (CFM50). A well-sealed home in most climates targets under 3 ACH50 (air changes per hour at 50 Pascals). Many existing homes test at 8 to 15 ACH50.
- Walk through the home with the auditor during the infrared camera scan if they permit it. Ask them to explain what you are seeing in real time. Thermal anomalies show up as color gradients that reveal missing insulation, moisture intrusion, and air leakage pathways.
- Request a written report that prioritizes improvements by cost-effectiveness, not just size of the problem. The report should include estimated savings, recommended contractors, and which improvements qualify for rebates or tax credits.
- Use the audit report to sequence your projects: air sealing typically comes first, then insulation, then mechanical upgrades. Doing them out of order can reduce rebate eligibility and make earlier work less effective.
Why It Works: The Benefits
Homeowners who act on audit findings typically save 20 to 30% on heating and cooling costs annually. On a $2,400 yearly energy bill, that is $480 to $720 back in your pocket every year.
Fixing air leaks and insulation gaps eliminates the cold drafts, hot upstairs bedrooms, and uneven room temperatures that HVAC upgrades alone cannot solve, because the root cause is the building envelope, not the equipment.
A professional audit includes combustion safety testing that can identify carbon monoxide risks, backdrafting flues, and cracked heat exchangers before they become dangerous. These issues are common in older homes and are completely invisible without specialized equipment.
An audit tells you exactly where to spend your improvement budget for maximum return. Without one, homeowners commonly spend thousands on new windows that deliver only a 10 to 15% improvement while missing attic air sealing that delivers 25% savings at a fraction of the cost.
Many utility companies require or incentivize a certified energy audit before approving rebates on insulation, HVAC, and air sealing projects. The federal Inflation Reduction Act also offers a tax credit of up to $150 for a professional home energy audit.
💰 Savings Impact by Action
Sealing attic bypasses around top plates, plumbing, and recessed lights reduces total building air leakage by up to 25%, which directly cuts heating and cooling load.
Bringing attic insulation from R-11 to R-38 reduces heating and cooling losses through the ceiling by 15 to 20% annually.
Sealing leaky ducts in unconditioned attics or crawlspaces recovers 20 to 30% of conditioned air that was previously lost before reaching living areas.
Insulating and air sealing the rim joist in a basement or crawlspace eliminates a major cold-air entry point, reducing infiltration by up to 10% in many older homes.
Correcting combustion inefficiencies found during an audit, such as a mis-adjusted burner or dirty heat exchanger, can recover 5 to 10% of fuel energy that was previously wasted as excess flue gas heat.
🏠 Key Concepts Explained
The Science Behind It
The building envelope, meaning your walls, roof, windows, and foundation, acts as a thermal barrier separating conditioned indoor air from the outdoors. Heat always moves from warm to cold, which means in winter your home is constantly trying to give its heat to the outside, and in summer the reverse is true. The rate at which this transfer happens depends on two separate mechanisms: conduction through solid materials (controlled by insulation R-value) and convection driven by air moving through gaps and cracks (controlled by air sealing). Most homeowners focus on insulation, but in a leaky house, air movement often dominates heat loss because it physically carries warm or cool air out of the building rather than just allowing heat to slowly conduct through a material.
A blower door test makes this invisible air movement measurable. By depressurizing your home to a standardized pressure difference of 50 Pascals using a large calibrated fan mounted in an exterior door, auditors can measure total leakage in CFM50 (cubic feet per minute at 50 Pascals) and calculate ACH50, a standardized metric of how many times per hour the entire volume of your home’s air is replaced by outside air at that pressure. Modern energy codes target 3 ACH50 or less for new construction. Many homes built before 1990 test at 8 to 15 ACH50, meaning the entire volume of conditioned air in the house is exchanged with unconditioned outside air every 4 to 8 minutes when wind or stack effect pressures are active.
Infrared thermography works on a different principle. Every surface emits thermal radiation proportional to its temperature, and an infrared camera makes these temperature differences visible as a color map. During a blower door test, air rushing in through leaks creates localized cold spots that show up vividly in an infrared image, even if the gap itself is too small to see with the naked eye. The same camera reveals insulation gaps in walls and ceilings because missing insulation allows the surface temperature to track more closely with the outside temperature, creating a visible anomaly. Together these two tools can locate and quantify problems that would otherwise take years of trial-and-error to discover.
Frequently Asked Questions
▼ How much does a professional home energy audit cost and is it worth it?
A certified BPI or RESNET audit typically runs $200 to $600, but many utility companies subsidize them down to $99 or offer them free in certain programs. Given that the average homeowner who implements audit recommendations saves $400 to $700 per year on energy bills, the audit itself pays back in 3 to 12 months. Check your utility’s website under ‘energy efficiency programs’ before paying full price.
▼ My house feels drafty but I already replaced my windows. Why is it still cold?
New windows rarely solve drafts because most residential air leakage happens at attic bypasses, rim joists, and interior wall top plates, not at window frames. Air can enter through outlets, light fixtures, and gaps around pipes and actually feel like it is coming from the window because it exits nearby. A blower door test with infrared scanning will identify the real source within a few minutes.
▼ Can I do a meaningful energy audit myself or do I really need a professional?
A DIY self-audit is genuinely useful for spotting obvious gaps, checking insulation depth, and building a prioritized fix list. However, it cannot measure total air leakage (CFM50), locate leaks inside wall cavities, or test combustion safety on gas appliances. For homes with gas heating or any history of high bills without an obvious cause, a professional blower door test is worth the investment.
▼ What is the first thing I should fix after getting an audit report?
In most homes, the auditor will recommend air sealing before insulation because adding insulation over unsealed bypasses is far less effective and may void rebate eligibility. Start with attic air sealing (around partition wall top plates, recessed lights, and plumbing penetrations), then add insulation on top. This sequence typically delivers the largest savings per dollar spent.
▼ Will an energy audit find mold or structural problems?
An energy auditor is not a home inspector and is not evaluating structural integrity or performing a mold assessment. However, infrared scans frequently reveal moisture anomalies that indicate water intrusion, which the auditor should flag for you. If moisture is detected in walls or ceilings, follow up with a licensed home inspector or moisture specialist before adding insulation, as trapping existing moisture behind new insulation can cause serious damage.
Quick Tips
- Schedule a professional audit in fall or early winter when temperature differences between inside and outside are greatest, making infrared scanning most effective.
- If your utility offers a free or discounted audit, take it even if you plan to hire your own auditor later. The utility report gives you a baseline and often unlocks rebate eligibility.
- Air sealing delivers the best cost-to-savings ratio of almost any home improvement. A full attic air seal with caulk and spray foam typically costs $300 to $800 in materials and can save $300 or more per year in a leaky home.
- After any significant air sealing project, test carbon monoxide detectors and consider adding mechanical ventilation (an HRV or ERV) if your home tests below 3 ACH50, since very tight homes need controlled fresh air to maintain indoor air quality.
Variations for Your Situation
- Apartment/Rental: Renters cannot hire a blower door test or modify HVAC ductwork, but a DIY self-audit is fully appropriate and free. Focus on sealing gaps around window AC units with foam tape, adding door sweeps to exterior doors, and using interior window insulation film on single-pane windows. These materials cost under $40 total and can reduce heating bills by 10 to 15%. Share your findings with your landlord in writing, as many states require landlords to maintain weatherization up to certain standards.
- Tight Budget (under $50): Start with the free version: call your utility company and ask for their no-cost or reduced-cost audit program before spending anything. While waiting, do a DIY smoke-stick audit and seal every gap you find with a $6 can of spray foam and a $4 tube of acoustic caulk. Prioritize the attic hatch (add weatherstripping and rigid foam insulation to the back of the door), electrical outlets on exterior walls (add foam gaskets behind face plates for $8 per pack), and the rim joist if accessible from a basement. These three areas alone can reduce infiltration by 15 to 20% in many older homes.
- Older Home (pre-1980): Homes built before modern energy codes typically have 3 to 4 inches of attic insulation (R-11 to R-13) instead of the recommended R-38 to R-60, and have no air barrier at all in many wall assemblies. A professional audit is especially valuable here because it will often uncover knob-and-tube wiring that prevents safe insulation upgrades, unlined chimneys, and atmospheric gas appliances that need combustion safety evaluation before any air sealing work begins. Expect audit findings to be extensive, and prioritize combustion safety and moisture management before tightening the envelope aggressively.