Insulation is one of those home systems that works silently in the background, and that invisibility is exactly what makes it so easy to get wrong. You can’t see it degrading, compressing, or failing to cover a critical gap, and yet those invisible flaws can account for 20 to 30 percent of your home’s total heating and cooling loss. For the average American household spending roughly $2,200 per year on energy, that’s a real and recurring cost.
The good news is that insulation mistakes are almost always fixable, and many of the most impactful repairs cost little to nothing. The bad news is that even well-intentioned homeowners repeat the same five errors over and over, often because the mistakes look harmless or were made by a previous owner. Whether your home is brand new or decades old, understanding these pitfalls is the first step toward stopping the monthly bleed.
This post breaks down each of the five most common insulation mistakes, explains exactly why they cost you money, and gives you a clear path to fixing them yourself or knowing when to call a pro. You’ll walk away with a practical checklist, realistic savings estimates, and the building science to understand what’s actually happening inside your walls and attic.
What You’ll Need
Click on an item below to shop for the recommended items for this recipe on Amazon.
As an Amazon Associate, we earn from qualifying purchases.
How to Do It
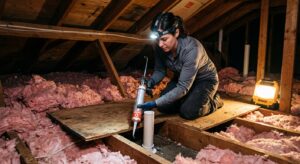
- Walk your attic on a cold day and look for daylight or feel for cold drafts coming through the attic floor. Mark any visible gaps around plumbing penetrations, wiring chases, recessed lights, or top plates with a piece of tape.
- Check your attic insulation depth with a ruler. Most attics need R-38 to R-60 depending on your climate zone, which equals 10 to 16 inches of blown cellulose or fiberglass. If you’re below 10 inches, you have a significant gap.
- Inspect basement rim joists (the framing where the floor sits on top of the foundation wall). This is one of the most under-insulated spots in most homes. If you see bare wood or thin fiberglass batts, this is a priority fix.
- Check attic hatch or pull-down stairs for insulation. A bare attic hatch is like leaving a window open year-round. Purchase a pre-made attic hatch cover or cut rigid foam to fit and attach it with adhesive for under $30.
- Press on any fiberglass batts you can access in unfinished spaces. Batts should be fluffy and fill the full cavity. Compressed, torn, or folded batts should be straightened or replaced to restore their rated R-value.
- Seal all attic floor penetrations with fire-rated acoustical caulk or canned spray foam before touching the insulation. Focus on top plates, plumbing stacks, electrical boxes, and HVAC chases. This single step can reduce air leakage by 15 to 20 percent in an average home.
- Install rigid foam board insulation (minimum R-10, 1.5 inches of polyisocyanurate) against the inside face of basement rim joists. Cut pieces to fit snugly, then seal the perimeter of each piece with spray foam. This often cuts basement heat loss by 30 to 40 percent.
- If attic insulation is below R-38, add blown-in insulation using a rented blower from a home improvement store (many offer free rental with purchase of a minimum number of bags). Blow perpendicular to existing insulation to avoid channeling, and target 12 to 14 inches of total depth.
- Install an insulated attic stair cover over pull-down attic stairs. Pre-made insulated covers cost $50 to $100 and take about 30 minutes to install. They typically add R-10 to R-22 over a previously uninsulated hatch.
- In unfinished areas where you can access wall cavities, check for missing insulation at exterior corners and behind kneewalls. Stuff any empty cavities with pre-cut fiberglass batts (friction fit, not compressed) and staple a vapor retarder facing toward the living space in heating-dominated climates.
- After completing all work, tape seams on any rigid foam boards with foil tape and verify that no existing insulation has been disturbed or compressed during your work.
- Schedule a certified BPI or RESNET energy auditor through your utility company or a private contractor. Ask specifically for a blower door test, which depressurizes the house and pinpoints every air leak with precision that visual inspection cannot match.
- Review the auditor’s report and prioritize recommendations by payback period. Most auditors rank fixes by cost-effectiveness. Air sealing and attic insulation typically have the shortest payback (1 to 3 years), while wall cavity insulation in finished spaces often takes longer.
- If wall insulation is incomplete or missing in a finished home, ask for a quote on dense-pack blown-in insulation installed through small drilled holes. This avoids drywall removal and brings walls to near-full R-value with minimal disruption.
- For homes with significant thermal bridging issues or older exterior insulation problems, ask about continuous exterior insulation added during a siding replacement project. This eliminates thermal bridging through studs and can improve whole-wall R-value by 40 to 50 percent.
- After all work is complete, request a post-remediation blower door test to confirm results and document improvements, which also supports any utility rebate claims or home resale documentation.
Why It Works: The Benefits
Fixing the five mistakes covered here can reduce annual heating and cooling costs by 15 to 30 percent. On a $2,200 annual energy bill, that’s $330 to $660 back in your pocket each year.
Rooms that are always too hot in summer or too cold in winter are usually suffering from insulation gaps or bypasses, not undersized HVAC. Correcting these issues eliminates hot and cold spots without touching your heating or cooling system.
When your home holds conditioned air more effectively, your furnace and AC run fewer cycles per day. Shorter runtimes extend equipment life, reduce maintenance costs, and can delay replacement by several years.
Air sealing alongside insulation fixes reduces infiltration of outdoor allergens, dust, and humidity. Homes with proper insulation and sealed envelopes typically show lower indoor particulate levels and more stable relative humidity.
DOE studies show that energy-efficient homes sell for 2 to 3 percent more on average. Documented insulation upgrades are a tangible selling point that buyers and appraisers increasingly look for.
💰 Savings Impact by Action
Sealing attic floor penetrations before insulating can reduce whole-home air leakage by up to 20 percent, directly cutting heating and cooling load.
Upgrading attic insulation to R-38 or higher reduces ceiling heat gain and loss by 15 to 25 percent compared to under-insulated attics.
Insulating and air sealing basement rim joists can cut basement-level heat loss by 30 to 40 percent, contributing roughly 10 percent to whole-home savings.
Dense-pack blown-in insulation in previously empty wall cavities reduces whole-home energy use by 10 to 15 percent in older homes with no existing wall insulation.
Sealing attic hatches, pull-down stairs, and major thermal bypasses eliminates point-source heat loss that standard insulation cannot address, saving up to 8 percent annually.
🏠 Key Concepts Explained
The Science Behind It
Insulation works by trapping air in tiny pockets within the material, slowing the transfer of heat through conduction. The R-value rating measures resistance to that conductive heat flow, and every material has a specific R-value per inch. Fiberglass batt insulation runs about R-3.1 per inch, while spray polyurethane foam reaches R-6.5 per inch. Compress a fiberglass batt and you reduce the air pockets, which directly reduces its R-value per inch, even though the overall thickness doesn’t change noticeably to the eye.
What R-value ratings don’t capture is air leakage. Insulation is a thermal resistor, not an air barrier, and the two functions must be combined to achieve real energy savings. The EPA estimates that air infiltration accounts for 25 to 40 percent of the energy used for heating and cooling in a typical home. When warm indoor air leaks into a cold attic in winter, it carries moisture with it, which can condense and degrade both the insulation and the roof structure. This is why building scientists consistently emphasize that air sealing and insulation are a system, not two separate upgrades.
The stack effect explains why attic and basement corrections deliver the highest return on investment. Because warm air naturally rises, a home acts like a chimney: air leaks out at the top (attic) and replacement air is drawn in at the bottom (foundation, rim joists, and basement). Every cubic foot of heated air that escapes through your attic floor must be replaced by cold outdoor air pulled in below, and your heating system has to condition all of it. Closing the top and bottom of this loop simultaneously, rather than just one end, is what produces the dramatic energy reductions reported in professionally audited homes.
Frequently Asked Questions
▼ I added insulation to my attic but my energy bills barely changed. What went wrong?
Adding insulation without first sealing air leaks is the most common reason upgrades underperform. Insulation resists conductive heat transfer, but air flows right through gaps in the insulation layer regardless of thickness. Go back to the attic floor and seal all penetrations around wiring, plumbing, and top plates with spray foam before your next heating or cooling season.
▼ My upstairs rooms are much hotter than downstairs in summer. Is that an insulation problem?
Almost certainly yes, and the attic insulation is the primary suspect. Attic temperatures can reach 140 to 160 degrees Fahrenheit in summer, and insufficient insulation allows that heat to radiate directly into the living space below. Check that you have at least R-38 in your attic floor (about 10 to 12 inches of blown fiberglass), and confirm that soffit vents are not blocked, since good attic ventilation is equally important for flushing out that heat.
▼ Can renters fix insulation problems without landlord permission?
Renters have fewer options, but not zero. You can add a pre-made insulated cover over an attic hatch if one is accessible, use window insulation film on drafty windows, and place door draft stoppers at the threshold. For anything involving the attic, basement, or wall cavities, you will need landlord approval, but framing the request around documented energy savings often gets a positive response.
▼ What if I find old insulation that looks like gray or silver-flecked granules in my attic?
That description matches vermiculite, an insulation material used widely before the 1990s that is frequently contaminated with asbestos from mines in Libby, Montana. Do not disturb it, bag it, or attempt to remove it yourself. Have a certified asbestos inspector take a sample for testing before doing any work in the attic, and hire a licensed abatement contractor if the test is positive.
▼ How do I know if my wall insulation is missing without tearing out drywall?
Remove a standard electrical outlet cover plate on an exterior wall (with the circuit breaker off), and look inside the gap around the electrical box with a flashlight. If you see bare stud cavity, wall insulation is missing. You can also use an infrared thermometer to scan exterior walls from inside on a cold day, as uninsulated sections will read noticeably colder than insulated ones, often by 5 to 10 degrees Fahrenheit.
Quick Tips
- Check your attic insulation depth every five years. Blown-in cellulose and fiberglass both settle over time, and what started as R-49 may have drifted down to R-35 or less without any visible sign from below.
- Don’t skip the rim joist. This thin strip of framing between your foundation and first floor is often uninsulated or poorly insulated, yet it represents one of the highest surface-area-to-heat-loss ratios in the entire house.
- Take photos of every improvement you make and keep receipts. Energy-efficient upgrades can qualify for federal tax credits (25C), and documented improvements increase appraised value if you sell.
- If you have recessed lights in a ceiling below an unconditioned attic, assume they are leaking air until proven otherwise. Replacing them with modern LED airtight IC-rated fixtures eliminates a chronic air leak and saves on lighting energy simultaneously.
Variations for Your Situation
- Apartment or Rental: Renters cannot modify wall cavities or attics, but they can still address the most impactful air leakage points. Focus on window insulation film kits ($15 to $25 per window), door draft stoppers, and foam gaskets installed behind outlet and switch plate covers on exterior walls. These steps alone can reduce drafts noticeably and cost under $50 total with no permanent modifications.
- Tight Budget (under $50): Prioritize the three highest-return, lowest-cost moves: seal the attic hatch with a sheet of rigid foam cut to size and held with adhesive ($10 to $15), seal electrical outlets and switch plates on exterior walls with foam gasket inserts ($8 for a 10-pack), and use a can of spray foam to seal the most visible rim joist gaps in the basement ($10 to $15). These three steps alone address the top three air leakage pathways in most homes.
- Older Home (Pre-1980): Homes built before 1980 often have little to no wall insulation, minimal attic coverage, and no vapor control strategy at all. Start with a professional blower door test to quantify total air leakage before spending any money, since the leakage rate in older homes is often three to five times higher than in newer construction. Dense-pack blown-in insulation through small drilled holes is the least invasive wall solution and typically costs $1.50 to $3.50 per square foot installed. Check for utility rebates, which are often more generous for older housing stock due to the larger efficiency gap.