Water heating accounts for roughly 18% of the average home’s energy bill, making it the second largest energy expense after heating and cooling. Yet most homeowners set it and forget it, never realizing the factory defaults are designed for liability protection and general use, not efficiency. Your water heater almost certainly left the warehouse set too hot, running too long, and wasting standby energy every hour of the day.
The good news is that five adjustable settings sit behind those access panels and on that digital display right now, waiting to be optimized. Some take under two minutes to change. Others require a screwdriver and a bit of confidence, but nothing approaching a plumbing license. Together, they can save a typical household $75 to $200 per year depending on unit type, household size, and current settings.
This guide walks you through each setting in plain language: what it does, what it should be, and exactly how to change it safely. Whether you have a traditional tank water heater, a heat pump water heater, or a tankless unit, at least three of these five adjustments will apply to your home.
What You’ll Need
Click on an item below to shop for the recommended items for this recipe on Amazon.
As an Amazon Associate, we earn from qualifying purchases.
How to Do It
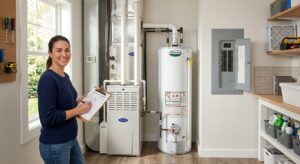
- Locate the temperature dial on your water heater. On gas units it is usually a knob on the gas valve near the bottom. On electric units it may be behind an access panel but some models have an external dial. Turn it from the factory default (typically 140°F or the ‘Hot’ mark) down to 120°F or the ‘Warm’ setting.
- Check for a ‘Vacation’ or ‘VAC’ mode on the same dial or digital display. If leaving home for 3 or more days, switch to this mode rather than leaving the unit at full operating temperature. This drops the setpoint to roughly 50°F and saves the full daily operating cost for each day you are away.
- On a heat pump water heater, navigate to the operating mode settings on the control panel and confirm it is set to ‘Heat Pump Only’ or ‘Energy Saver’ mode rather than ‘Electric’ or ‘High Demand.’ The heat pump mode uses 60 to 70% less electricity than resistance-only mode.
- If your gas water heater is older than 15 years, look at the pilot light assembly. If a small blue flame is always visible, you have a standing pilot. Note this for a future upgrade discussion with your plumber, as it burns $8 to $15 per month in gas doing nothing but staying lit.
- Run the hot tap at the furthest fixture for 2 minutes after making changes and verify a comfortable but not scalding temperature. Use a kitchen thermometer to confirm the output is close to 120°F.
- Turn off the circuit breaker for your electric water heater before opening any access panels. Confirm power is off using a non-contact voltage tester near the element terminals before touching anything inside.
- Remove the upper access panel cover (usually two screws) and peel back the insulation carefully. You will see a thermostat with a small flathead adjustment slot and an ‘ECO’ or high-limit reset button. Use a flathead screwdriver to turn the upper thermostat to 120°F.
- Replace the insulation and upper panel, then remove the lower access panel. Adjust the lower thermostat to the same 120°F setting. Mismatched thermostats are a common source of inefficiency where the lower element cycles constantly while the upper one overshoots.
- While the lower panel is open, press the red high-limit reset button once if the unit has not been heating adequately. This button trips if the thermostat ever allowed temperature to exceed 170°F and sometimes stays tripped after the heater is moved or installed.
- Optional: Wrap the water heater in an insulating blanket designed for tanks (sold for $20 to $40 at hardware stores). This step applies only to electric tank heaters in unheated spaces like garages; do not wrap gas heaters around the top or vent area. A blanket reduces standby losses by 25 to 45% in cold spaces.
- Restore power at the breaker and allow the tank one full hour to reheat before testing the output temperature at the farthest tap with a thermometer.
- Purchase a dedicated electric water heater timer rated for the amperage of your unit (check the label on the tank for amps; most are 30 amps). Intermatic and Honeywell both make models widely available at home improvement stores for $25 to $60.
- Turn off the circuit breaker for the water heater. Use a non-contact voltage tester to confirm power is off at the junction box or disconnect near the unit.
- Mount the timer on the wall near the water heater or in the electrical panel. Follow the manufacturer’s wiring diagram exactly. Typically this means connecting the incoming hot wires to the LINE terminals and the water heater leads to the LOAD terminals.
- Program the timer to run during the two or three windows when your household uses hot water, typically 5:30 to 8:00 AM and 5:00 to 9:00 PM. Disable heating from 9 PM to 5 AM and during midday hours to capture the largest savings windows.
- Restore power and monitor for two days to confirm hot water is available when expected. If the tank runs cold before a scheduled window ends, extend that window by 30 minutes. The tank will retain heat for 2 to 4 hours after the element shuts off due to its insulation.
Why It Works: The Benefits
Dropping the thermostat from 140°F to 120°F alone saves 3 to 10% on total water heating costs, while adding a timer and enabling vacation mode can push total annual savings to $75 to $200 for a typical household.
At 140°F, tap water causes third-degree burns in as little as 5 seconds. Lowering to 120°F still kills most harmful bacteria but significantly reduces the risk of accidental scalding, particularly important in homes with children or elderly residents.
Running a tank at a lower sustained temperature reduces sediment buildup and mineral scaling, which are the primary causes of reduced efficiency and premature tank failure. Most tanks last 10 to 15 years; proper settings can push that toward the upper end.
Thermostat adjustment, vacation mode activation, and timer setup cost nothing and pay back immediately on the next utility bill. These are among the very few home improvements with a zero-dollar investment and measurable first-month returns.
Legionella bacteria thrive between 77°F and 108°F and are killed at 120°F and above. Setting your heater to exactly 120°F balances energy savings with the biological safety threshold recommended by the CDC and most health authorities.
💰 Savings Impact by Action
Dropping from 140°F to 120°F reduces standby and demand energy losses by 3 to 10% depending on tank size and ambient conditions.
Switching a hybrid water heater from resistance-only to heat pump mode cuts electricity consumption by 60 to 70% for the same volume of hot water.
Restricting electric heating to peak usage windows eliminates unnecessary standby cycling during 12 to 16 low-demand hours per day, saving roughly 8 to 15% annually.
Adding an external insulation blanket to an electric tank in an unheated space reduces standby heat loss through the tank walls by 25 to 45%, translating to roughly 7 to 16% savings on water heating energy.
Activating vacation mode eliminates nearly all water heating energy use for every day the home is unoccupied, saving the full daily operating cost of $0.50 to $1.50 per day.
🏠 Key Concepts Explained
The Science Behind It
Water heaters lose energy in two distinct ways: standby losses and demand losses. Standby loss is the heat that bleeds through the tank walls into the surrounding air continuously, even when no one is showering. It follows basic conductive heat transfer: the greater the temperature difference between the water inside and the air outside, the faster heat escapes. Dropping from 140°F to 120°F in a 65°F basement cuts the driving temperature differential by roughly 27%, directly reducing that constant bleed.
Demand loss is the energy used to heat cold incoming water to replace what was drawn out. This is unavoidable, but thermostat temperature affects it in a subtle way: the higher your setpoint, the more you mix in cold water at the faucet to reach a comfortable temperature, which means you are drawing down the tank faster and triggering more frequent heating cycles. At 120°F, less cold water mixing is needed, so each shower draws a smaller fraction of the total tank volume, and reheating cycles become shorter and less frequent.
Heat pump water heaters operate on a refrigerant cycle, moving heat from the surrounding air into the water rather than generating heat directly. This process delivers 2 to 3 units of heat energy for every 1 unit of electrical energy consumed, a ratio called the Coefficient of Performance (COP). A standard resistance element has a COP of exactly 1.0. This is why heat pump mode is not just slightly better; it is fundamentally more efficient by physics, and switching away from it even temporarily to ‘Electric Only’ mode erases that advantage entirely.
Frequently Asked Questions
▼ I turned down my water heater to 120°F but the water coming out is still extremely hot. Is it working?
Wait at least 2 hours after adjusting for the tank to stabilize at the new setpoint, then measure the temperature at the tap using a thermometer. If output still exceeds 125°F after stabilizing, your thermostat may be mis-calibrated. On electric heaters, double-check that both the upper and lower thermostats were adjusted to the same setting, as leaving the lower one at 140°F will cause the upper portion to overheat.
▼ My family runs out of hot water faster after I lowered the temperature. What went wrong?
At lower temperatures, each shower uses a slightly higher percentage of hot water before you reach a comfortable mix. The tank holds the same number of gallons but fewer of them can be diluted as deeply. Try staggering showers by 15 to 20 minutes to allow partial reheating between uses, or consider a $30 to $60 shower timer to reduce per-person usage. Raising the setpoint back to 130°F is a middle-ground option if 120°F proves consistently short.
▼ Can renters adjust their water heater settings?
In most cases yes, since the thermostat dial adjustment is non-destructive and reversible. However, check your lease first, as some landlords specify that appliance settings must not be changed. Opening electrical access panels is a gray area in rental units and most renters should avoid it. Focus instead on the dial adjustment, vacation mode, and heat pump mode settings on the display, which require no tools and leave no trace.
▼ How long before I see the savings show up on my bill?
Thermostat and mode changes take effect immediately and will appear on the first full billing cycle after the change, typically within 30 days. The savings may be slightly obscured in the first month if you made the change mid-cycle or if seasonal temperature changes affected overall usage. Compare the same calendar month year-over-year for the clearest picture, or track daily usage in your utility’s app if available.
▼ What if my water heater is more than 12 years old? Is it worth optimizing?
Yes, make the free adjustments regardless of age since they cost nothing and reduce both your bill and the load on an aging unit. However, tanks older than 12 years are past the midpoint of their typical lifespan and efficiency has usually degraded meaningfully from sediment and element wear. If your current unit is more than 15 years old, begin budgeting for replacement rather than investing money in insulation blankets or timer hardware for a unit that may fail within a few years.
Quick Tips
- Drain 1 to 2 gallons from the tank drain valve every 6 months to flush sediment. Sediment on the bottom of the tank acts as insulation between the burner and the water, forcing longer heating cycles.
- If multiple family members shower back to back and the last person gets cold water, the solution is usually a larger tank or a timer adjustment, not raising the thermostat temperature.
- Install low-flow showerheads rated at 1.5 to 2.0 GPM alongside your thermostat adjustment. Less hot water used per shower compounds the savings from a lower setpoint.
- On tankless water heaters, the temperature setting is the only output temperature since there is no stored volume. Set it to 120°F directly and skip the mixing valve concerns that apply to tank systems.
Variations for Your Situation
- Apartment or Rental: Most apartment water heaters are electric and accessible via a dial or digital panel that requires no tools. Focus on the thermostat setpoint dial (set to 120°F) and vacation mode when traveling. If you have a heat pump water heater, confirm it is in Energy Saver mode. Avoid opening any access panels in a rental without written landlord permission. These zero-tool changes alone can save $40 to $80 per year in a one-bedroom apartment.
- Tight Budget (under $20): The thermostat adjustment and vacation mode changes are completely free. Add a $3 to $5 faucet aerator on the kitchen tap and a $15 low-flow showerhead to compound the water heating savings with reduced hot water consumption. These three changes together deliver 80% of the total savings potential at under $20 out of pocket, with an immediate payback on the first bill.
- Older Home (pre-1980): Homes of this era often have water heaters with inaccurate or sticky thermostat dials, so use a thermometer at the tap to verify actual output temperature rather than trusting the dial markings. Pipes in older homes are more likely to be uninsulated in crawl spaces or basements; adding foam pipe insulation ($10 to $20 for a crawl space run) prevents heat loss between the tank and the tap and is especially high-impact when the water heater is far from the main bathrooms.