Summer cooling bills can feel like a tax you just have to pay, but the reality is that most homes have 3 to 5 specific weak points that make the AC work far harder than it needs to. A gap here, a dirty coil there, or an outdated thermostat schedule can quietly add $200 to $400 to your annual energy bill without you ever noticing the cause.
The good news is that the upgrades with the fastest payback periods are rarely the most expensive ones. You do not need a new HVAC system to cut your cooling costs significantly. In fact, the five upgrades covered in this post range from completely free to around $300, and each one has a defensible payback period under three years based on average U.S. energy costs and DOE efficiency data.
This post walks through each upgrade in order of fastest payback, gives you real numbers to compare against your own situation, and explains exactly how to implement each one yourself or decide when to call a pro.
What You’ll Need
Click on an item below to shop for the recommended items for this recipe on Amazon.
As an Amazon Associate, we earn from qualifying purchases.
How to Do It
- Raise your thermostat setpoint to 78 to 80°F when you leave the house and program a 30-minute pre-cool before you return. This single change saves an average of 8 to 10% on cooling bills.
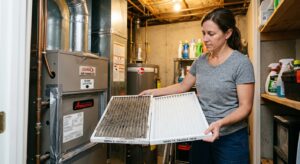
- Check your air filter. Hold it up to a light source. If you cannot see light through it, replace it immediately. A clogged filter increases energy draw by 10 to 15% and costs under $10 to fix.
- Close blinds, curtains, or shades on south and west-facing windows between 10am and 5pm. This simple habit reduces solar heat gain by 30 to 45% through those windows and costs nothing.
- Walk around your home and place your hand near door bottoms, window frames, attic hatches, and electrical outlets on exterior walls. Noticeable airflow or temperature differences indicate leaks worth sealing.
- Redirect ceiling fans to run counter-clockwise at medium speed in summer. This creates a wind-chill effect that lets you raise the thermostat 2 to 4°F without any comfort loss, saving 6 to 8% on cooling.
- Upgrade 1: Install a smart or programmable thermostat ($25 to $150). Set a schedule with a 4°F setback during work hours and sleep. Average payback is 6 to 12 months based on $140 average annual savings per ENERGY STAR data.
- Upgrade 2: Air-seal your attic hatch and top plates with caulk or spray foam ($15 to $30 in materials). Attic bypasses are responsible for 20 to 40% of total air leakage in a typical home. Apply weatherstripping to the hatch lid and use fire-rated caulk around any penetrations.
- Upgrade 3: Install reflective window film on south and west-facing windows ($30 to $80 for a typical home). Quality low-e film blocks 55 to 70% of solar heat gain and pays back in 1 to 2 cooling seasons. Clean the glass first and allow 30 to 60 minutes per window.
- Upgrade 4: Add door sweep and weatherstripping to exterior doors if the existing material is compressed or torn ($8 to $15 per door). Slide a piece of paper under a closed door. If it slides freely, you are losing conditioned air and need a new sweep.
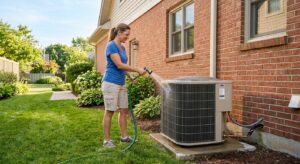
- Upgrade 5: Clean your outdoor condenser coils with a garden hose and fin comb ($0 to $20 for a fin comb). Dirty condenser coils reduce heat rejection efficiency by 10 to 30% and raise energy use proportionally. Turn off the disconnect first, rinse from inside out, and straighten bent fins.
- Schedule a professional AC tune-up ($80 to $150) that includes checking refrigerant charge, measuring airflow, inspecting electrical connections, and testing thermostat calibration. Low refrigerant alone can reduce efficiency by 20%.
- Request a blower door test as part of a home energy audit ($200 to $400, often subsidized by utilities). This reveals exactly where air is escaping and quantifies the leakage rate so you can prioritize sealing.
- Have a technician inspect and seal ductwork if the audit reveals duct leakage above 10%. The DOE estimates duct leaks waste 25 to 40% of cooled air in a typical home. Mastic sealant applied by a pro lasts far longer than tape.
- Ask about adding attic insulation to reach R-38 or R-60 depending on your climate zone if current levels are below R-19. A professional crew can typically complete an attic blow-in in half a day for $800 to $2,000, with payback periods of 2 to 4 years in hot climates.
Why It Works: The Benefits
Implementing all five upgrades can reduce cooling energy use by 15 to 35%, translating to $120 to $400 per year in savings depending on climate and home size.
A properly sealed and shaded home reaches setpoint faster after a setback, which means shorter run cycles and less compressor wear over time.
Reducing infiltration and blocking solar gain eliminates hot spots and sticky humidity that make a room feel 4 to 6 degrees warmer than the thermostat reads.
Reducing the cooling load and maintaining clean coils can add 3 to 5 years to compressor life by reducing runtime hours and preventing freeze-ups caused by restricted airflow.
Energy-efficient upgrades like smart thermostats and attic insulation are recognized by buyers and appraisers, with the DOE estimating insulation upgrades return 100% or more at resale in many markets.
💰 Savings Impact by Action
Sealing infiltration pathways in a leaky home reduces the cooling load by up to 20% by preventing hot humid air from entering and conditioned air from escaping.
A properly programmed setback of 4°F during away and sleep hours saves approximately 10% on annual cooling costs per DOE data.
Reflective low-e window film on south and west windows blocks 55 to 70% of solar heat gain through glass, reducing total cooling load by 10 to 15% in sun-heavy climates.
Cleaning dirty condenser coils restores heat rejection capacity and can recover 10 to 30% of lost system efficiency in a neglected unit.
Upgrading attic insulation from R-11 to R-38 reduces heat gain through the ceiling by 15 to 25%, one of the highest-impact single improvements in hot climates.
🏠 Key Concepts Explained
The Science Behind It
Your air conditioner does not create cold. It moves heat from inside your home to outside using a refrigerant cycle. Every watt of efficiency you gain comes from either reducing how much heat enters the home in the first place (cutting the load) or improving how efficiently the system moves that heat out (improving the equipment). Both matter, but reducing the load is almost always cheaper and faster.
The three main paths heat takes into your home are conduction through the building envelope (walls, roof, windows), infiltration through air leaks, and solar radiation through glass. Insulation and window film address conduction and radiation respectively, while caulk and weatherstripping address infiltration. According to the DOE, the average U.S. home loses enough conditioned air through leaks to fill two full blimps per day. Cutting that infiltration in half directly reduces how long your compressor runs each day.
On the equipment side, the condenser coil outdoors must reject heat into ambient air. When coil fins are clogged with dirt, the heat transfer surface area is effectively reduced, forcing the refrigerant to operate at higher pressure and temperature. This causes the compressor to draw more current and wear faster. A clean coil running in a well-sealed home with proper shade can cut your seasonal energy efficiency ratio (SEER) losses in half compared to a neglected system in a leaky home, even if both units have the same nameplate rating.
Frequently Asked Questions
▼ Why is my AC still running all day even after I tried these fixes?
If the unit runs continuously without reaching setpoint, the two most likely causes are low refrigerant charge or a significantly undersized system for your home’s load. Neither of these is a DIY fix. Call a licensed HVAC technician to perform a refrigerant check and Manual J load calculation. Also confirm your attic insulation is at least R-30, since a poorly insulated attic alone can overwhelm a properly sized system on peak days.
▼ Can renters do these upgrades without landlord permission?
Yes, most of these upgrades are renter-safe. Replacing air filters, adjusting thermostat schedules, using window film (removable versions exist), closing blinds, and running fans counter-clockwise all require zero landlord approval. Avoid permanent caulking of windows or structural changes without permission. Removable rope caulk is a great renter-safe option for drafty windows and comes off cleanly at move-out.
▼ How long before I actually see lower bills after making these changes?
Thermostat scheduling and fan direction changes show up in the very next billing cycle. Air sealing and window film effects are visible within one to two months as the system runs fewer hours per day. For changes like attic insulation, most homeowners see a clear before-and-after comparison by comparing the same calendar month across consecutive years, since month-to-month weather variation can obscure shorter-term results.
▼ What if my home is older than 30 years?
Older homes typically have more air infiltration, lower insulation levels, and single-pane or early double-pane windows, which means the savings potential from these upgrades is actually higher than in a newer home. Prioritize air sealing first since the leakage rates in pre-1990 homes often exceed 15 air changes per hour, far above the modern standard of 3 to 5. Consider requesting a utility-sponsored energy audit, which many providers offer free or subsidized for older homes.
▼ My energy bill went up after I installed a smart thermostat. What went wrong?
The most common cause is an incorrectly wired thermostat or a schedule that uses aggressive recovery settings that pre-cool the home for too long. Check that the thermostat is wired correctly for your system type (especially if you have a heat pump), and review the recovery or pre-cool window settings in the app. Also confirm it was not accidentally set to a comfort mode that keeps temperatures constant 24 hours a day, which eliminates all setback savings.
Quick Tips
- Set your AC to 78°F when home and 85°F when away. Each degree above 72°F saves roughly 3% on cooling costs.
- Replace your air filter every 60 to 90 days during peak cooling season, not just once per year.
- Plant deciduous trees or install exterior awnings on south and west walls for passive shading that reduces cooling load by 15 to 25% over time.
- Run your bathroom exhaust fan for only 15 minutes after a shower. Leaving it running longer pulls cooled air out of the home, wasting energy.
- Check that supply and return vents are not blocked by furniture. Even one blocked return vent can reduce system airflow by 10 to 15% and raise energy use noticeably.
- If your home has a radiant barrier in the attic, confirm it is installed shiny-side-down facing the air gap. Installed incorrectly it provides almost no benefit.
Variations for Your Situation
- Apartment or Rental: Renters cannot modify central HVAC or add permanent window treatments, but removable window film ($20 to $50), plug-in smart thermostats for window AC units ($25 to $60), and blackout cellular shades ($30 to $80 per window) can cut cooling costs by 15 to 25% without violating a lease. Focus on portable fans, filter replacement if the unit is accessible, and blocking west-facing windows during afternoon hours.
- Tight Budget Under $50: Start with the zero-cost steps (thermostat scheduling, fan direction, shade management) which together save 15 to 20% with no upfront cost. Spend the $50 on a new air filter ($8), door sweep for the leakiest door ($12), and a roll of foam weatherstripping for window frames ($10 to $15). These three items address the biggest low-hanging-fruit leaks and typically pay back within one cooling season.
- Older Home Pre-1980: These homes commonly have R-0 to R-11 attic insulation, significant infiltration through plaster walls and original window frames, and aging ductwork with no mastic sealing. Prioritize a professional blower door test first to identify the worst leaks, then add attic insulation to at least R-38 ($800 to $2,000 professionally installed). Expect savings of 25 to 40% on cooling bills after combined air sealing and insulation work, with payback periods of 2 to 4 years in warm climates.